
With Streamlabs OBS, it’s all about the viewer experience, and the biggest headache is usually lag, frame drops, and you guessed it … more lag! Fear not though, there are plenty of ways to combat glitchy streams.
We have compiled 7 ways to fix Streamlabs OBS lag:
- Optimize Your Internet Speeds
- Check Your PC Specifications
- Set Bitrate Limits
- Use a Hardware Encoder
- Avoid Display Capture
- Scale Your Canvas Resolution
- Change Your In-game Graphics
Top 7 Streamlabs OBS lag Fixes
1. Optimize Your Internet Speeds
Before we get started on our streaming journey, it’s essential to understand the limits of internet speed.
Internet speed is everything when it comes to Streamlabs; what you’re fundamentally doing is uploading videos to the internet in real-time, and of course, if your internet speed is crawling, these video files will look pretty rough!
Put simply; you need to be looking at a minimum internet upload speed of 8mb/s to do any streaming at a decent quality.
Anything less, and you’ll want to call your internet provider and ask them to bump that up, but don’t fret. This is usually a simple and reasonably cheap process!
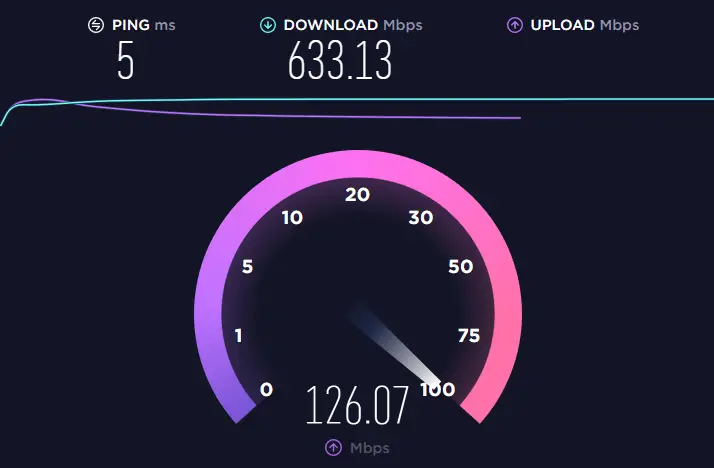
To check your internet speed, we’d suggest using speedtest.net, a super quick and unintrusive browser-based speed check. Keep your eye on that purple figure, and hopefully, we’re seeing 10mb/s or more!
TL;DR: Make sure your upload speed is more than 8mb/s!
2. Check Your PC Specifications
Here’s the sad truth of streaming; it is power-hungry. We’re talking grizzly bear here. Streamlabs take up a LOT of CPU power while running, and without a system that can bear the load, you will start to see performance issues in your stream.
A few bottleneck areas in a PC setup can negatively impact your stream quality and causes lag in Streamlabs OBS; Those are the RAM, CPU, and GPU.
RAM
This is essentially your computer’s short-term memory. To stream modern games (Warzone, Fortnite, Fifa), you should be looking at an absolute minimum of 8MB of installed RAM. Even then, it may not be enough, and 16GB of RAM would be our recommended way forward.
CPU& GPU
Twitch officially recommends having an Intel Core i5-4670 processor or higher (or its AMD equivalent). That’s a lot of words and numbers that the majority of new streamers wouldn’t recognize! Don’t panic though, in short, you need to make sure you have an I5 processor or higher AMD Ryzen 5. The following numbers indicate the strength of the processor (the higher the number, the better the processor).
TL;DR: Ensure your computer has a minimum of 8GB RAM and an I5 processor or higher! (You can check all of your system specs by heading to ‘System Information on your PC)
3. Set Bitrate Limits
Ah, the neverending complications of bitrate limits and streaming. Does it seem whatever number you set your bitrate to, it still looks like you’re playing 1980’s Doom?! Let’s break it down.
As it says on the tin, bitrate is the rate of bits (file information) sent from SLOBS to your stream per second. In theory, the higher the rate, the better your stream will look. But the keyword here is THEORY … there are a couple of complications with just bumping your bitrate up to 1,000,000.
Complication 1
Your viewer’s download speed determines the streams they can watch. If you stream with a high bitrate (8000mbps) and your viewer’s download speed is fairly low (3mbps), then ultimately, they won’t be able to buffer your stream.
Complication 2
Some stream platforms (Twitch, we’re looking at you here …) enforce their own bitrate limits. This means that no matter what you set your stream rate to, Twitch will grab your stream, stuff it into their 6000mbps suitcase and then sit on it until it fits, causing quality issues.
Solution
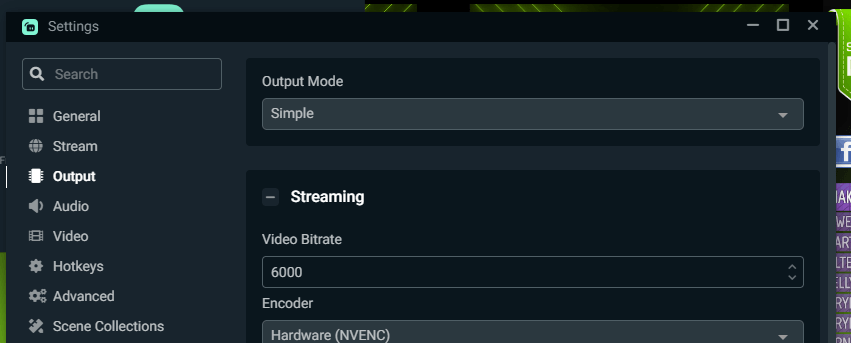
In general, you should keep your stream bitrate hovering around the 4000mbps mark. This is a safe rate for streaming in 720 and 1080p and also avoiding platform restrictions. To change your video bitrate in SLOBS, go to Settings and the ‘Output’ tab, as below:
TL;DR: Make sure your stream bitrate is around 4000mbps
4. Use a Hardware Encoder
Okay, we are not going to lie; we’re getting into slightly technical territory here.
Your encoder is the part of your PC that will take the stream processing brunt and provide the power and memory. This can usually be only one of two parts; your CPU or your GPU.
The CPU is your PC processor, which takes on a lot of different background tasks. It’s represented by the name ‘Software x264’ in the encoder options.
Your GPU is your Graphics processor, represented by ‘Hardware NVENC’. This usually has less to do than your CPU unless you are streaming a graphics-heavy game (Cyperpunk on full quality etc.)
Because your GPU is only responsible for game processing, it usually is better to set this as your encoder. This depends on your PC specs, however. If you have a weaker GPU, set the encoder to your CPU and vice versa.
The encoder can be changed in Settings > Output > Encoder

TL;DR: 99% of the time, the best encoder for streaming is Hardware (NVENC)
5. Avoid Display Capture
Webcam? Check. Overlays? Check—gameplay… inbound.
When capturing your screen for gaming, there are 3 primary sources that people use; display, window, and game capture.
Display capture is optimized to capture precisely that, your display. If you’re doing software tutorials or just chatting streams showing your internet browser or reacting to YouTube, then this is the source you want. It’s fast, simple, and great for capturing basic display images.
Game and Window Capture, however, are slightly different. They can capture higher FPS sources, perfect for gaming! If your game with high FPS or high-quality textures, you should be using Game Capture (your game must be in Full-Screen mode to use game capture!!) .
If you use a display capture source to capture gameplay footage on games that run FPS rates of 60+, expect to see big frame issues.

TL;DR: Always use Game Capture or Window Capture for capturing gameplay. Display Capture will not work correctly and might lag out!
6. Scale Your Canvas Resolution
Head into your settings and go to the ‘Video’ tab. Check what your base canvas resolution is set to. Now right-click on your desktop and click ‘Display Settings.’ Does your display resolution match your base resolution (in SLOBS)? If not, make sure they are identical.
Now, you can scale down your input size to make the video you’re sending slightly smaller. If you see lag here and there, try changing your Scaled resolution to 720. You’ll be streaming in a lower resolution, but it might make it look far better!
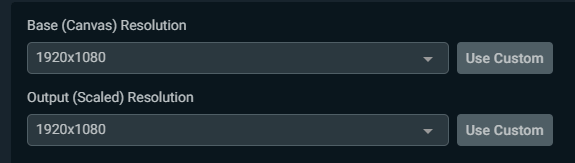
TL;DR: Make sure your canvas resolution matches your display resolution. Then, you could change the scaled resolution down to 720.
7. Change Your In-game Graphics
Love playing Cyberpunk with the graphics on 200%? Want to see every single raindrop, ray of light, and blade of grass? Unfortunately, this could be holding your stream back and cause lag in Streamlabs OBS.
Playing AAA games in 2021 demands a LOT of your GPU (graphics card) and will use 90-100% of the GPU power when running at full spec.
Add to this the 30-40% that Streamlabs normally uses, and suddenly your GPU can’t handle it. (Yes, SLOBS really IS that GPU intensive, but it is worth it for the user-friendly interface and helpful menus)!
To fix that small hit on graphics options when streaming, turn that FPS down to 120, the texture detail onto medium, and low and behold, you’ve got an extra 30% of GPU power!
Each game will have a slightly different graphics menu, but the main items you’re looking for are Texture Quality (Resolution), Particle Quality, and Texture Filter.
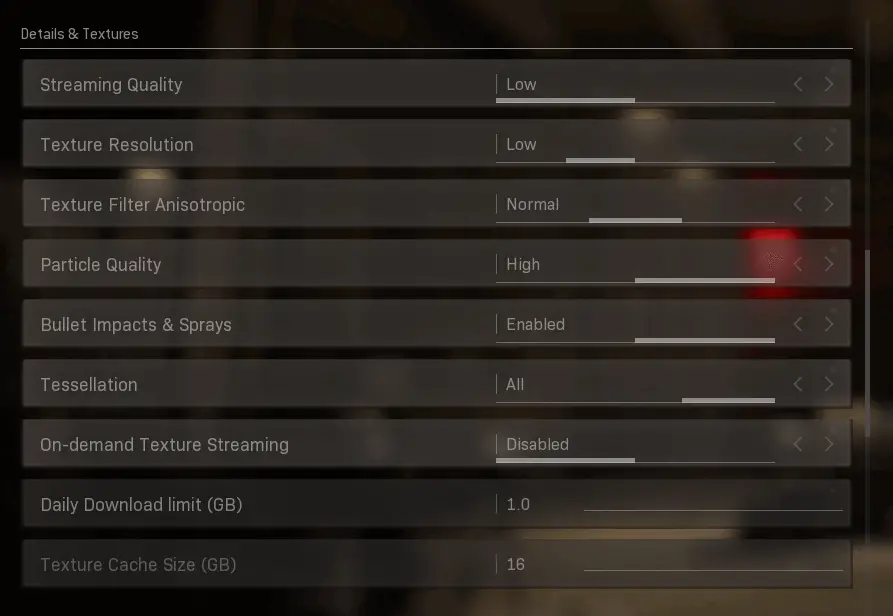
TL;DR: High graphics settings in-game can cause frame drops. Change them to standard settings.
In Conclusion
Streamlabs can be confusing at the best of times, with hundreds of different settings, menus, and buttons. But knowing these 7 bottleneck areas that affect Streamlabs OBS lag and frame drops will help you to no end in producing smooth and reliable streams!
In the end, the heavy CPU usage is the tradeoff when having so many features compared to OBS Studio.
Master the above tips, and your days of lag with Streamlabs OBS will be long behind you!
Thank you for the tips I have been using the dreaded “DISPLAY CAPTURE” and thought nothing of it but always had lag on my gameplay I have changed this now thank you