
It seems crazy, but it’s true. You could have 4K quality streams with a bazillion FPS and visual effects flying all over the place. Still, the simple truth is if your audio sounds like you’re recording with a potato, nobody is going to watch!
Recent research suggests that audio quality matters more to viewers than visual quality. Especially when it comes to gaming and stream interaction.
This puts a lot of importance on your audio setup and settings in Streamlabs OBS, which can be quite complicated to master at times. Don’t sweat; we’re here to help your audio stand out from the rest!
We have compiled 5 simple steps to master your audio settings in Streamlabs OBS:
- Choose your mic carefully
- Listen to yourself with audio monitoring
- Fix audio delay
- Get your levels just right
- Prepare your room for great sound
The Best Streamlabs OBS Audio Tips & Settings
1. Choose Your Mic Carefully
We’ve all been there. You go to the electronics store, head to the gaming section, and have about a hundred headsets and microphones waiting for you. Some cost an arm and a leg, others the same as a hot chocolate.
The question is, why is there such a huge difference between pricing, and what does that mean in terms of audio quality for you and your viewers?
As tempting as it is to get an all-in-one headset and microphone because they look pretty and functional, please don’t. The main issue with these sets is that you cannot individually control your mic input in some software.
Be sure to make two separate purchases; a microphone and a headset.
The headset naturally should be comfortable and provide good sound quality. We would recommend a set with 7.1 surround sound compatibility like the Mad Dog GH705. Ultimately, your headset won’t affect the viewer experience, and so you don’t need to spend a fortune unless you want to!
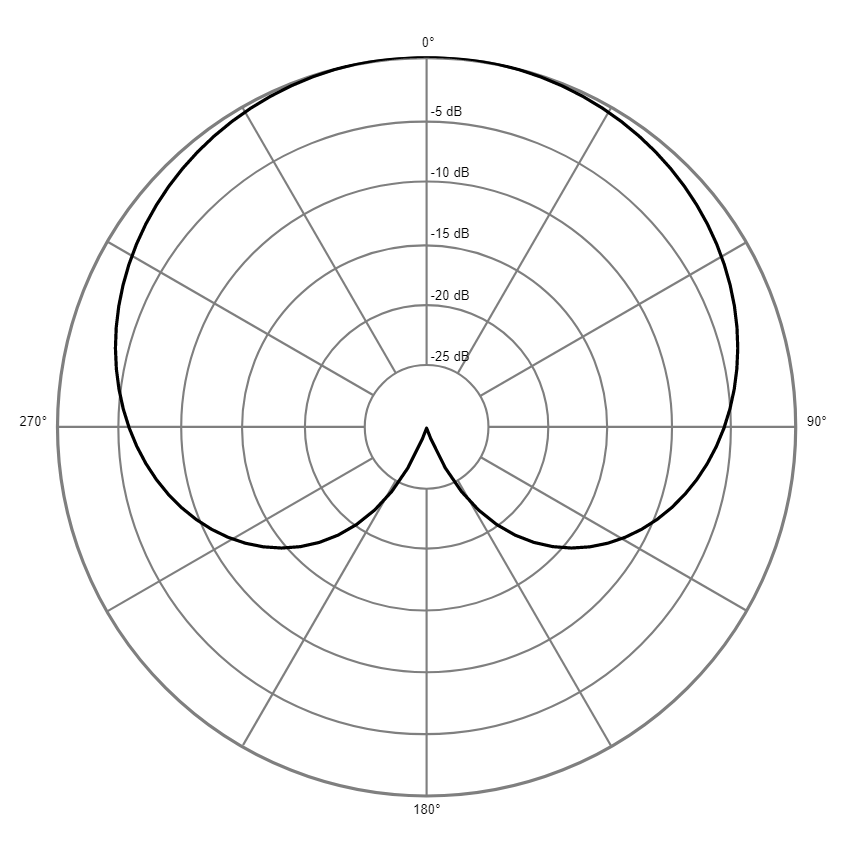
To start with, a USB microphone should be excellent for your streaming needs. There are multiple ways in which a microphone collects sound, but most importantly, you should be trying to pick up a Cardioid USB Microphone for the best sound and connectivity.
Cardioid microphones are mics that only collect the sound made in front of them (see below). There are 3 other major microphone types that are not best suited to streaming, so stick to Cardioid if at all possible!
A couple of popular mics in this category right now would be the Blue Yeti X or the Blue Yeti Nano. Neither of which breaks the bank or requires a separate processing unit.
Spending pennies on a microphone will increase the amount of background noise and general grain that your viewers hear.
Whereas spending a little more ($60+) should provide you with a clean, pleasant-sounding recording!
TL;DR: DON’T purchase a headset and microphone combo, DO buy your Mic and Headset separately!
2. Listen to Yourself With Audio Monitoring
This is one of our favorite tricks. Almost every day, people tell us how they are bored of having to record themselves to test their microphone and audio settings in Streamlabs OBS. Here’s the good news; it’s way easier than this to test your mic in Streamlabs!
In the bottom right-hand corner of your Streamlabs app, you should see the Mixer section. In the top right of the mixer, there is a small settings cog. Click it to enter your Mixer settings.
Once you’re in, find the line of the mixer, which is your microphone (it will normally be named your microphone brand and model or mic/aux).

Under the ‘Audio Monitoring’ column, switch this setting to ‘Monitor and Output,’ and voila, you can now hear your microphone through Streamlabs!
The audio you can hear when you speak is your microphone audio and any filters that you may have activated (we’ll come to audio filters in a separate article very soon!). It’s a much quicker and less data-intensive way of checking out your mic quality.

Pre-warning: You will want to switch this setting back before you go live! If you don’t change back, it won’t affect your stream audio, but you will be able to hear yourself the entire time, which can be super distracting!
TL;DR: Use the audio monitoring setting to listen to your mic quality in real time!
3. Fix Audio Delay in Streamlabs
Sometimes, there is an unavoidable delay that can take place between you speaking and Streamlabs receiving your audio.
Now obviously, if you don’t use a webcam, a 2ms difference won’t make any difference to your stream at all. However, if you have a video source that is slightly off with what you’re actually saying, it can be channel ending!
The way to battle this delay is not actually fixing the issue from the mic, as this isn’t possible. It’s to add a small amount of delay to your webcam to match the mic lag (clever, right?!).
To do this, simply right click on your Webcam source, click filters and add ‘Render Delay’ as a filter.

Typically, the delay will be anywhere between 20-100ms (if you have any at all!), so you will need to test in this range, with recordings, to find out exactly how much delay you need.
Fundamentally what you’ve just done is told your webcam to wait just a tiny bit for it to broadcast the same time as your microphone audio. It may look a bit strange to you at first in SLOBS, but it will look far better to your viewers on stream!
Delays can also be caused by lag in Streamlabs that are unrelated to the mic or audio settings. If that is the case, we recommend this article.
TL;DR: Fix audio delay caused by the microphone simply by adding a short delay to the webcam in the settings.
4. Get Your Levels Just Right
Getting the mix right between game sound and your mic is one of the most important factors of good stream audio, and it’s relatively simple to set up.
Whether your game sound is controlled by ‘Desktop Audio’ or an external device like an Elgato, you want to make sure the level never reaches the yellow part of the audio monitor. In fact, it should really only be showing 80% of the green section at its loudest. This can be easily edited by scrolling the white bar below the source (see below).

For your microphone, you want the level to always be in the yellow, preferable mid-way, but careful not to have it reaching the red monitor level, or your audio will start to clip and sound terrible!
To test how the mix sounds, you can monitor both inputs using the steps from tip #3; only this time apply it to both your microphone and your game audio sources!
Another popular audio source that people like to have in their streams is some background music. Keep this level at about 30-40% of the green. This will ensure it doesn’t overpower your vocals or the game audio.
TL;DR: Use your mixer sliders in SLOBS to keep your game audio in the green and mic audio in the yellow.
5. Prepare Your Room for Great Sound
Do you have a cupboard under the stairs free? Funnily enough, this would actually be the perfect place to stream from in terms of audio quality!
When working with audio, it’s important to cancel out as much background noise and reverb as possible.
Reverb is that roomy echo that you hear when talking in a large room without much furniture and can be quite a problem in rooms with tall ceilings or undecorated walls.
To combat reverb, try to stream in a small, well-decorated room and preferably close your curtains over any flat surfaces. Flat surfaces like walls or windows will reflect your sound and can affect your live vocals.
Another flat wall resolution is using acoustic foam. You can grab meters of acoustic foam from online retailers for relatively cheap, but don’t expect it to perform miracles in a large room! Try to place them in echo hotspots like corners and walls in direct proximity to your computer setup.
The biggest sources of troublesome background noise for some streamers are fans … both PC and normal stand-up fans. Our biggest advice would be, no matter HOW good your PC looks on your desk, to place it on a different surface away from your microphone.
Also, if you have a stand-up fan, you might need to point it into the room instead of straight at you so that your mic doesn’t collect that awful gusty noise!
TL;DR: Stream in a small room and place the PC far away form the mic.
In Conclusion
The tips above will help you nail clean and pleasant sounding audio in your streams, but we can do so much more within the Streamlabs OBS audio settings. Stay tuned for more Streamlabs audio tips, including compression filters, equalization, and generic ways to stand out from other streamers online!