
Whether you are working on a 30-seconds commercial or a 2-hour-long feature film, previsualization of how your final work is going to look is an integral part of pre-production. The most common and effective way to sequence and visually break down your scenes is known as storyboarding.
In this article, we are going to provide a short introduction to storyboarding, cover different approaches, and share a step-by-step guide on creating a storyboard for your next project.
What is a Storyboard?
Think of your storyboard as a comic book or a graphic novel for your upcoming film. It is made up of several frames, each representing a shot from a particular scene.
Storyboarding helps filmmakers to create a visual language, and to share their ideas among their collaborators. First and foremost, it helps to shape directors and directors of photography’s vision of the film itself.
Often storyboards are created together by the director, cinematographer, and a storyboard artist. This process helps them pre-visualize an overall sequence of visual storytelling that will later be applied to the screen.
Essential for Planning
Together with the screenplay, a storyboard is a document that is often shared amongst different departments on the production for everyone to be prepared.
For instance, the film’s cinematographer might share it amongst the camera & lighting departments, so the crew prepares all the required lighting equipment and gear for the scene. The production designer will often share the storyboard with the Art and Costume Departments, so they have a clearer vision of what exactly is director planning for a particular scene.
When dealing with technically challenging scenes it is important to have a storyboard to prepare your cast & crew for the shooting. The art department will make sure that all the correct props and set pieces are prepared for the scene. Grips and electricians will prepare all the necessary gear.
All of these factors effectively assist the production and make the set run faster. Storyboards help to save a lot of time on set, and as a result, loads of money.
Most of the time storyboards are completed by drawing and sketching, however, there are other ways to storyboard your project.
3 Storyboard Approaches
There are multiple ways to approach the creation of storyboards. These approaches range based on the production’s budget, director’s creative approach, style of the production, and multiple other factors.
On larger, multi-million productions, there is an entire team of storyboard artists trying to bring the director’s vision to life. Especially in large-scale Hollywood action films; Where it is important to have an entire sequence of action drawn before, as loads of the film is shot with a green screen.
In these cases, the VFX team will request an approved storyboard before the film goes into production, so they can start planning out and preparing CGI and other VFX.
Understanding different ways to storyboard will provide you more insight into this process and help you understand which storyboard style works better for your project.
Most beginning filmmakers often use three of the following storyboard approaches: drawing approach and photo approach, storyboard software approach.
1. Drawing Approach
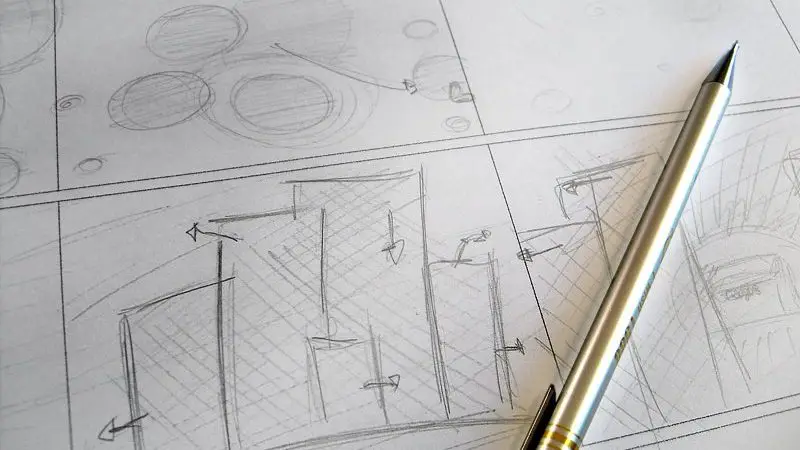
The most common and traditional way to create a storyboard for your film. To complete a drawing-style storyboard one only needs a white piece of paper and a pencil (in an ideal scenario it is also good to have a professional storyboard artist).
Knowing how to draw well can be an incredible advantage when it comes to working with this approach, however, even the most basic stick-figure drawings can work out well as long as they communicate basic elements of the shot.
The greatest advantage of approaching a hand-drawn storyboard by yourself is that it is free and you can get as creative as you want with it. The downside is that it does take a lot of your time to create a good-looking storyboard that matches your creative vision.
On bigger productions, there is at least one storyboard artist working on sequencing out events shot by shot in a hand-drawn storyboard. Apart from sequencing the events, storyboard artists also try out different color palettes, blocking, and draw out technically challenging elements of the scene.
2. Photo Approach
But what happens in the case that drawing is not your thing? And what if you can’t hire a storyboard artist to create outstanding storyboards that would otherwise easily communicate your vision to your production team? Does it mean that you can’t storyboard?
In the digital age, storyboarding became more accessible and easy than it has ever been before. All you need for this storyboarding approach, all you need is your smartphone (if you have a camera it’s even better), and storyboard software (there are multiple free storyboarding apps you can find online).
You can either invite the actors to block the scene, or you can bring a couple of friends over and show them the blocking. When your two actors/stand-ins are in the correct positioning, all you have to do is try and take a photograph that matches your vision in terms of shot size, shot type, and framing. Once you take photographs of different shots, you can assemble them in a storyboard format using one of the storyboarding apps.
3. Storyboarding Software Approach
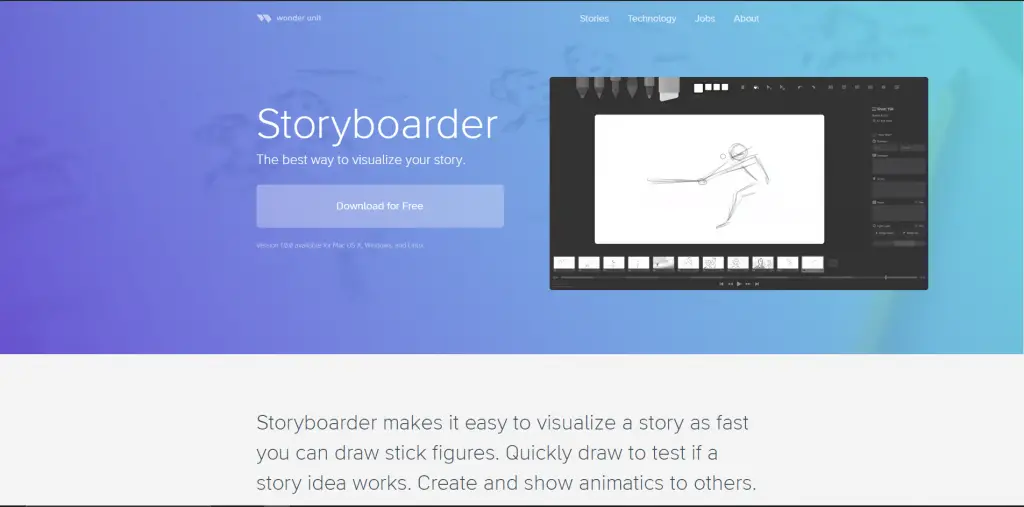
Some filmmakers want a more realistic representation of their vision to end up in a storyboard.
That is why there are multiple storyboard apps and software that can help them achieve that. Some of these apps are grounded in 2-D animation storyboarding and have an established catalog of elements and characters that filmmakers can drag onto their frames and arrange in a way that they want. Other software systems are more advanced and can render a close-to-life representation of the characters and set pieces.
The most powerful tool to draw a storyboard through the software approach is Unreal Engine. Initially created as a game development tool, Unreal Engine has been used by the film industry recently as an effective platform for virtual productions that can generate real-life 3D creation mechanisms. A lot of cinematographers use Unreal Engine as a tool for storyboarding. However, it does take a lot of time and may cost a lot based on particular plugins/extensions.
If you are a filmmaker who wants to use storyboarding apps that are more affordable and user-friendly, there are plenty of them available.
ShotPro, for instance, allows you to create a hyper-realistic 3D rendered storyboard for an affordable price.
Storyboarder is a free app with a straightforward interface that has easy-to-use drawing tools and is much better if you want to combine your software with a drawing approach.
Important Factors to Consider
Here are some tips and important points that you should consider when you create a storyboard:
Aspect Ratio
Aspect Ratio in film and digital media refers to the height and the width of your frame. Knowing what aspect ratio your project will be filmed in will determine how big your storyboard boxes should be.
For instance, the aspect ratio 1.85:1, known as an American Widescreen (used by most cinemas in the USA), means that your frame’s width is 1.85 times more than its height.
This means that when you are storyboarding a film that you are planning to shoot in the American Widescreen ratio, you will need to draw your storyboard boxes in the same format. The size of your aspect ratio needs to be decided as early as possible in the pre-production process, as it will affect your scene’s framing and blocking. They also set parameters for the scope of your story.
Here are some of the most commonly used aspect ratios:
- 1.33:1 – Known as an academy standard and was used in an original silent film.
- 1.78:1 – Aspect ratio used for the U.S. digital television and high-definition video.
- 1.85:1 – VistaVision or American Widescreen Aspect ratio, most commonly used in the US theatres.
- 2.35:1 – Anamorphic Scope, also known as a CinemaScope. Used for wide-screen theatrical showings.
Indicate Camera Movement
Storyboarding can also help you understand the movement and the tempo of the scene. To achieve this effect more clearly, you can indicate camera movements in your frame-by-frame sequencing with the use of arrows and annotations.
The directions of arrows will indicate the movement of the camera.
For example, if the camera is going to pan left, you are going to draw an arrow going into the left side of the frame. Or when arrows point towards the frame from four different corners indicate that a camera is going to zoom in.
In some cases, when there are multiple camera movements taking place in the same shot and thus there is more than one line. In that case you will need to annotate them, and perhaps even number what camera movement takes place when.
Sometimes, it is better to break down camera movements into multiple storyboard frames to avoid confusion.
Consider Making an Animatic
If you have spent loads of time and resources working on your storyboard, and you have come up with something that looks very good, you can consider making an animatic.
An animatic is a sequence of storyboard frames that have been timed to provide a very basic video of your scene. Creating an animatic will bring your storyboard to the next level. It will allow you to understand your timing and camera movement better.
Animatic is a good supplemental material to have when you are going into the pitching process or looking for investors. It can also convey how the story sequence will play with the music, dialogue, and sound effects, and therefore will create a dynamic tone to your project at a very early stage.
How to Create a Storyboard: Step-by-Step
1. Planning
Before you begin to draw out your storyboard, consider these factors:
- Choose a particular aspect ratio, that you imagine your project being screened in.
- Are going to create the storyboard all by yourself or is there going to be an artist assisting you?
- What software are you planning to use (if any), and which one can provide you the most benefit?
2. Go Back to the Script
Choose a particular scene from your script and start breaking it down. Read it multiple times, and take all the important notes on the action sequence that is taking place in this scene.
Visualize how this scene looks at the end of the day in a final cut of your film. Start thinking of the framing, staging, and emotional journey that your characters experience.
3. Write Descriptions
Write down script references, a brief description of action underneath each of the frames, and start thinking about what sort of shot it’s going to be.
Label each of your frames with all the important information such as shot number, shot size, FX, dialogue, music, camera, movement, etc.
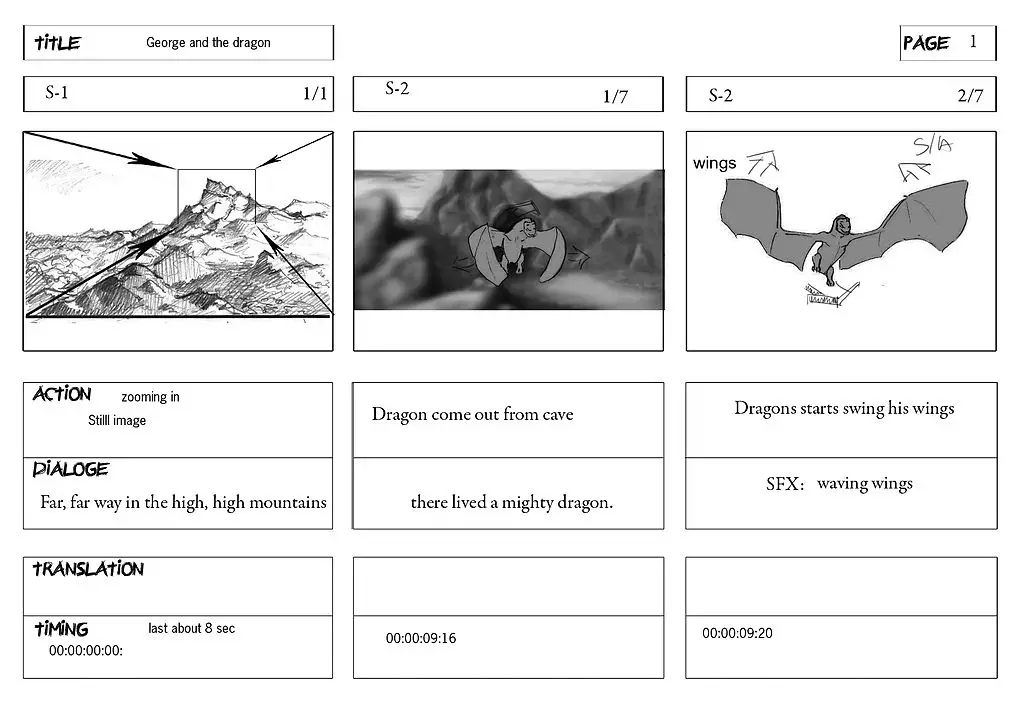
Above is an example of a storyboard with camera movements, descriptions and timing added. This goes to show how you can really plan everything out to communicate your ideas.
4. Draw
Start sketching your story out. We recommend doing it on a draft paper first and then re-draw the final images into your storyboard frames.
Make sure that all the important elements of the scene, such as characters, props, locations, special effects, etc. are present in a storyboarded frame.
5. Add Camera Movement
Once you are happy with the sketches and your shot sequencing, you can start adding lines that indicate camera movement. Add all the essential details, and notes that each frame requires. Make all the necessary labels and you are done.
6. Clean Everything Up
Try to make your storyboard as presentable and clean as possible. Don’t forget that a storyboard is a document that acts as a primary visual communicator amongst the entire production team. When it is tidy and organized, it is easier to transmit ideas.
In Conclusion
Knowing how to create a storyboard is a vital tool that helps to share the director’s vision across the production team, and tell the story as economically as possible.
With the latest technological developments, you do not need to be a good drawer to bring your vision to life.