
Animated overlays will make your live streams more attractive, garner more attention from new and recurring viewers, and can help you stand out from the competition.
Fortunately, adding animated overlays to OBS doesn’t have to be challenging. Follow our guide to add animated overlays to OBS Studio efficiently and effortlessly so you can start producing captivating content as soon as possible.
Add Animated Overlays to OBS Studio in 3 Steps
Adding a Twitch overlay template is pretty straightforward for those of you who have used OBS Studio previously or currently use the platform. If you are familiar with the platform, you can skip ahead to animated overlays specifics.
However, if you’re new to the video content creation platform or want a few refreshers, we cover it all here, beginning with choosing a scene and finishing with various adjustments. We also recommend checking out our beginners guide to OBS Studio as well.
1. Choosing Your Scene
You need to pull up your content and select the scene you want to incorporate the animation to before making any drastic moves to add your overlay to OBS Studio. Don’t immediately add the overlay to your stream. Instead, ensure you’ve selected the correct scene first.
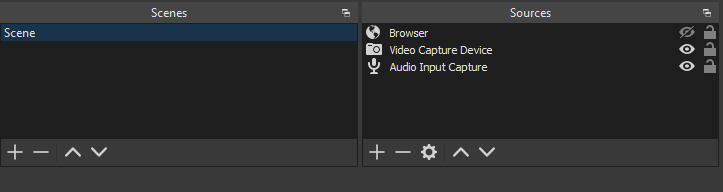
If you aren’t sure whether or not you’ve selected your desired scene, you can easily click on your choice. If it highlights blue, you’ve marked it for the overlay. You can also add a new scene if you plan to add the animated overlay to some content you haven’t uploaded yet. To do so, you can right-click within the scenes category and hit “add.”
2. Add the Animated Overlay
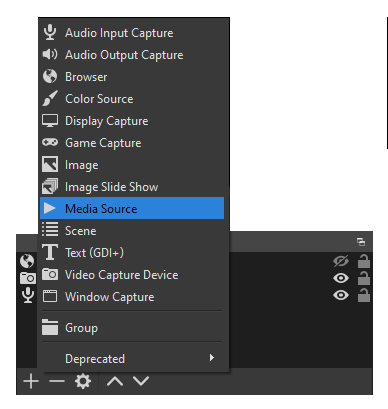
Now that you have your desired scene selected, you can navigate to the source section of the screen and choose the “add source” option. The process is similar to adding a static image overlay. But, instead of clicking on the image button, you’ll choose a media source.
Adding a media source accommodates animated overlays since they are typically either .mov or .mp4 files–otherwise known as video files. The standard image option will not let you add either of these file types.
You can name your animated overlay anything you want and click the “add new source” button below the title. Then, you can browse for the file on your computer to add. If you do not have your overlay saved to your computer, you need to do so before adding it to OBS Studio.
Once you’ve chosen the file, an animation preview will pop up in OBS Studio for you to view how it will look. From this screen, you can change the overlay to a different file if you chose the wrong file or don’t like how it appears on the screen.
Depending on how long the file runs, you can continue as is or hit the loop option beneath the preview to keep the animation continuous throughout the content.
For example, if the video file only lasts three seconds to showcase a twinkle light effect, you’ll want to hit the loop option to keep the animation going for the duration of your video. Alternatively, if the animation runs over your planned content length, you can leave the option alone.
Finally, you can click “done.”
3. Making Adjustments
After you click “done” to import your overlay, you can resize and adjust the graphic as you see fit. Once you’ve got the animation where you want it, you can add your camera feed. To do so, you’ll navigate back to the source section on the screen, click “add,” and choose the video capture device.
The video capture device option will open up a pop-up window to either add a new video capture source or choose from an existing one. If you have an existing webcam integrated with OBS Studio, you’ll choose it from the list. Then, you should see the webcam’s feed pop up just as you saw the overlay animation pop up before adding it to the screen.
Similarly, once you have the video capture feed selected, you can hit “done.” You’ll notice that the video stream lies on top of the animation overlay. You will drag your webcam source title below the animation overlay in the source listing section to drop the video feed behind the graphic.
After you’ve added both the animation and your webcam stream, you can adjust them to your liking on the screen. The standard background behind the video and animation is black, but you can add an image overlay to simulate how the two might look during the finished product. You can even go into the media source options to adjust colors and filters for the animation.
Where to Find Animated Overlays for OBS Studio
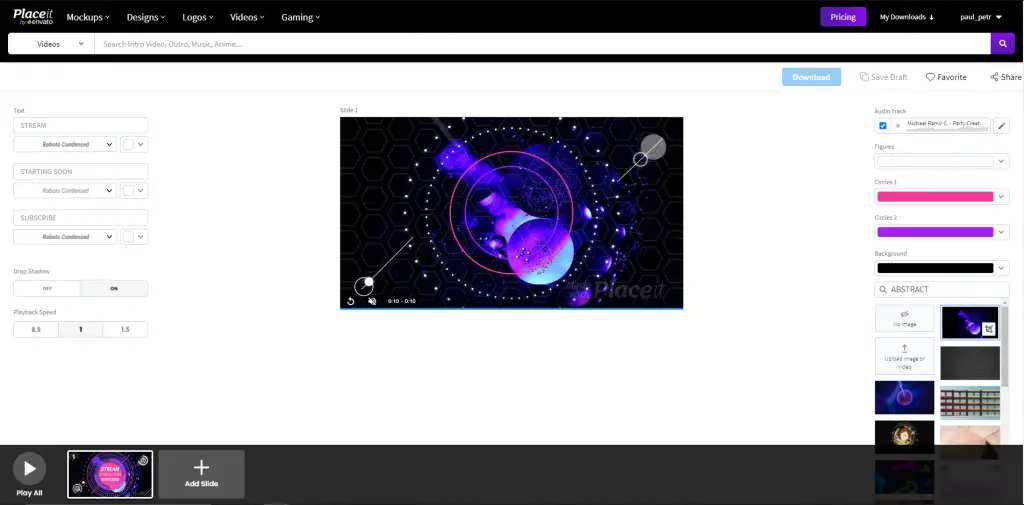
You can find different pre-made animated overlays online, but if you like playing around with graphics and animation, you can create your own.
To find animated overlay templates, we recommend Placeit by Evato. There are also more premium options like NerdOrDie or www.twitchoverlays.com. If you want something more personalized, you can hire a graphic designer on Upwork or Fiverr to create a custom overlay.
In Conclusion
As the world gravitates toward digital media more and more every year, you might find keeping up with video content standards difficult. How can you improve your videos and content? How do you stand out in the competitive crowd? A straightforward but instrumentally beneficial fix is to add animated overlays to your content.
Adding animated overlays to OBS Studio isn’t hard either. All you need to do is follow the few short steps we’ve listed above to completely transform your video. Once you get the hang of it, you can keep your content fresh, exciting, and captivating.