
The first time you open OBS Studio can be overwhelming, especially if you are a beginner on streaming software. But don’t worry though, this beginner OBS Studio tutorial covers everything you need to know to get started.
We will show you all the steps from when you first open the software to recording your first video or live stream. We will also share the best-recommended settings for video output and how to add overlays, live chats, and more.
Without further ado, this is the beginner OBS Studio Tutorial for 2024.
What is OBS Studio
OBS Studio is open-source software, meaning it is entirely free to use. You can download it at www.obsproject.com. Open-source software are applications that can be manipulated by anybody with access to it. This means that community-made plugins can easily be installed, and as a result, it has vastly more features and tools available than any other streaming software by a long way!
Once you install and open the software for the first time, you will be greeted by an Auto-Configuration Wizard.
Auto-Configuration Wizard
The first time you open OBS Studio, it will run an auto-configuration wizard. If you are just getting started, follow the steps shown to get the best possible settings that your PC can handle. (You can also find the auto-configuration wizard in tools on the main menu.)
Choosing the auto-configuration wizard instead of a manual install can help reduce crashing and lag issues in the future.
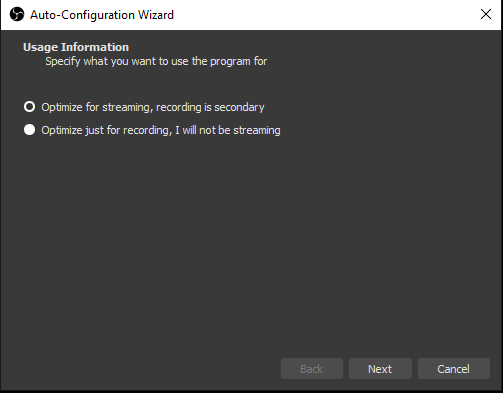
First, you get the option to choose between ‘Optimize for Streaming‘ or ‘Optimize for Recording.’ This is self-explanatory. Select what you want to optimize OBS for. This will apply some default settings to your software. Don’t worry; you can always easily change these in the future!
You then get to set up your video settings.
Base Canvas Resolution: We recommend the ‘use current’ option. This will select a resolution that matches the resolution of the monitor you are using.
FPS: Here, you can choose between prioritizing frame rate or resolution.
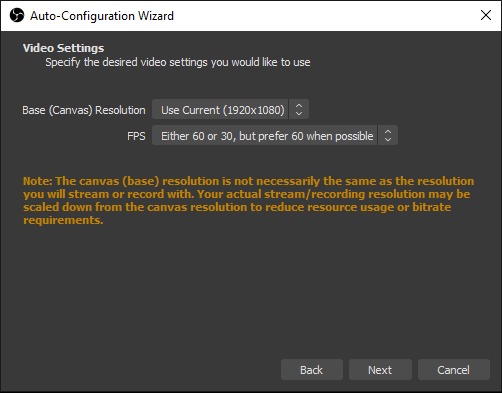
Generally, you want to prioritize a higher frame rate when recording or stream video games, even in lower resolution. A low frame rate will make video game streams hard to watch.
At the same time, however, the resolution is essential to avoid ‘bitty,’ low-quality streams, which are also hard to watch. We recommend a starting FPS value of 30 and a resolution of either 1920×1080 or 1280×720 (depending on your monitor resolution.)
If you want to record or stream your desktop or software, prioritize resolution over frame rate to capture all the detail on the screen.
Click ‘Apply Settings.’
The auto-configuration wizard works well for most people. But there are advanced tweaks you can make to maximize video quality. We will cover them later in the tutorial.
OBS Studio Environment
Once the configuration wizard is set up, it is time to check out the user interface. This tutorial will give you a quick walkthrough of OBS Studio and each of its main features.
Now when you have OBS open, it will look something like this.
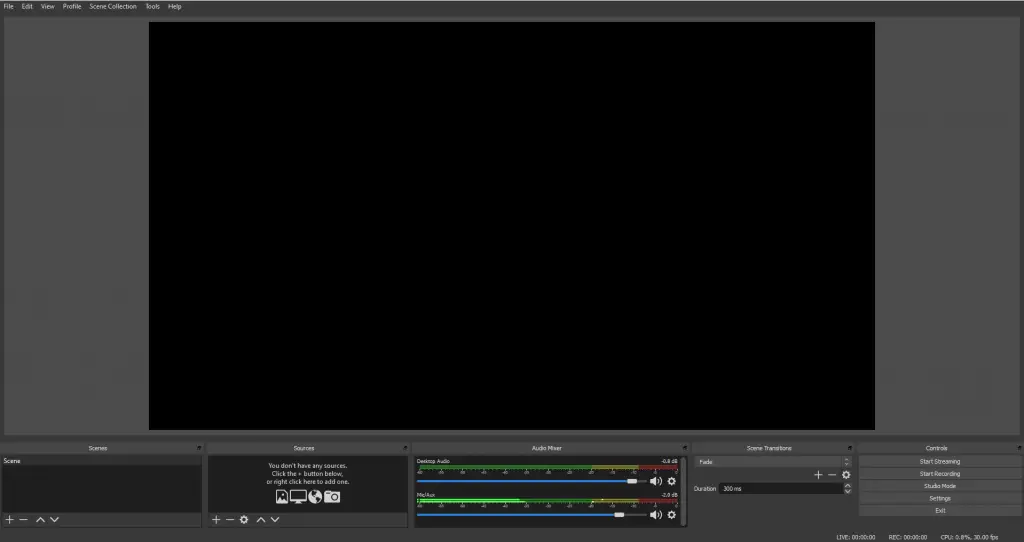
Below the playback screen (the large black rectangle at the top of your screen) are three panels called Scenes, Sources, and Audio Mixer. These are the critical parts to setting up your live stream.
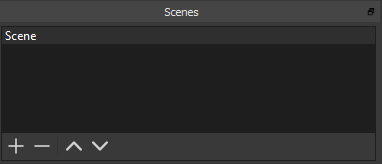
Scenes – In OBS, scenes are a collection of sources. You can think of them as folders with a layout for your stream. You can save or switch between scenes to get different setups for your stream.
Popular scenes for streamers include live scenes, be right back scenes, stream starting scenes, and stream ending scenes. You can easily switch between them by selecting each one in the scenes list or assigning them hotkeys.
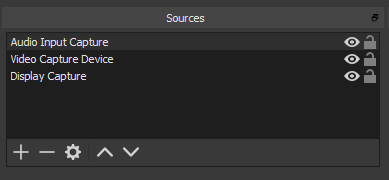
Sources – Sources are where you add video, audio, logos, and overlays to your stream. One scene can have multiple sources—for example, one source for your webcam, one for desktop recording, etc.
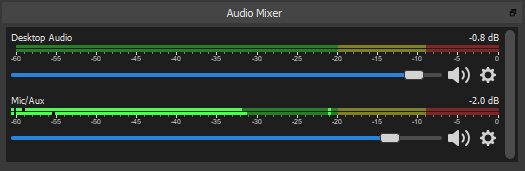
Audio Mixer – You will find all the audio sources in the audio mixer. Here you can adjust the volume or mute a source. You can also add filters and set them to each audio source.
How to Set Up a Scene in OBS Studio – Tutorial
To set up a scene in OBS Studio, simply click on the add (+ icon) to add sources to your scene.
Sources
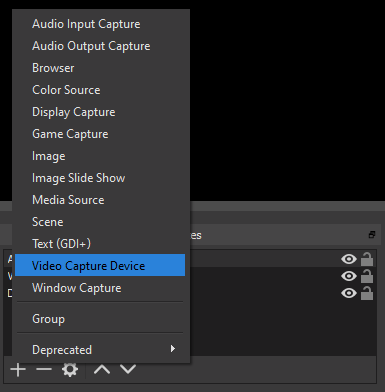
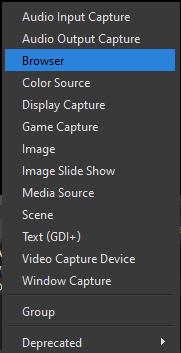
As mentioned above, sources add the components to your stream. This is a quick overview of the most common sources:
- Audio Input Capture – Audio from your microphone
- Audio Output Capture – Audio coming from your device.
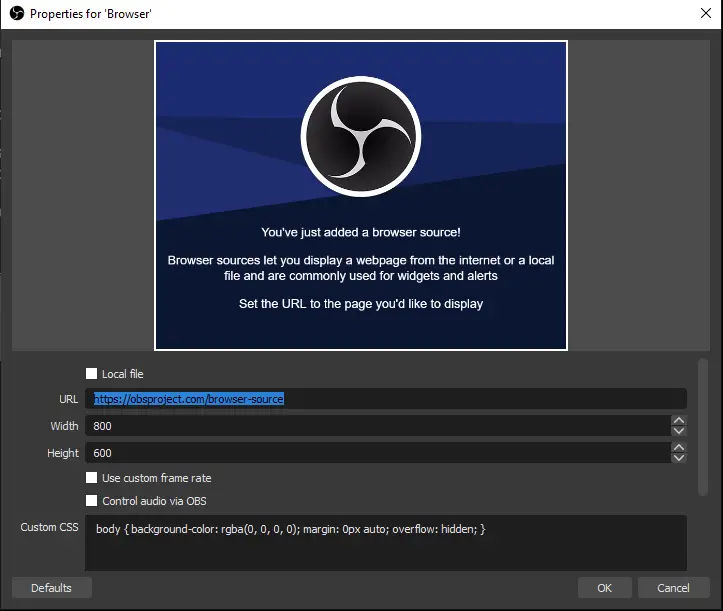
- Browser – Input from a URL, used for widgets and overlays. Ex. Live chats.
- Display Capture – Records your desktop.
- Game Capture – Only records your game window
- Image – Add JPEG, PNG, and Overlays
- Video Capture Device – Video input from your camera.
- Window Capture – Only records a window. It can be used to record software or for games when game capture doesn’t work.
How to Add Video Filters
With video filters, you can adjust the image of your video and improve production quality.
Below is a quick tutorial on how to add video filters in OBS Studio:
- First go to the source panel.
2. Left-click on the source you want to add a filter to.
3. Select ‘Filters.’
4. In the filter panel, you add a filter by clicking on the + button.
You have many filters to choose from in OBS, and you can adjust almost every aspect of your image. Below are the two most common filters people use:
Apply LUT
LUTs are filter files that you can apply on top of a source to give it a specific coloration. Imagine you’re using a social media application and taking a photo. You add a sepia filter to the image to make it look old school and aged. This is, in fact, a LUT, and they are great at getting consistent color results across many different sources.
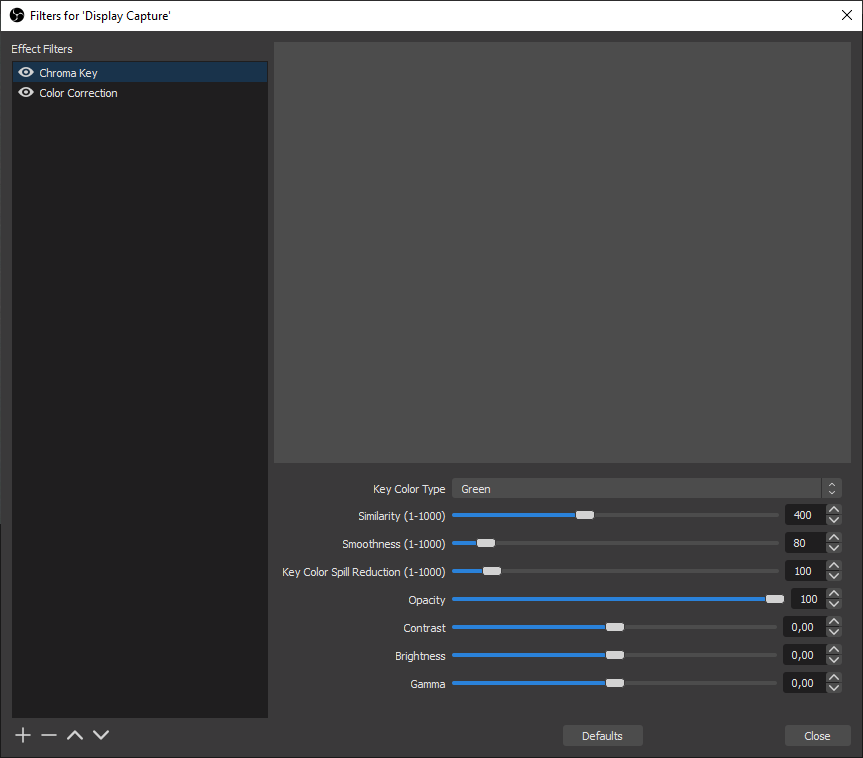
Chroma Key & Color Key
Both of these filters are used to remove green screen backgrounds in OBS. Make sure the video you are capturing is in a well-lit environment to get the best results. This usually consists of a green or blue screen placed behind the streamer.
The similarity and smoothness sliders determine the amount of a specific color to remove and can be adjusted slightly to attain better results.
It’s important to ensure that the screen itself is taught, doesn’t have any creases, and is evenly lit by a few bright lights. The more consistent the shade of green or blue across the screen, the more effective the chroma key filter will be.
Color Correction
With this filter, you can change and adjust the image’s brightness, gamma, contrast, opacity, and more. This is great for improving how your live stream or recording looks. Still, don’t go too crazy with these settings, as they can end up looking over the top.
Crop/Pad
This filter adjusts the bounds of your source and allows you to drag in the top or side limits to resize your source. This is great for editing the boundaries of sources such as webcams or videos to fit inside a particular frame or overlay.
Image Mask/Blend
An image mask will apply definite transparent boundaries to your source, limited by a predetermined image. It sounds very complicated but is, in fact, simple. If you have an image of a white circle on a black background and apply it as a mask to your webcam, only the parts of the webcam in the white circle will be visible, and everything else will not appear. It’s a great tool and can help in creating unique overlays and features.
Scroll
Perhaps the most used filter on OBS is the scroll filter; It allows you to apply movement to your source. This is controlled as horizontal and vertical speeds, moving your source sideways or up and down. It’s most often used on text to create a news-style ticker tape at the top or bottom of your stream.
How to Add Audio Filters
The quality of your audio on your stream or recording will largely depend on your microphone and environment. But through filters on OBS Studio, you can improve the sound quality of your voice. You can add these filters to your microphone and all of your audio sources.
Here is a beginner tutorial on how to add audio filters in OBS Studio:
- To add a filter, first go to the Mixer Panel on the OBS home screen.
2. Click on the Settings (gear icon) on your audio source.
3. Select Filters
4. In the filter panel, you add a filter by clicking on the + button.
Below are the most useful filters for improving audio quality. You might want to tweak these settings to find what works for you and your setup.
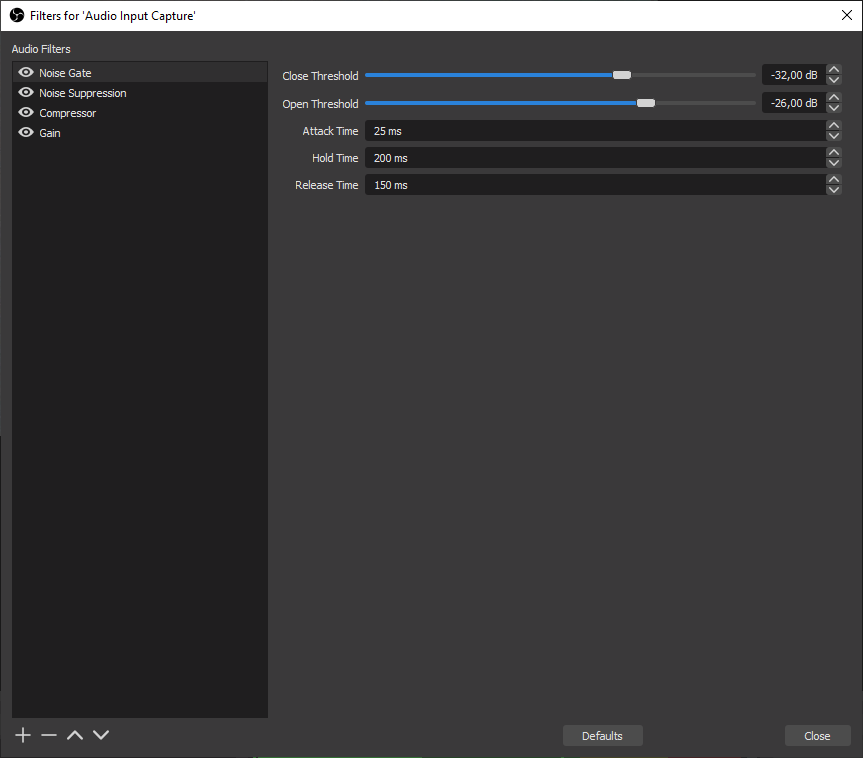
Noise Gate
A noise gate filter cuts off all the background noise while not talking. Use a close threshold above noise volume and an open threshold slightly below to get the best results.
Noise Suppression
This filter can help you eliminate background noise from your audio while talking. This is great if you are in a noisy environment. Play around with the suppression level until you find something that works for you. There are two pre-installed plugins for noise suppression available in this menu, RNNoise, and Speex.
Speex provides a manual slider for suppression and enables users to choose how much suppression they put onto a source. This can be useful for audio sources that require minimal suppression, not to ruin the quality of the main audio focus (i.e., a voice or instrument).
RNNoise automatically filters out background noise. It does an excellent job but sometimes confuses vocals at high ranges for noise and can also cut these out at times. It requires less setup, but the results are not quite as reliable.
Gain
The gain filter lets you adjust how loud your microphone is. If you have a low-volume microphone, you can use the gain filter to make it louder.
Compressor
A compressor improves audio quality by limiting audio distortion and noise when your microphone reaches peak volume. You have to try different adjustments with this filter to achieve good results.
How to Add Widgets
If you are using OBS for live streaming, you can make your content more engaging by adding a live chat on the screen, alerts, and other widgets.
Widgets are usually hosted externally and need to be added to your stream as a browser source. You simply need to set up the widget on a website (Streamlabs, StreamElements, Nightbot) and paste the URL of your widget into the browser source settings.
Widgets can be found on Streamlabs, Youtube, or Twitch.
Here are just a few of the most popular stream widgets:
Chat
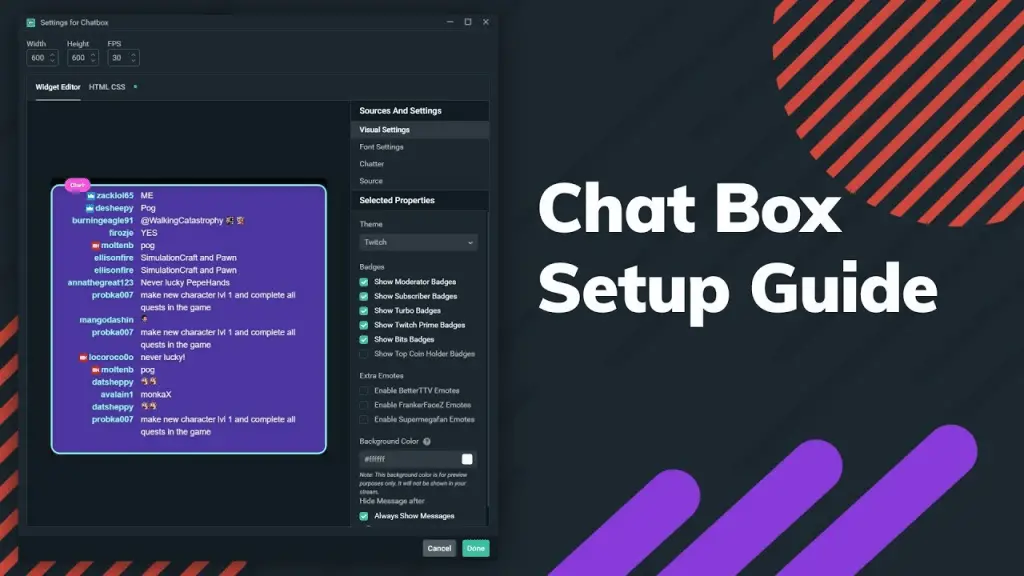
The Chatbox is a widget that sits on top of your stream and displays your live chat. It shows each user’s name and their message. It’s a great addition for streamers who like to upload their streams as VODs as it’s not always possible to have live chat replay on these videos.

Alert Box
Having an alert box widget in your scene allows for alerts to pop up when important events occur, such as donations, new subscribers, and merchandise purchases. The specifics as to what these look and sound like can be managed from the external website such as Streamlabs or Streamelements.
Donation Goal
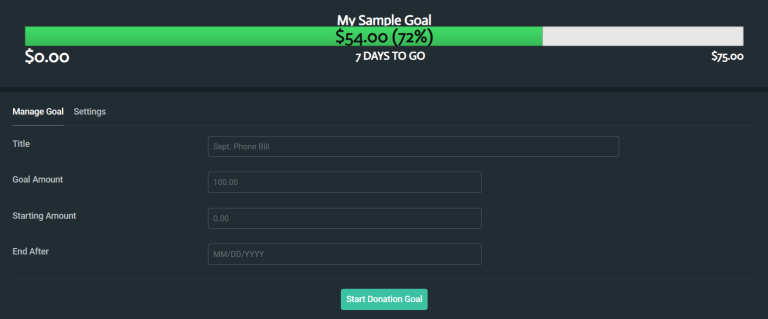
A donation goal widget tracks your progress towards a specific donation target. The bar will fill up the more donations you receive and will update itself with a percentage and exact amount donated. It can be a great addition if you’re saving up for a certain piece of hardware or raising money for charity.
Event List
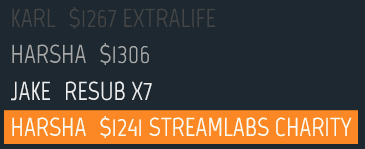
Event lists are widgets that display new activities such as donations or new members. Unlike alert boxes, event lists don’t show large gifs and make sounds. They display the information in a line of text and stack it on top of each other as the events occur. They can also stay on screen permanently.
Advanced Settings in OBS Studio – Tutorial
Video Settings
Go to files and then settings.
In the Output section, you will find export settings for streaming and recording. There you can change the output quality for your video/stream.
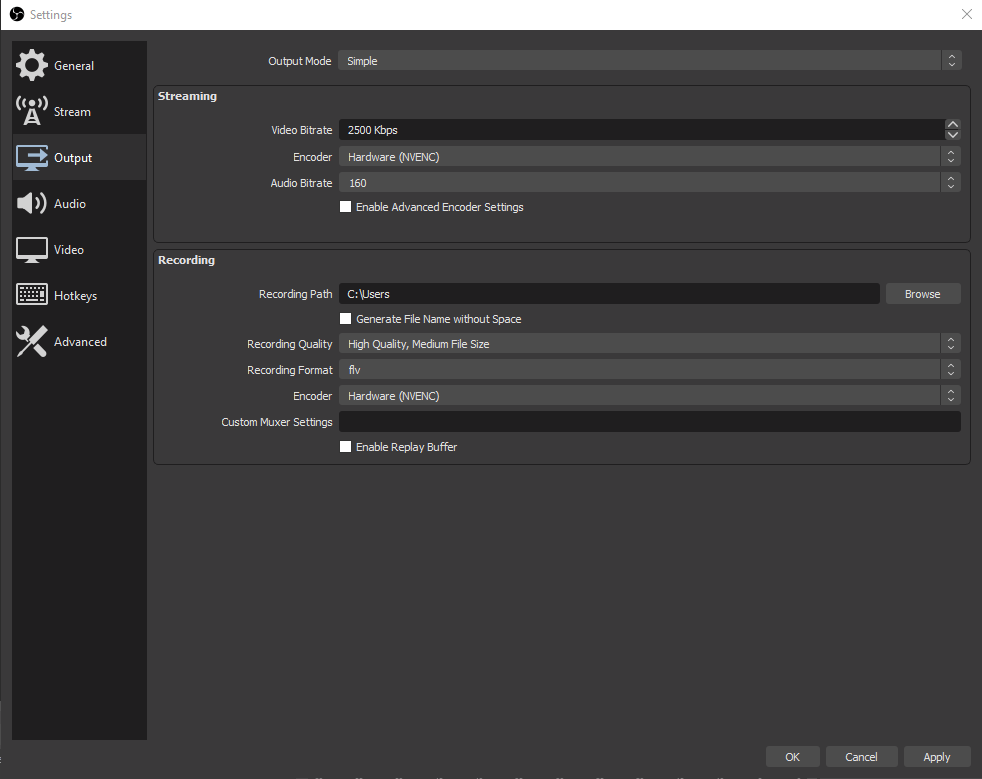
Format Options
While you might be more familiar with the .mp4 or .mov formats, we recommend using .flv when recording video on OBS. This ensures that if, for some reason, OBS crashes, not all data will be lost. While other formats like .mp4 are simpler to import to editing software, you will lose all the footage if OBS crashes.
Bitrate Options
The bitrate value deciphers how much information is sent from your streaming software to your online streaming platform. The higher the bitrate, the more information is sent and therefore the higher the quality of the stream.
You might think that you should just set this value to 1 million, then… think again. Your internet upload speed limits your bitrate capabilities. If you have an upload speed of 6mb/s, you’ll need to set this no higher than 3500kb/s. Generally, try to leave a buffer of 2-5mb/s for other services to use plenty of internet bandwidth.
Similarly, your bitrate will affect who can watch your streams. If you stream with a bitrate of 6mb/s, but your viewers only have 3mb/s download speed, they will not be able to watch your stream. Increasing this value can alienate certain viewers who might have slower internet speeds. Keep that in mind. Most streamers tend to stream at anywhere between 3500kb/s and 6000kb/s.
Encoder Options
In the output settings section, you can choose between different encoding options. There are pros and cons to each.
Software(x264) – This option lets the CPU of your computer do all the encoding.
If you have a powerful CPU on your computer, you could choose this option. If you have a lower-end device, there is a chance the CPU won’t handle it, especially if you are recording a video game as the processor has to render the game on the screen and do the encoding. This will affect the quality of your recording.
Hardware(QSV) & Hardware(NVENC) – These two options allow the graphics card to do most of the encoding. The QVS option is the Intel hardware, while NVENC is the NVIDIA. Pick between the two depending on which one you have.
Profiles
In OBS, a profile is a saved settings file. You might, for example, have one profile for recording 720p and another for 1080p.
Audio Settings
In settings, you will find an audio section. For beginners, you only need to know two settings in this window.
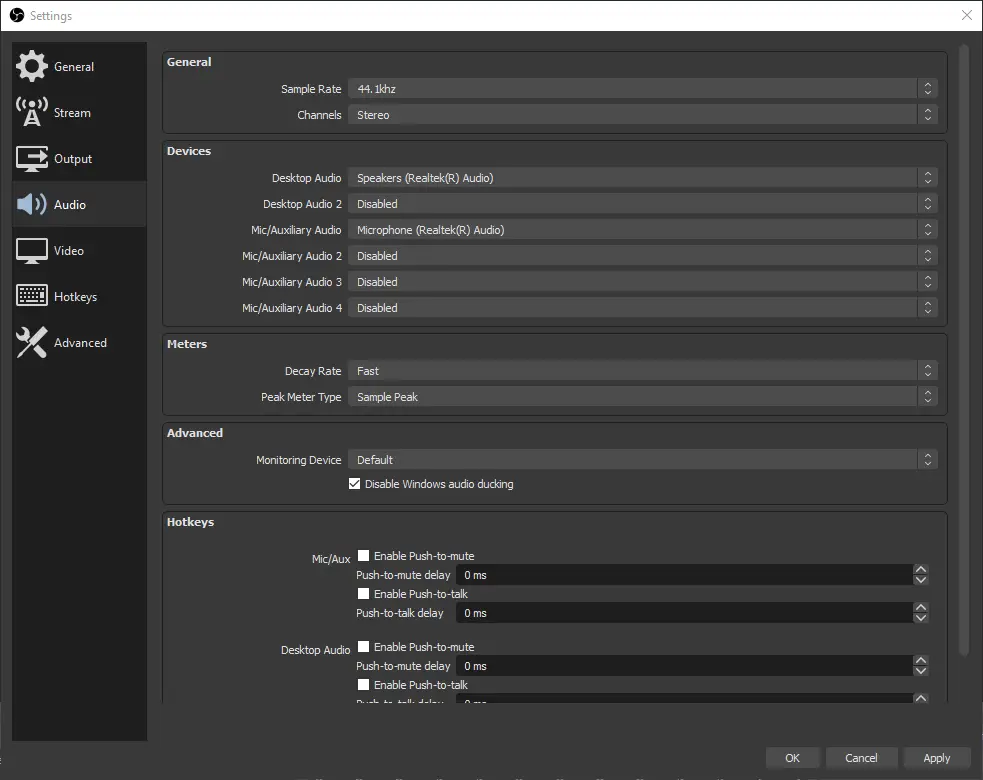
Desktop Audio
This is capturing the audio coming from your computer. Choose the device the sound is coming from; it could be your speakers, headphones, or an audio interface.
Mic/Auxillary Audio
Here, you choose what microphone device you want to record audio from. In many cases, the microphone will appear with its name and the audio driver it’s using (in this case Microphone (Realtek(R) Audio).
Sample Rate
A higher sample rate helps to produce a cleaner sound. The higher the value, the more information and data is processed, making the audio deeper and clearer. Most audio you hear on CDs, MP3 files, etc., is sampled at 48khz, although the difference between 48 and 44.1 will be inaudible to most listeners.
You can go even more advanced, but this will be beyond the scope of this tutorial. These settings should be more than enough to get you started.
Hotkeys
Assigning hotkeys to processes inside OBS studio can help you save time while streaming. Rather than switching to OBS to change scenes or turn on a source, you can do this all with the press of a button on your keyboard. It looks far more professional and streamlines the entire streaming process.

Let’s say we want to apply a hotkey to our ‘Live’ scene for our stream to switch to that scene when the hotkey is pressed.
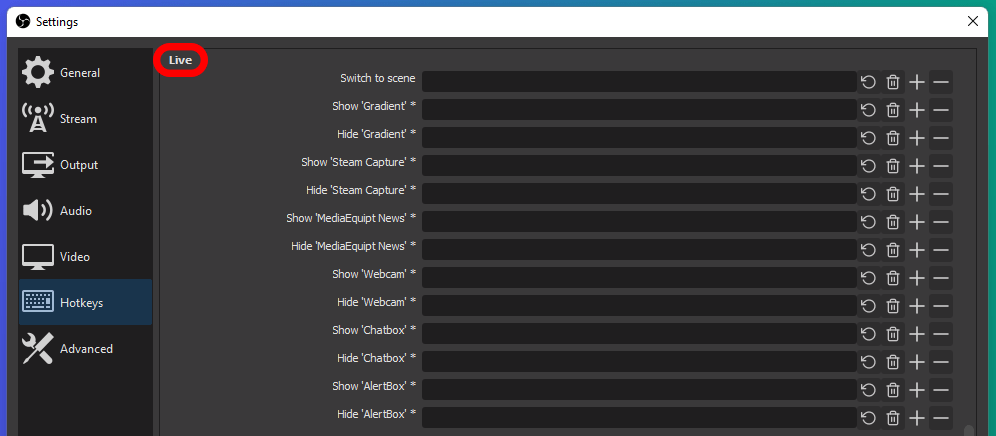
Go to your stream settings and select the hotkeys tab. If you scroll down the hotkeys menu, you will eventually see your scene title on the left-hand side of the options, as circled above.
Next to where it says ‘Switch to scene,’ you’ll see a blank greyed-out line. Click inside this box and type the key you want to assign as the hotkey. For now, we’ll use NUM 1.
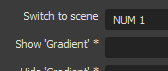
Click ‘apply’ and ok. The key NUM 1 is now hotkeyed to switch to the Live scene.
You can apply hotkeys to any source or scene in the same way, meaning that every aspect of your scene can be controlled from your keyboard or mouse!
Test Your Stream
Hopefully, you have gotten the basics of OBS Studio with this tutorial. Now it is time to test your stream.
Always test your stream a few minutes before going live. This ensures that all the video and audio are getting captured correctly.
The most effective way to test that all of your widgets, overlays, and other features are working correctly would be to record a 1-minute segment of your stream before actually going live. Click start recording in the bottom right to do this. You can then play the recording and ensure your visuals and audio are correctly configured to go live.
Unfortunately, there is no built-in test feature for streaming to a specific server. The best way to go about this is through trial and error!
In Conclusion
This OBS Studio Tutorial should have you all set for your first live stream or video recording with OBS. You will always be able to tweak the settings and improve your streams with time, and as you stream, you will no doubt become more and more comfortable with all of the incredible capabilities of OBS Studio!
If you want to start live streaming, check our ultimate guide on How to Become a Live Streamer. You might also want to check out our list of Top 10 Cameras for Livestreaming.
You are wonderful. Here’s a typo — ‘hard to watch, not har to watch. Fairly high on these instruction pages. Full text: ‘Generally, you want to prioritize a higher frame rate when recording or streaming video games, even in lower resolution. A low frame rate will make video game streams har to watch.’
Hi. Noted and fixed!
Thank you for telling me.
Also in this vein, the phrase is “without further ado”, not “…a due”.
Fixed! Thank you.
Hello
Can you create chapters with time endings to each chapter.
Hi! Thank you for the suggestion.
If you mean like a series of chapters for a tutorial, I am actually planning to create a video course covering everything OBS.
I was referring to OBS-ChapterMarker, how do I install the plug in?
Go to https://obsproject.com/forum/resources/chapter-marker.1323/ and click on “Go to download.”
Then, extract the zip file to your C:\Program Files\obs-studio. Hope this helps!
Hello, I have two problems.
1) There is no audio from the grabber card of video acquisition.
2) Every now and then a line appears for an instant.