
If you’re a streamer, you might want a system to notify you when someone joins your stream, when you gain a follower, or when one of your favorite streamers goes live. This short tutorial will detail the different alerts you can add to OBS studio and how to do so.
Types of Alerts You Can Add to OBS Studio
To add alerts in OBS Studio, you will need a 3-rd party service like Streamlabs or StreamElements.
Before we can outline each notification and alert service, we must understand that each service is different. They require different accounts and setup. Below, we will outline how to set up both Streamlabs and StreamElements for OBS Studio.
These systems serve essentially the same purpose, so the provider you choose is up to you. They have different response times and topics they cover, so we recommend giving each system a chance and seeing what best suits your specific stream.
For beginners, we also recommend you check out our beginner OBS Studio tutorial before going ahead and reading about alert widgets.
Setting Up Alerts Using Streamlabs OBS
Once known as TwitchAlerts, Streamlabs is the primary alert functionality linked to Twitch, which is most likely the streaming service you will be using. However, they also work with Youtube, Facebook, and other platforms as well. Their alert box widget will allow you to get alerts directly on your stream.
One feature that helps Streamlabs stand out from other alert service providers is its customizability. You’ll be able to fully customize an alert widget by changing fonts, colors, or by using premade templates. Also, the length of time it displays alerts, alert approvals, and profanity checks are fully flexible.
The easiest way to add alerts using Streamlabs is by downloading their entirely free version of OBS Studio, called Streamlabs OBS. We have a complete comparison of the differences and advantages of each streaming software.
Streamlabs OBS already has alert widgets built-in, so it is a bit easier and faster than setting them up manually in OBS Studio.
To get started with Streamlabs OBS, follow these steps:
- Update software and drivers
You’ll want all system software to be entirely up to date. Streamlabs regularly edits the software to be compatible with the newest technology, and older versions might not work with it.
- Open your firewall and white-list it on your anti-virus provider
Since Streamlabs OBS will need to access the internal working of your computer to function correctly, you’ll need to let down the gates before using it. Disable your firewall in computer settings and put it on your antivirus “white-list,” a mechanism for sorting safe sites from dangerous ones.
- Run it, check with the system, set presets
On the first run of Streamlab OBS, you’ll be able to check its compatibility and also import your OBS Studio profile. Afterward, you can make adjustments like changing the quality/resolution and selecting your encoder and CPU usage levels.
- Add Alert Box Widget
Widgets are tools for interacting with your community during your stream. In the “sources” section of Streamlabs OBS, you’ll find a plus button. Press it, then select “Alertbox” from the drop-down menu under “widgets.”
- Customize Your Alerts
Once you have the alert widget added, you’ll be able to customize what you want to be alerted about. Streamlabs also has pre-made alerts, which you can choose from that apply to the specific game or genre you’re streaming.
Setting Up Alerts Using StreamElements
StreamElements is another popular software tool for streaming on OBS. They operate via an “overlay” system which provides a snazzy theme or around your stream. Their services include tipping and chat mechanisms as well for follower engagement.
Beyond those services, they also have chatbots for filtering out clogged-up stream chats and a merch system that is 100% free. Major names on Twitch like Harris Heller, King George, and Maya all use StreamElements for their live streams.
Instead of downloading software, StreamElements lets you customize and save alerts online that you can later add to OBS using an URL.
To set up StreamElements Alerts on OBS, use the following steps:
- Register StreamElements with OBS using the same first three steps listed for Streamlabs above
With all alert services, you’ll need to update your software, authorize it with security systems and set it to the specifications of your computer.
- Log in to the StreamElements Dashboard
After you’ve downloaded and registered with StreamElements, you’ll gain access to their dashboard. On the dashboard, you’ll be able to customize your streams and also receive notifications to your inbox.
- Press the “Create New Overlay” button
Since StreamElements operates primarily through overlays, the only way to add alerts to your stream is to make them a feature of your overlay. You’ll be able to adjust where the box appears, but it will match the other functions of your overlay theme.
- Press the Pencil called “Go to Overlay Editor”
- Press “widgets”
Inside this drop-down menu, you’ll find several widget options. Choose the one called “AlertBox.”
- Customize Your Alert Box
Like with Streamlabs, here you can select the information you would like your alert box to notify you about. Next to each possible alert is a gear icon. You can use those gears to further customize your alerts and their frequency.
- Save your Alertbox
Once you’ve finished working on your alerts, you can save the function and the press launch. Be sure to copy the URL so you can add it to OBS.
Add an Alert URL to OBS Studio
When adding an Alert option to OBS, the service you choose will generate a unique URL. This URL is vital to your notifications functioning correctly during your stream. The URL helps OBS find sources for the notifications and also helps with storage.
You’ll need your alert URL to have these alerts function in OBS, and then you’ll need to add that URL to your OBS Studio application.
To add an Alert URL to OBS Studio, follow these steps:
- Choose the scene you want your alerts to show up in
The scene where your alerts show up will determine how your followers see them. Once you’ve decided where you want it to be, right-click that scene.
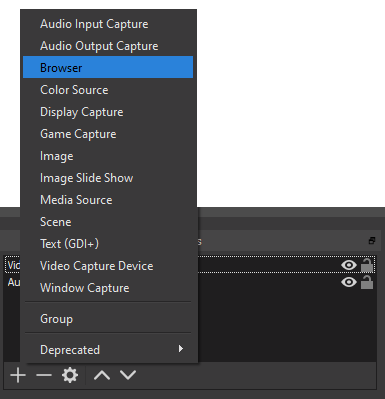
- Add a Browser
In the right-click menu, you’ll see the “Add” option. Select it, then select “Browser.” You’ll be prompted to name this browser, so try something like “Alerts URL” so it’s easy to find.
- Paste the URL
Your alert application should have already provided you with a URL for your alerts. Copy and paste it into the URL box here.
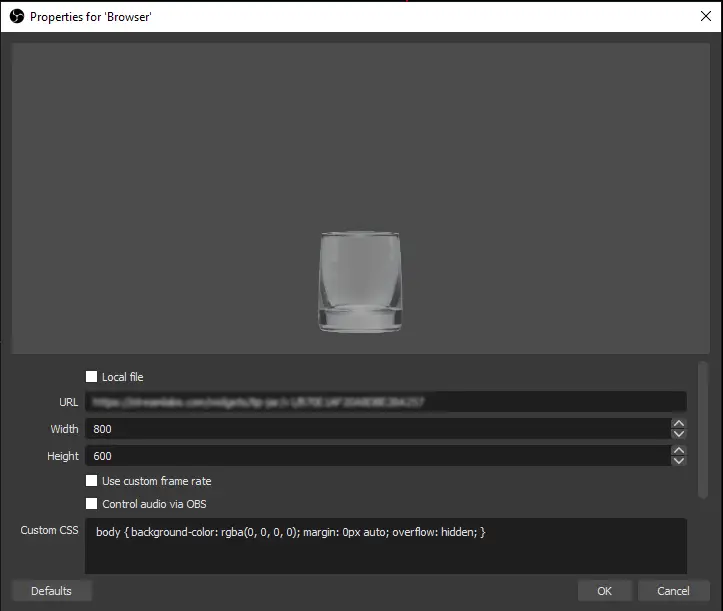
- Customize the Alert Box
After you paste the URL, you’ll be able to change the width and height to your liking. You can also adjust the FPS (frames per second), so you can decide how fast the alerts appear. If you select the “shutdown source when not visible” option, then you won’t hear the notification sounds when you hide the alert source.
- Press “OK.”
After you’ve completed the step above, your alert source will be added and ready to use.
In Conclusion
Now that you’ve learned about the alert systems for OBS, you’ll never miss a new follower. Alert systems like this will help you thank subscribers and interact with your fanbase to keep them coming back for more.
Enjoy your streams, and good luck playing!