
Does your audio get distorted when you upload a video to YouTube? Or maybe your videos are too quiet when played? This concerns the YouTube loudness standard and how sound gets normalized on their platform.
All of this audio talk can quickly get confusing, though. But don’t worry. We cover what the YouTube loudness standard is and how to normalize your audio for a perfect viewer experience!
What is the YouTube Loudness Standard?
Most audio and video streaming services ensure their content is not too loud. They do this by ‘normalizing’ – bringing down the volume on all audio that does not conform to their loudness standards.
This makes sense. After all, these platforms want to provide the best viewer experience possible. And most people have had bad experiences with loud or clipping audio at some point.
YouTube has a loudness standard of -14LUFs in 2022. More on what that means later. But the gist is that YouTube will bring down the volume of videos that are above that level. So what does all of this mean for you?
What Happens if the Audio Is Too Loud When I Upload It to YouTube?
If your video has audio levels above -14LUFs, YouTube will normalize the audio automatically and reduce the loudness.
But letting YouTube normalize your audio can sometimes cause some distortion in the sound as it gets compressed. This should be avoided; instead, you should normalize your audio yourself before exporting.
You can see if or how much YouTube will normalize your audio with this tool: loudnesspenalty.com.
Just upload the video you plan to publish, and it will give you a percentage of how much YouTube and other platforms will normalize the audio. Although this tool is primarily made for music videos, it works the same for dialogue.
What Happens if Your Audio Is Too Quiet When Uploaded to YouTube?
Unfortunately, the opposite is not valid. YouTube will do nothing to your video if it is too quiet. So the only thing you can do here is to ensure you export your video with the correct loudness before uploading.
But before we do that, let’s clarify what LUFs are and how you can ensure your audio is exported with the correct loudness! We cover all of this below!
Understanding LUFS
YouTube measures audio levels (or how loud your audio is) in LUFs, which stands for Loudness Unit Full Scale. It is a loudness standard aiming to normalize volume levels across all audio and video streaming services.
We mentioned that YouTubes loudness standard is -14LUFs. That means that any video above that will be normalized. If you, for example, uploaded a video with a loudness of -10LUFs, YouTube will bring it down to around -14LUFs. A video with a -5LUFs loudness will also be brought down to the same level.
How to Check Your Audio Loudness on Youtube
There is a simple way to check your video’s loudness on YouTube and if they have been normalized. That is by using their ‘Stats for nerds’ feature:
To open Stats for nerds on your PC, follow the steps below:
- Open the video you want to check the loudness for and play it.
- Then, right-click on the video player, and a menu will appear.
- Click on ‘Stats for Nerds,’ and an overlay will appear over the video with a bunch of helpful info.
You can also use ‘Stats for Nerds’ on mobile. It just requires a few more steps:
- In the YouTube app, click on your profile icon.
- Then click on ‘Settings’ and then ‘General.’
- Find and enable ‘Stats for Nerds.’
- Play the video you want to check the loudness for.
- The Stats for Nerds overlay won’t appear automatically. You must press the ‘three-dot button’ in the video player and then click on the ‘Stats’ icon.
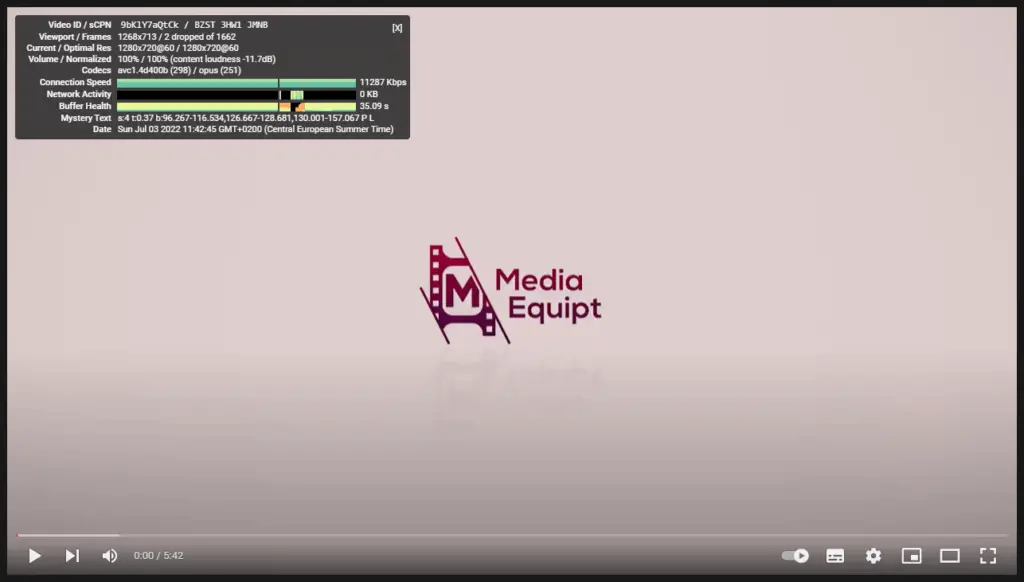
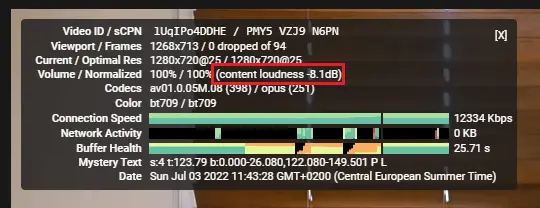
So what can you make of all of these stats? We are interested in the fourth line down, which has information regarding the volume of the video.
The first value is a measure of the volume of the player. If you adjust the volume slider, the number will change—nothing too crazy here.
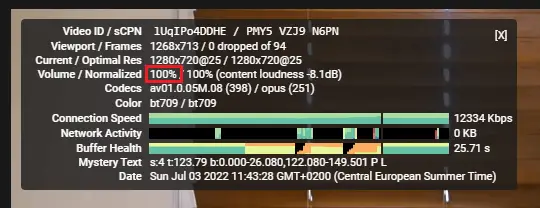
But the second value measures if and how much YouTube has normalized that video’s audio—described as a percentage.
A number of, let’s say, 80% means that YouTube has normalized the audio by 20% and that 80% of the loudness remains. We hope that is clear enough, but there is a reason all this is called ‘stats for nerds.’

Lastly, you can also find content loudness here measured in decibels. If it shows anything over 0, it means YouTube has deemed the clip too loud and has normalized it.
How Loud Should YouTube Videos be?
So what to do with all of this info? Well, you want your audio not to be too quiet, nor too loud and distorted.
Aim for an audio level under -14LUFS, ideally close to that level but with a slight margin to be safe. This can easily be done before exporting your YouTube video with the most popular editors.
We will show you how to do that in different video editors below:
How to Normalize Your Audio in Premiere Pro
There are a couple of ways to normalize your audio in Premiere. But this one is by far the fastest and easiest we recommend.
Assuming you have already mastered your audio in the project and you are happy with it, it’s time to normalize the sound.
- Go to the exporting window of Premiere Pro and select the ‘Effects’ tab.
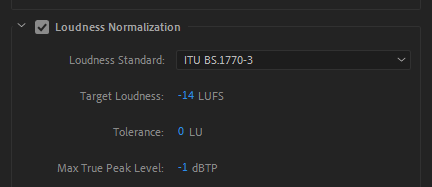
- There, enable ‘Loudness Normalization’ and make the following changes:
- Set the ‘Loudness Standard’ to ITU BS.1770-3
- The ‘Target Loudness’ to -14LUFs
- Tolerance: 0LU
- Lastly, set the ‘Max True Peak Level:’ to -1dBTP. (this ensures no clipping happens when the audio is compressed).
After these configurations, your video should be good to go with nearly perfect audio according to YouTubes loudness standards.
This can also ensure your audio is pretty much the same across all of your exports, so save these presets for next time.
How to Normalize Your Audio in DaVinci Resolve
Again, before adjusting the loudness, ensure you have mastered everything beforehand.
- Begin by opening Resolve and click on the ‘settings icon’ (the cog).

- In the Settings menu, select the ‘Fairlight’ tab.
- Under the ‘Audio Meetering,’ set the ‘Target Loudness Level’ to -14LUFs.

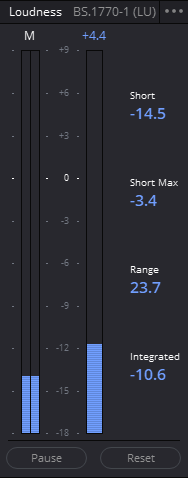
- Now, go to the ‘Fairlight page,’ and you will find a loudness meter to the right of the audio controls.
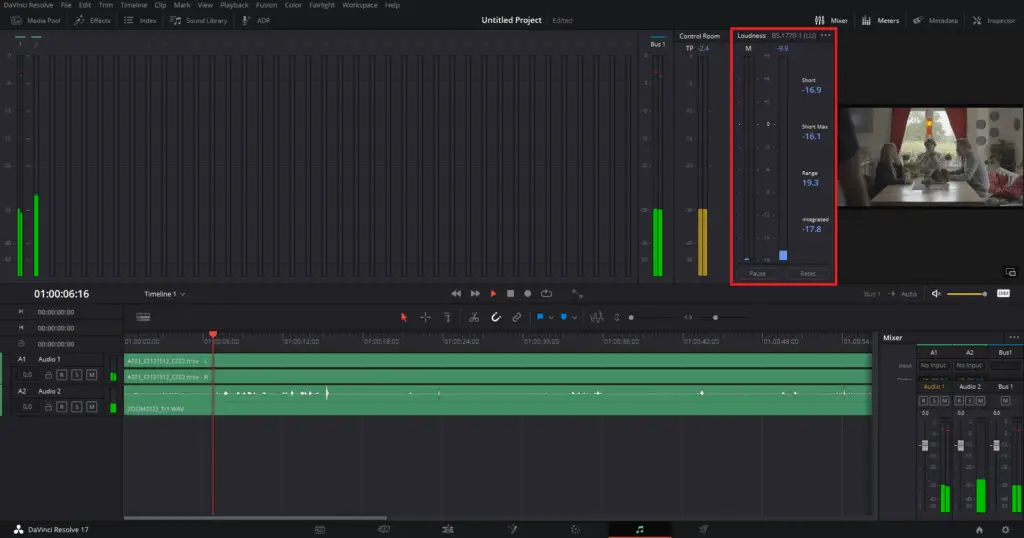
Playing clip now will make the loudness meter jump up and down, and different values will come up. But the 0 in the loudness meter represents the ‘Target Loudness Level’ we just set – which, in our case, is-14LUFs.
This means we want to get as close to that 0 mark as possible, but ideally not above it.
As for the other values:
- Short: Represents how many LUFs you are above or below the target level. It is constantly changing as you play the clip.
- Short Max: Gives you how far or below the target level the loudest point recorded yet was.
- Range: Tells you the difference between your quietest and loudest peaks in the audio.
- Integrated: This number tells you how many LUFs you are above or below the target level overall in your clip. This is the number we want as close to zero as possible.
Loudness History Diagram
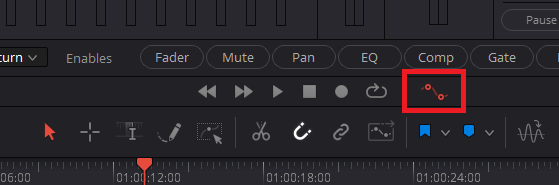
- To make it even easier to see which loudness levels you are at during the clip, click on the ‘Audio Automation Controls’ (which look like two curved keyframes).
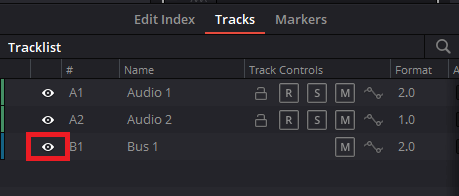
- Then, open the ‘Index’ and select the ‘Tracks’ menu. You want to set your main audio track to be visible. To do this, find the main audio track (which will probably be named M1), and click on the ‘visibility icon’ (the eye icon).
- Expand your main audio track in the timeline, and enable ‘Loudness History.’ Now, you will get a diagram of the loudness of the clip and how it changes during its duration.
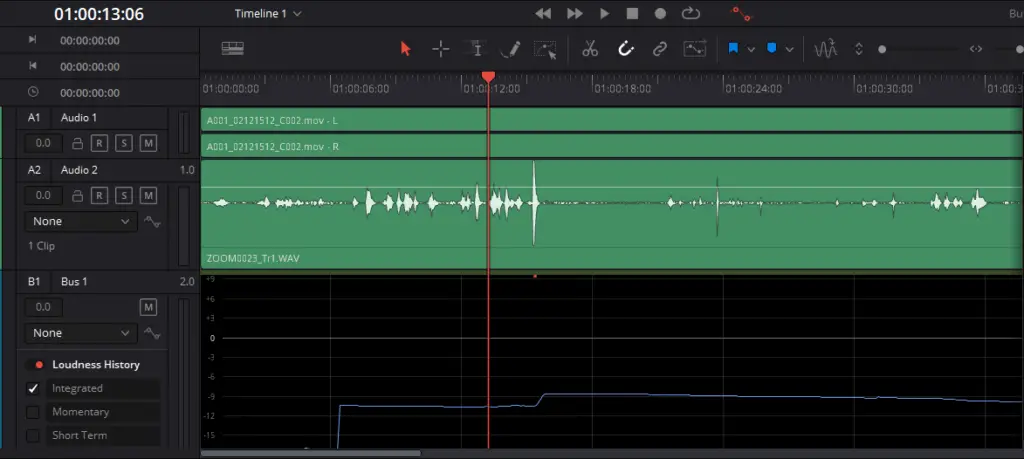
To reset your loudness meter, hit reset in your controls above and start again.
By checking the loudness levels, you can adjust the gain of the audio clips to achieve ideal loudness before exporting. Just remember not to go over -14LUFs because then YouTube will normalize it, and the sound might get distorted.
In Conclusion
To summarize, YouTube has a loudness standard of -14LUFs in 2022. This means the platform normalizes all audio under -14LUFS, and you should try to stay just below that level when uploading videos with enough margin to be safe.
You can use YouTube’s tool, ‘Stats for nerds,’ to identify which videos have been normalized. Then, adjust the audio levels properly in your editing software before uploading for the best viewer experience.
For more tutorials on YouTube, vlogging, and video production, feel free to check our other articles!