

A good voice-over is integral to your video’s success on YouTube. No matter how cool your video is, a lousy voice-over, or poor quality audio, will reflect negatively on your work. For that reason, we will show you how to record a voice-over for Youtube videos–professionally in 5 steps.
Decide How To Record Your YouTube Voice-Over
Depending on how you edit your videos, there are several ways of adding voice-over for Youtube.
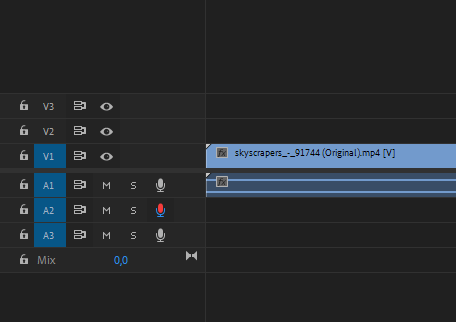
Some editing software, like Adobe Premiere Pro, has an audio recording feature available if you enable the record button on the track.
However, it’s very common that voice-over is recorded in separate audio recording software called DAW (digital audio workstation). There are many to choose from, like Adobe Audition, Pro Tools, or Garageband, but one of our favorites is Audacity.
Audacity is a free software well suited for beginners as well as professionals. It has a simple interface (once you know what you’re looking at), and you can quickly hit record and get the audio you need.
Step 1: Get a Microphone
This tip is obvious. You can’t record audio if you don’t have a microphone.
If you don’t already have a microphone for recording voice-over for Youtube videos, you can think ahead and get the gear that you most need. You may not want the highest grade mic if you’re on a budget, and if you have little time to learn about new gear, you can take the simple route.
Pro-voice-over artists use condenser XLR mics connected to a mixer, which in turn connects to your computer. This option, while professional, is the more expensive one with a bigger learning curve since you need to learn how to use this hardware.
They will, without a doubt, give you the best sound, but there isn’t only one “best mic.” There is the best mic for beginners, for travel, for sparse spaces … You get the point.
There are many opinions on mics. Think about your filming style, and decide on the best mic for you.
The other option is getting a USB mic. It is a simple and cheaper option so that you can get going quickly. Simply plug it in, and you’re ready to go.
If you are really on a budget, consider recording on your phone in the closet. (More on the closet thing next).
Step 2: Sound-Treat Your Room
Almost more important than the mic is the room you are recording in. If your room is lacking in treatment (curtains, carpets, and generally fabric of all kinds), your voice-over will sound echo-y, or “boomy”.
Your viewers might pick up on this, so we recommend trying to minimize sparse rooms as much as possible.
If you don’t have many furnishings or a voice booth, DIY studio setups don’t need to cost much. There are plenty of resources on Youtube for this, but you can get away with a simple duvet or blanket and build a fort to record in. (It’s kind of fun too).
Another common budget technique is to get in the closet. The clothes will soak up sound and give you a nice and dry voice-over recording.
Step 3: Record Your Voice
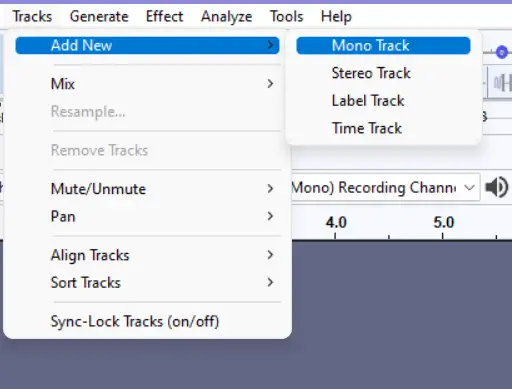
It’s time for you to hit the record button and perform. When recording voice, use a mono track, not a stereo track.
While reading from a page is easy, getting a “good read” may require a little practice. Before you record, try reading through your script a few times so that you can record smoothly without snagging on any long words.
A pet peeve among voice-over artists is the clicky noise that might come out of your mouth when you speak.
These clicks get caught and magnified in the microphone and are very noticeable in the final take. They are also tough to edit out, even for audio engineers.
How much clicky noise you will produce is up to each individual and can be more or less pesky to get rid of.
Sound engineers’ recommendations on dealing with mouth clicks range from using proper mic technique to staying hydrated.
If you listen back to your recording and notice a large amount of clicky noise, try drinking some water. Tips from voice-over artists and singers include drinking warm water, tea, or apple juice.
See what works for you.
Do a test recording and check your levels while you do it. Is your audio level going red? That means you need to lower your gain. Just make sure your volume levels don’t clip. That means it rises into the red area, which will result in distorted audio.
If you don’t have a pop filter, to filter out your puffy P and B sounds, try to angle your microphone so that you are not speaking directly into it. It will eliminate these plosives, which are not ideal for your audience to have to listen to.
Step 4: How to Edit a Voice-Over for YouTube
We have a section on editing audio in Audacity in our post How to Record and Edit a Podcast in Audacity but essentially, to make sure you get the best out of your voice-over, consider editing for good flow and volume.
Similar to video editing, you can cut your audio track to improve the flow of your take. If you feel that you paused a little too long, or if there was a dog barking at one point, you can get your scissors out and cut it.
Many YouTubers make the mistake of not “normalizing” their audio. Normalizing audio means that you are changing the volume to achieve an optimal level.
When the audio is not normalized, it can cause the issue of making the audio too low. On top of being difficult to hear what is being said, the video doesn’t have the same volume as other videos or ads, making you have to toggle the volume on your device up and down.
You can normalize audio in your DAW, and depending on the software, this is done in different ways. But let’s take Audacity as an example.
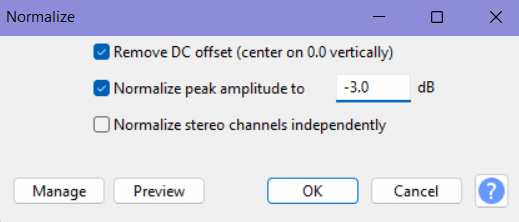
Normalizing in Audacity
- Highlight the track you want to normalize by clicking on it.
- Click Effects, and then Normalize.
- The only setting you need to care about in the box is Normalize Peak Amplitude. The recommended amount of dB is between -3 and -6, depending on your recording. You can preview the recording right here in the box.
To further improve your recording, you may want to have a look at equalization and compression. This is advanced and not a necessary step to how to record voice-over for Youtube videos, but if you’re going pro, you’ll need to learn this.
Equalizing
When doing voice-over, you want your voice to sound as clear as possible to improve understandability. You will achieve a clearer sound by removing the extreme top and the extreme bottom frequencies.
You will have to use different EQ settings depending on if you are editing a male or female voice. Roughly speaking, you can boost bass frequencies for men and treble frequencies for women.
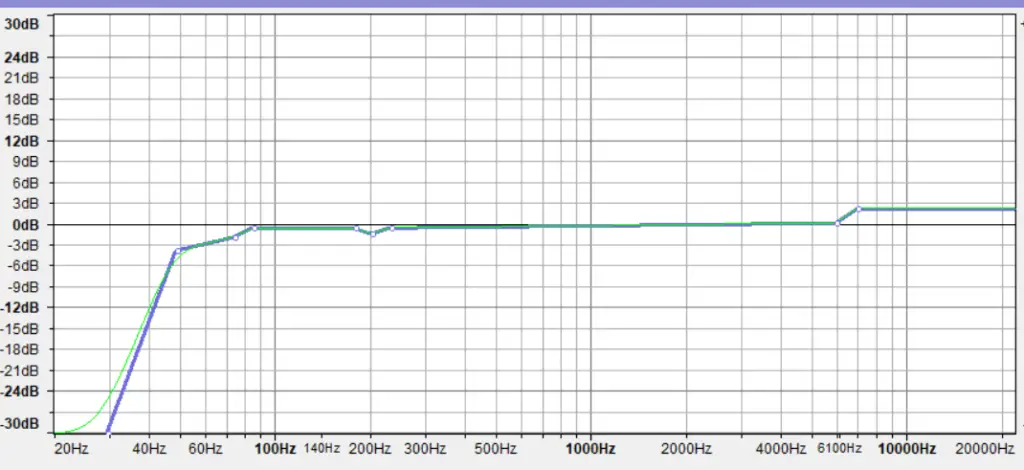
Another thing to consider is your S sound. If it’s too “essy,” you will need to decrease frequencies to avoid very trebly sounds.
Compression
Compression is the intelligent version of normalization and can pick up individual words that are hard to hear and bring them up to match the rest. It works the other way around by decreasing the volume of loud noises to make the audio even.
What you will need to do is choose
- Threshold, the decibel you want to compress to,
- Noise Floor, letting your DAW tell the difference between spoken and silent parts
- Ratio, how much to compress
Learn more about compression in Audacity here.
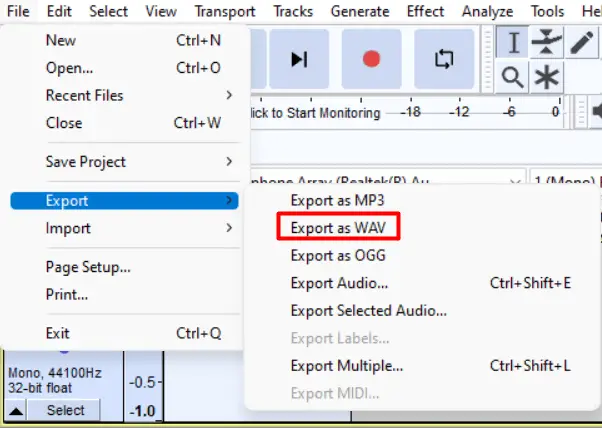
Step 5: Export an Audio File
When you are done editing, you need to get the audio out of your DAW and into your video editing program.
Export a WAV file, not an MP3 file. The WAV file holds more information and is a high-quality audio format compared to the MP3, which is compressed and not as detailed.
You can make further tweaks here to increase the timing and flow of your video and add any effects or transitions.
In Conclusion
All you have to do next is export your video, and you now know how to record an excellent voice-over for YouTube videos.
Remember, people, forgive bad video but never bad audio, so it’s essential to put the proper time and effort into making your voice-overs sound the best they can.