
Working with moving and still images, content creators nowadays can create combinations of sources that look visually stunning. By overlapping PNGs or hotkeying media sources to play one after another, streamers and videographers can go above and beyond what we thought was possible with streaming software only five years ago.
At times, however, your sources can appear decolorized or lacking that ‘pop’ that keeps viewers engaged. This could be due to its original coloration or some hardware settings affecting a capture source such as a webcam.
Either way, OBS is packed with solutions for your color issues. Read on below to find out how to tackle color correction in OBS Studio in multiple different ways!
What Is Color Correction?
If you are looking to use an image or video in your content but aren’t sure about your source’s shade, tone, or brightness, you can apply a color correction in OBS Studio to get the desired image coloration.
What this means is you don’t even have to edit the image in different software such as Photoshop or GIMP; you can just apply an effect (filter) in OBS studio and make your changes all within one application.
Color correction tools are helpful for cases where you have two sources with slightly different shades and want them to match or a webcam source that is slightly too dark and needs a lighting lift.

In the above example, hue correction has been applied to the second image in order to completely mix up the color palette used in the image.
There is a multitude of ways that color correction can be used to benefit your content, and having a solid knowledge of how to do so will definitely help in future projects.
From our OBS Mastery Course – Check out the whole 7-hour video course on our YouTube channel.
Which Filters Can Help With Source Color?
Before we go into which filters are best to use for color correction, you need to know exactly how to add a filter in OBS Studio.
Filters can be applied to all visual sources. These include:
- Image sources
- Media sources
- Browser sources
- Game or window capture sources
- Video capture device sources
Once you have added your source, right-click on it and choose ‘Filters’ in the drop-down menu.

This will open up an additional menu where you can pick and choose the filters to add to your source. Here are our top picks for color correction filters in OBS:
1. OBS Color Correction

Probably the most commonly used color correction tool in OBS Studio, the ‘Color Correction’ filter is a simple to use filter with just a few individual settings for you to change. Although the list of capabilities in this filter is short, they should be more than enough for most creators to get their desired color output.
Gamma
Gamma is a complicated display aspect to explain. Perhaps the best way to explain it is by balancing image brightness through contrast. Changing the gamma value will look similar to changing the brightness while also increasing and decreasing color contrast. It is best to use for webcam footage and can also be used delicately to remove shiny foreheads!

L > High Gamma
R > Low Gamma
Contrast
Contrast is the difference in shade and color between two different elements. Increasing the contrast will make your image colors stand out more but are potentially difficult to look at. While decreasing the contrast can make opposing colors compliment each other better but can make the image appear a bit faded and bland.

L > High Contrast
R > Low Contrast
Brightness
The brightness level of an image controls how much light the image reflects off of certain colors. This will make the image look lighter and darker as you change the value.

L > High Brightness
R > Low Brightness
Saturation
Saturation controls the intensity of color in your image. When you increase the saturation value, the colors in your source will appear bolder and stronger. Decrease the value, and the colors get less dominant until eventually, you reach a grayscale image with no coloration.

L > High Saturation
R > Low Saturation
Hue Shift
Hue Shift allows you to reimagine your image with an entirely different color palette. As you slide, the marker left or right your image colors will flow through the color spectrum and change accordingly. An example of a change in hue can be found in the ‘What is color correction’ paragraph!
Perhaps the only tool on this list that doesn’t affect color, the opacity slider, determines the transparency of your image. Many people don’t know that this setting is found under the ‘Color Correction’ filter; however, it is massively important. Placing an image on top of another with 80% opacity means you will be able to see the second image ever so slightly underneath the top one. This helps to create a feeling of depth and layers in your content and gives it more than just a two-dimensional feel.

L > 50% Opacity
R > 100% Opacity
2. Color Grade
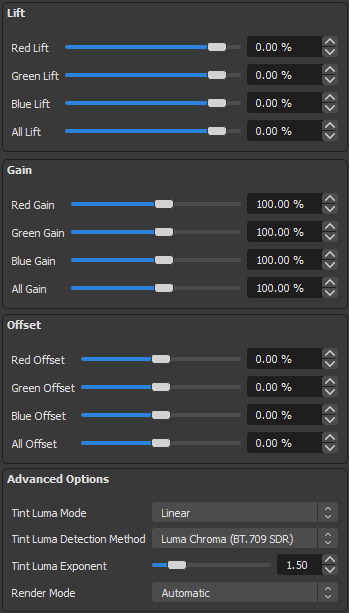
Color Grading takes the Color Correction filter and delves a little deeper. You have a much larger library of corrective tools at your disposal, including the ability to lift out specific colors and leave others. If you have a bit of graphic design experience and know-how to balance color lift and multiply, then the Color Grading filter is a great option.
The lift tool helps you to remove certain colors from your image without affecting others. This is perfect for when you have a subject with red-eye or bright purple light and want to decrease the intensity of that one outstanding color.
Gain controls the intensity and depth of a specific color. Increasing blue offset will make your blues much brighter and deeper, whereas decreasing the blue offset value will make your blues darker until they lose their color!
Finally, offset changes the reference point for each tool to work off of. It essentially increases or decreases the threshold of each tool. Unless you’re particularly knowledgeable in graphic design, we’d suggest leaving these at the default values.
3. LUTs
The above filters and processes are powerful but can take a long time to get perfectly consistent results. LUTs or ‘look up tables’ provide creators with a default template of colors that they can apply to their sources in the same manner and with the same values every single time. It is essentially a colored lens similar to filters that you find on Snapchat or Instagram.
How to Apply a LUT in OBS
To apply a LUT, add a filter as you usually would and choose ‘Apply LUT.’ In the filter settings, click ‘browse.’

You should see a folder similar to the one above with just a few LUT files available. Choosing one of these will apply a default LUT filter to your image.
For this particular selection of LUTs, head over to OBSProject.com and download the FREE LUT Filter Pack here.
Top tip: The OBS Project site is an incredible playground of OBS downloads and plugins. Spend some time over there checking out recent uploads, and you definitely won’t regret it!
What About Webcams and Cameras?
Webcam and cameras are added to OBS Studio as a video capture source. Because of this, they can have filters applied to them in the same way as images or media sources using the filters discussed above.
However, certain cameras might have their own software which determines specific image and color settings.
To find out if your camera is being controlled by external software, double click on your video capture source and click ‘Configure Video’.

If your camera has additional software, a new popup will appear with your camera’s software settings and should look similar to the menu below.

In theory, this is a great addition and gives the creator even more freedom to make graphic changes to their video capture source. However, these settings DO NOT save on PC and when OBS restarts and is therefore highly unreliable in many cases. If you choose to make a change in this menu, you will need to make that change every time you restart your OBS software!
OBS Color Correction Plugins
Honestly, the in-built color correction tools can more than handle most of your image editing needs. If you want to experiment even more in terms of image effects, shadows, and glows, the StreamFX plugin is one of the most popular on the market and very easy to use.
Other than that, the other corrective plugins do pretty much the same job as the filters in OBS Studio and aren’t really worth adding to your library.
In Conclusion
And there we have it; you’re now a color correction wizard on OBS! Whether your images were looking dull and faded or too bright and in your face, hopefully now they stand out just right and keep your viewers engaged!
For more video and image filter help on OBS, check out our top tips and tricks right here. There’s no limit to the fantastic things these filters can do!