
Once you’re all done editing your project, there is one final step in your journey to owning the physical file; Export the video file in Premiere Pro. When you open the export menu for the first time, it can be INCREDIBLY overwhelming! There are hundreds if not thousands of different settings combinations that you can choose from and knowing which one to pick is tough.
In this tutorial below, we’ll help you get your video file exported in the correct format and with the most suitable settings for you and your system.
Importing and Exporting in Premiere
No doubt you’ve already edited down your video footage if you’re here reading this article. This means that you’ve already imported files into your project to edit. Importing is the process of taking footage files, be they still images or video files, and placing them into Premiere Pro so that they are ready to be altered.
Exporting on the other hand is basically the opposite, taking your edited project and saving it outside of premiere pro as a video file ready for sharing or uploading to the internet. When you export your project, it will save as a video file on your system and will no longer need to be opened with Premiere Pro.
Every Important Export Setting in Premiere
Once you are happy with your project and are ready to export, you’ll need to make sure your timeline is selected in order to export it. If you have anything else selected in the application the export button will appear greyed out. Simply click on your timeline to select your project. It will show a blue box around your timeline if it is properly selected.

Go to File -> Export -> Media and a pop-up menu should appear.

In this menu, you should see an export preview on the left-hand side and export settings on the right-hand side. Now let’s break down each individual setting and the choices you have for exporting. If we do not mention a certain setting or line, leave it as the default setting!
Format
The format setting decides which file format to export your project into. These are basically the encoding settings of your file. Some formats are more compatible with other programs than others so it’s important to select the correct file format according to what you plan to do with the video. Here are a few of the most popular selections for video file formats
H.264
Otherwise known as MPEG4 10, H.264 is the most popular export format with users of Premiere Pro due to the fact that it is compatible with almost all modern-day platforms and software. Stick to this format 99% of the time and you’ll be rewarded with great results.
AVI
AVI is optimized to work with Microsoft software. The way it encodes its data means it can store more data in lower file sizes. If you know you’re going to stick to Microsoft software and want to optimize your storage space, consider exporting to AVI format.
WEBM
WEBM format is popular with those who want to export transparent video from Premiere Pro. It also compresses relatively well and can be used to create shorts. Realistically, only use WEBM when you want to render transparent footage!
Preset
Very handily, Premiere Pro comes with a humongous library of presets to help you navigate the abundance of confusing settings. Simply clicking on one of these presets will change all of your settings to match the title of the preset. Here are some fan-favorite presets to help you on your way:
Match Source High Bitrate
Choosing this preset will match all of your settings from your original files. If you imported video at 720p and 30FPS then that is what your output file will be encoded as.
Creators tend to choose this preset so as not to end up distorting and warping their footage by choosing an incorrect resolution ratio or FPS value.
YouTube 1080p Full HD
Looking to upload your output file to a video sharing site? Perfect for online viewing, this preset chooses a suitable bitrate and frame rate for online platforms such as YouTube, Vimeo, and Facebook. It increases the maximum bitrate for lower quality files and exports at 1080p, the most popular HD resolution for YouTube.
Mobile Device 720p HD
If you’re creating content for mobile ONLY, this is preset for you. It casts aside unnecessary high resolution and bitrate due to the fact that mobile devices very rarely benefit from image resolutions higher than 720p. This results in video that looks fantastic on mobile and yet is relatively small in size.
High-Quality 2160p 4K
Are you working with DSLR cameras or professional video recording equipment? If you are and want to maintain that top-notch quality, this 2160p 4K preset will do just the trick.
Be warned, files with this preset that are any longer than 1 minute are going to be HUMONGOUS in file size. Make sure you have ample space on your system or even an external hard drive to store these monstrous files!
Output Name

You can now save your project and give it a custom name by clicking on the hyperlink on this line. Next to the heading ‘Output Name’, click on the file’s default title. A window will appear, allowing you to rename the file and save it to your preferred location.
We’d recommend saving the file to your desktop or default video file location for easier access later down the line.
Once you’ve changed the name and location, click the save button. The hyperlink in the export menu will now show your new file name.
Basic Video Settings
If you’re using a preset from the list above or anywhere in the extended preset library, you won’t need to worry about the Basic Video Settings window or its settings. They will all be greyed out and locked in accordance with the preset. However, it’s good to know what each setting does just in case you start building your own presets down the line.
Width and Height
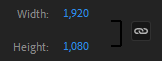
The width and height of your exported file will usually match the resolution of your video files in the project.
You may want to downscale the resolution of your output file, which is also fine. The small next to the setting values should be clicked ‘on’ to make sure the aspect ratio stays the same and your output file is not warped. When this is on, making any change to the width or height will automatically scale the other to the same resolution.
Frame Rate
Put simply, frame rate is the speed at which images are shown in a video file. As we know, video files are made up of thousands of still images called frames. When played successively and at speed, these still images make up a moving image or video.
The higher the frame rate, the smoother the video output. The industry standard for online videos is now 60FPS, 30FPS, and 24FPS.
In most cases, you want to keep the frame rate at the same value your video files are.
Field Order
Have you ever seen or made video content before which has those annoying black horizontal lines appearing all over the footage? This is called interlacing and can be countered by changing the field order of the file.
Keep this setting on progressive if you are not experiencing interlacing issues. This will only occur with older or experimental filming equipment.
Aspect
This setting changes the aspect ratio of the pixels in your project. Unless you’re looking to become the Picasso of the video production world, always keep this on Square Pixels (1.0)!
TV Standard
The two settings here, NTSC and PAL, are the analog systems used to decode video on TV systems across the world. Realistically, the choice between the two is an outdated issue and you will not see better results with either. Stick to the default setting which is NTSC.
Publish
This is perhaps our favorite feature on Premiere Pro. The Publish tab allows you to post directly to online platforms such as Twitter, Vimeo, or YouTube as soon as the export has finished.
With this feature, there is no need for you to even open up your social media account as you can do everything from inside Premiere Pro! Simply link up your account by clicking ‘sign in’ and Premiere will upload the video for you.
Final Export
Once you have chosen your settings or desired preset, it’s time to finally export your file in Premiere Pro. Head to the bottom right-hand corner of the window and click ‘export’.

Another window will appear showing you the export progress and estimated time remaining.

Larger file sizes can sometimes take a very long time to export. Don’t be surprised if a 2GB estimated file size export takes anywhere between five to thirty minutes; it will all be worth it in the end!
In Conclusion
And there you have it, your project is exported and ready to be uploaded or shared elsewhere. Generally, we’d suggest always choose one of the presets for export, as playing with the individual settings can result in some funky video footage.
Still, struggling to get to grips with Premiere Pro? Check out our beginner tips and tricks right here!