
As of a recent update, OBS is now simple to set up with Zoom. You can use all of your scenes, overlays, and widgets as a video source for the popular conference meetings software. Knowing how to use OBS Studio with Zoom will help you improve the professionalism of your meetings.
In this article, we’ll be taking you through how to set up OBS Studio as a virtual camera so you can use any of your OBS collections instead of your webcam in Zoom.
What Are OBS Studio And Zoom?
OBS Studio is a streaming software that helps users design and organizes their content. You can collect multiple sources together to create informative and exciting visual scenes.
Zoom is a video conferencing software where users can meet via video link at any given time. Its main use is for conference calls and business meetings, but over the past few years has grown in popularity with families and friendship groups alike.
Why Use OBS Studio With Zoom?
Using OBS Studio with Zoom allows you to change the video of your Zoom call with footage and widgets from your OBS Studio setup. Through this, you can activate different sources and presentations, which will be directly reflected in your Zoom call video.
Some also use OBS with Zoom because of its chroma key capabilities, meaning it allows you to use green screen software to create false backgrounds.
What Is A Virtual Camera?
Your computer or laptop undoubtedly comes with a webcam or other camera source. When you use software that requires a camera, it will appear in the list of available video sources. When you click it, it’s used as your camera source.
A virtual camera source is when you use an image or software on your system as a camera source for software such as Zoom. Some software allows you to project its product as a virtual video source and make it choosable in video camera settings.
For example, if you use OBS Studio as a virtual camera, all of the items in your preview area will be projected as a video source. When you select OBS Virtual Camera, you will see the same OBS projection as to when you record through the program or stream from it.
How To Use OBS Studio As A Camera With Zoom
Using OBS Studio with Zoom used to be quite complicated. Before recent updates, a special plugin was required, and it had to be installed manually. Not any more!
In a recent update, OBS has released a virtual camera that is pre-installed in the OBS Studio build. It’s available to everyone on all new installs. If you do not have this available, check for an OBS update by clicking the help tab at the top of the app and then clicking check for updates.
Enable Virtual Camera In OBS Studio
Enabling a Virtual Camera inside OBS Studio has never been easier. Gone are the days of complicated plugins and settings!
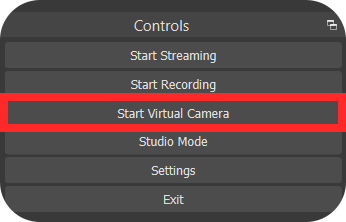
In the bottom right-hand corner of OBS Studio, there is a list of buttons you can click that perform specific operations called the controls. You will see a button that says start virtual camera in the menu. Once clicked, your OBS Studio application will be projecting your preview area as a virtual camera on your device.
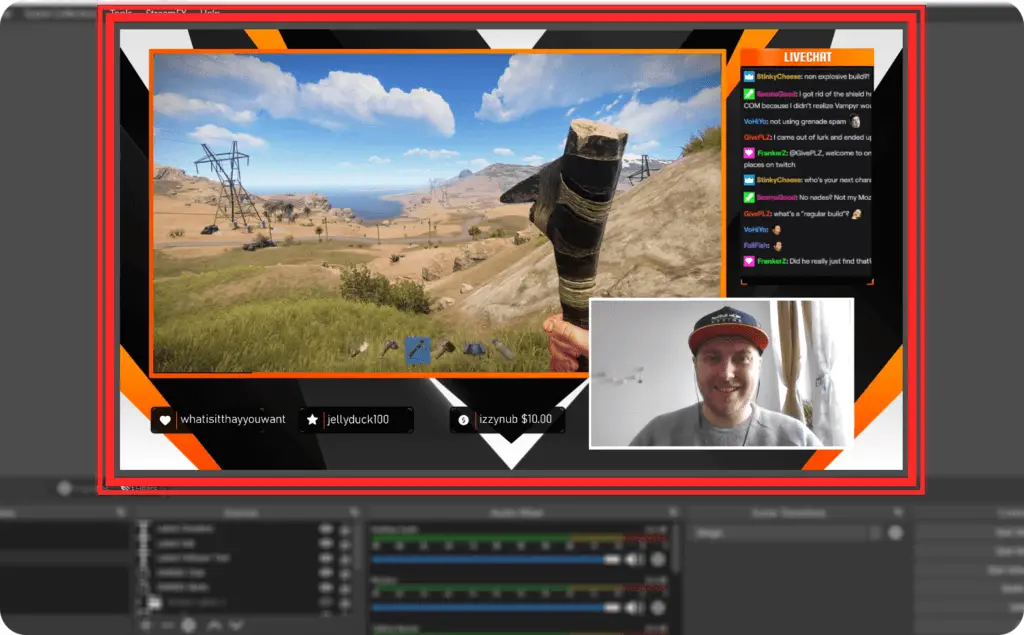
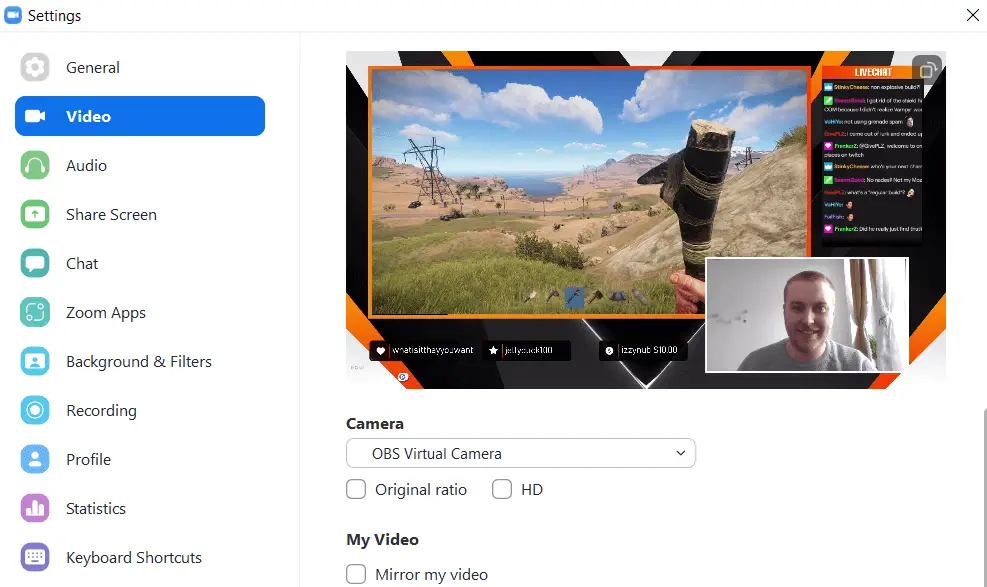
Top tip: The preview area is located in the top center of your screen and shows everything that will be projected (as seen below). Anything outside this box (indicated by red boxes below) will not be sent out to your virtual camera.
Choosing OBS Virtual Camera In Zoom
The next step is choosing OBS Virtual Camera as your default camera in Zoom settings. By default, your camera will be set to any pre-installed webcam that comes with your system. It’s time to change that.

- Open Zoom on your system. It is far easier to use the downloaded program rather than the browser version. If you don’t have it installed already, you can find the free download here.
- Click the gear icon in the top right-hand corner of the application to access your Zoom settings (as seen above). It can be found underneath your profile picture and above to the right of the clock and date widget.
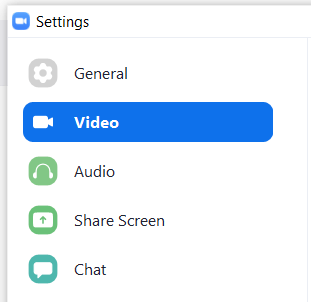
- Click the video tab on the left hand side of the settings menu.
- Find the camera drop down menu and select OBS Virtual Camera. Once selected, your OBS Studio preview area will appear in the Zoom camera preview area above the camera drop down menu.
Zoom Video Settings
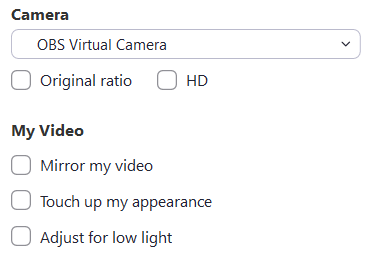
OBS Studio manages the majority of your video picture settings, but there are a few additional settings in Zoom that you can play with to achieve better results:
- Original ratio and HD – This will change the quality of the OBS feed that Zoom is receiving. Choosing original ratio will keep the feed at the original quality. HD will attempt to upscale the resolution to be as high definition as possible. We recommend keeping this on original ratio.
- Mirror my video – Checking this box will transform your OBS feed in Zoom by flipping it horizontally. This is handy if you have text in your image and need to flip it to be readable.
- Touch up my appearance – This setting applies a filter to your Zoom camera footage to remove any blemishes and spots. If you’re using OBS Studio as a Virtual Camera it’s better to apply these filters in OBS rather than Zoom. For more information about OBS image filters, click here.
- Adjust for low light – This setting will add brightness to darker colors in your video feed. Keep this turned off. As with the above setting, it’s better to correct colors inside OBS Studio than in Zoom settings.
How To Set Up Audio From OBS Studio
Setting up your OBS Audio with Zoom is a little more complicated than video, but not by much! If you’re just using a microphone, it will take you two seconds to set up. However, if you want to use multiple audio sources from OBS, such as background music or desktop audio, you’ll need to configure some external software.
Single Microphone Set Up
If you only want to use your microphone as an audio device for Zoom, the setup is effortless!
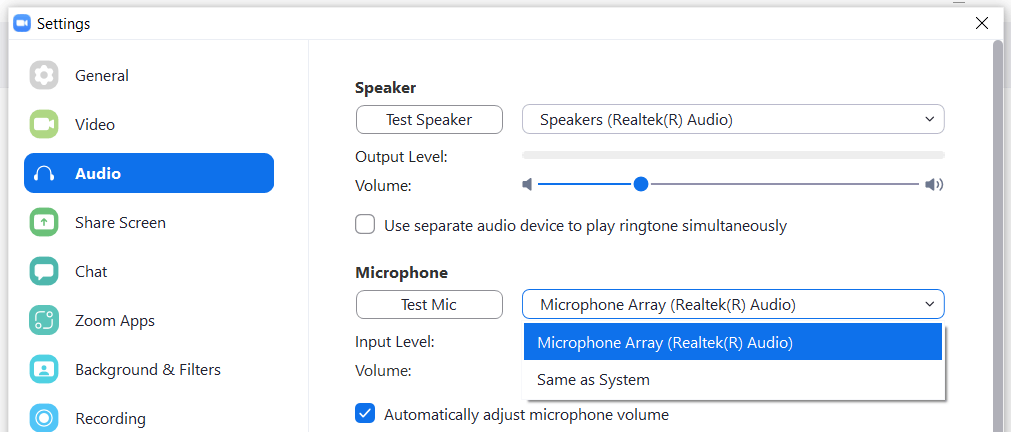
In your Zoom settings, go to the Audio tab. In the following menu, you will see a microphone subheading and a drop-down menu. Click the drop-down menu and select the microphone you wish to use.
Your microphone is now configured as your primary audio input in Zoom.
More Complex Audio Set Ups
If you have more than just a microphone source in OBS that you want others to hear on Zoom, you will need to install and configure a virtual audio cable.
A virtual audio cable is essentially a driver that Zoom can recognize as an audio source. Zoom can’t recognize OBS Studio as an audio source, so that it won’t appear in the list of potential microphones. Using this hardware will act as a ‘virtual’ microphone and appear in those settings. Set up your virtual audio cable by following these steps in order:
- Download the VB-Audio Voicemeeter audio cable drivers here.
- In OBS Studio, go to your audio settings in the main settings menu and set your monitoring device to CABLE Input (VB-Audio Virtual Cable).
- Open the mixer settings and set all of your audio sources (that you want to be heard in Zoom) monitoring settings to monitor and output.
- In Zoom, set your microphone to VB-Audio Virtual Cable. You will now be receiving all of the selected OBS audio in Zoom.
Top tip: Using this method will alter your system’s default audio settings. Your system settings can get muddled up, and it becomes confusing. Only go through with this setup if you’re confident navigating your system’s audio settings.
In Conclusion
Knowing how to use OBS Studio with Zoom can set you apart from other Zoom users. Whether you’re taking part in an interview or simply chatting to family, it enables you to engage other users with impressive features and transparent backgrounds.
It may seem complicated at first, but by following the simple steps above, you’ll be switching scenes and impressing colleagues in Zoom in no time at all!