
Premiere Pro is a fantastic piece of editing software, but it’s not perfect. Among common issues when exporting in Premiere Pro is when encoding gets stuck at 0%. This makes it impossible for you to export your project.
Sometimes, you will even be unable to cancel the encoding, forcing you to shut down Premiere through the task manager and risking losing all of your work. In other words, it is not fun.
This article will assume you have tried the more obvious stuff like restarting the program, rendering all previews, and such. Below are four quick fixes to fix Premiere Pro encoding getting stuck.
- Export through the Media Encoder
- Delete your markers
- Copy to a new project
- Change your Premiere Pro version
What is Encoding in Premiere Pro
Before we jump into how you can fix the issue, it might be helpful to understand what encoding in Premiere is to begin with.
In video editing, encoding means converting one format to another via a codec. It is also called exporting or transcoding. When you press ‘Export,’ Premiere reads all of the files in your project and encodes them into a compressed file of your choosing. This conversion has to be done for every single frame.
Encoding, therefore, requires a lot of resources and relies primarily on your CPU. Here, issues can occur preventing you from exporting your Premiere project.
How to Resolve Premiere Pro Encoding Getting Stuck at 0%
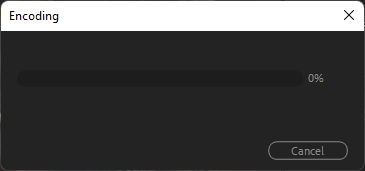
This issue occurs when you try to export in Premiere. The encoding panel appears but is stuck at 0%. Often it does not even show the estimated time left for the export. Below are four fixes to resolve this issue:
Fix #1: Export Through the Media Encoder
First, try exporting through Adobes Media Encoder, which should come with Premiere. For larger project files with many clips, it is recommended that you use the Media Encoder to export.
Exporting with Media Encoder also allows you to export the sequence in several formats simultaneously, and you can even continue working on other projects at the same time. But the biggest reason you might want to try this as a possible solution is that the Media Encoder uses lightly different engines to encode a video project. So if there are problems with exporting in Premiere, you can likely go around that by encoding the project there.
1 So to do this, you go to File > Export > Media like usual.
2 In the export panel, set all of your presets for your export.
3 Now, instead of clicking on ‘Export,’ press ‘Queue.’ This will open the Media Encoder and export from there.

Now, if this does not work, don’t worry. We have a bunch of other fixes for you below. None of them are challenging or require that much time, so try each fix with the process of elimination.
Fix #2: Delete Your Markers (Premiere Pro/Adobe Media Encoder v 14.0.1)
It has been reported that markers on your Premiere timeline can mess up your encoding. This issue was found on older Premiere versions, so it might have been resolved by now.
The solution for this issue is to remove all the markers in your timeline before exporting.
To remove all of your markers simultaneously, go to Marker (inside your Premiere project) and then ‘Clear All Markers.’
That was the easy way to resolve the issue, but you might want to export while keeping all of your markers. That is possible to do. It will just be a little more complicated. Just follow the steps below:
1 Once in the project file, go to Windows > Markers
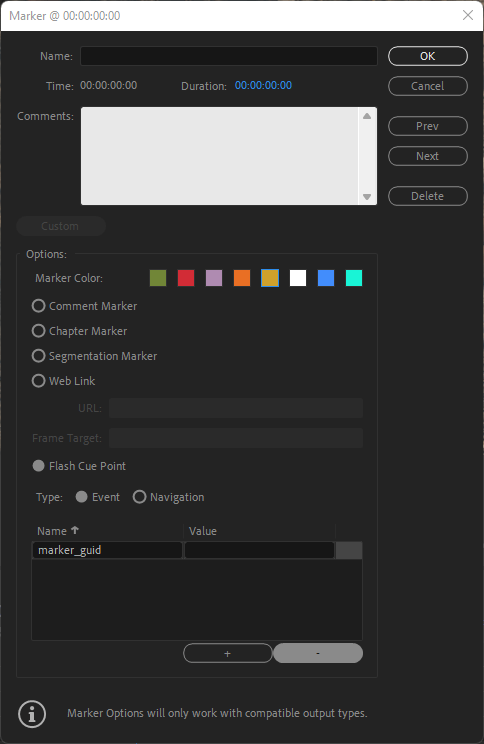
2 Then, double-click on the Marker Icon, and a properties panel will appear.
3 In the panel, there is a ‘Flash Cue Point’ section. In that section, check if you can find any entry called ‘marker_guid.’
4 If there is a ‘marker_guid’ entry there, enable the ‘Flash Cue Point’ option and delete that entry by selecting it and pressing the minus button.
5 After the changes, click ‘Ok’ and export your premiere project.
Your issues should now have been resolved without deleting all of your markers.
Fix #3: Copy to a New Project
If you still have trouble, you can copy everything from your timeline to a new premiere project, then render and export. It might be that there is an error in the current project file. To go further, try saving your new project file in another location just in case that fixes the issue.
Fix #4: Change Your Premiere Pro Version
If you have tried everything and still cannot encode and export your project, you might want to try to either update Premiere or downgrade it to an earlier version.
1 To change the version of your Premiere Pro, open the ‘Creative Cloud Desktop App.’
2 There find the Premiere app listed and press on the show more options button ( the icon with three dots)
3 A menu will appear, and now click on ‘Other Versions.’
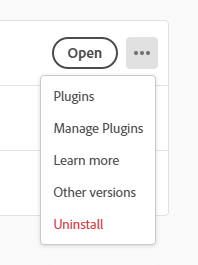
4 Now, you will be able to install and try older and newer versions of Premiere Pro.
If you downgrade Premiere, you will also have to downgrade the Premiere Project to be able to open it.
This can be done by using this tool: http://joshcluderay.com/downgrade-premiere-project-converter/.
Instructions on how to use this tool to downgrade a Premiere project go beyond the scope of this article, but it is one we might release in the near future!
In Conclusion
Now you know how to fix the issue with Premiere Pro encoding being stuck at 0%. Hopefully, you got it resolved and were able to export your project.
We recommend you try the fixes in the order we showed you above as they are ordered from really easy to more hustle. After all, this should be a relatively quick fix for most.
– Export through the Media Encoder
– Delete your markers
– Copy to a new project
– Change your Premiere Pro version
For more helpful guides and info on editing and Premiere, check out our other articles on the subject!