
OBS Studio is compatible with Mac, but for beginners, the setup is slightly more complicated than doing so on a PC counterpart. Don’t worry, we’ll guide you through every step and make sure you’re good to go. Read on to find out how to setup and configure OBS Studio on Mac in 4 steps.
- Step 1: Locate the OBS Studio Download
- Step 2: Install The Application
- Step 3 (Optional): Select the Recommended Settings on Mac
- Step 4: Change Mac Permissions to Allow Screen Capture
Step 1: Locate the OBS Studio Download
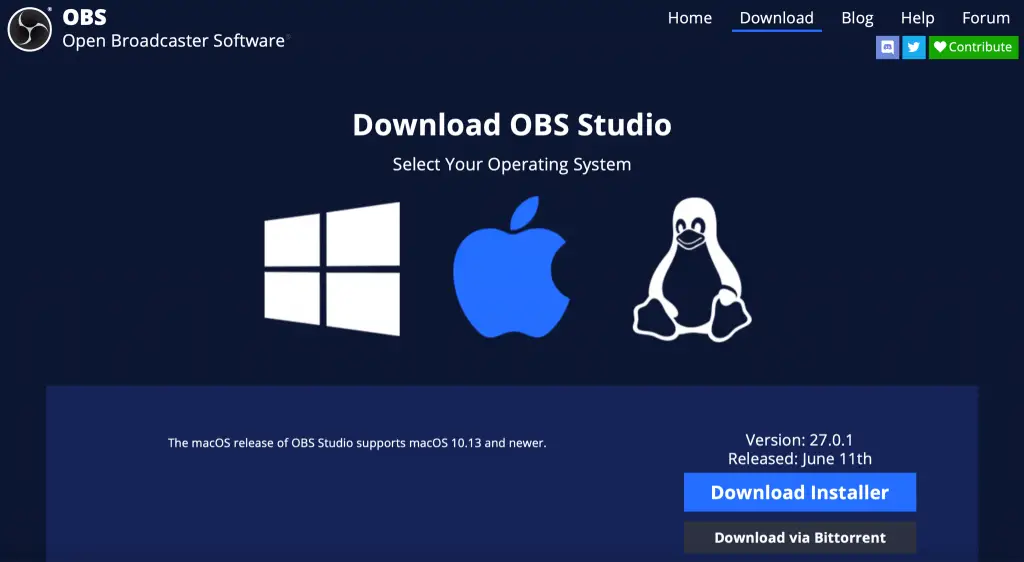
First up you’ll need to download the software from the OBS website. Head over to obsproject.com and click the ‘download’ tab in the top right-hand corner, between ‘blog’ and ‘home’.
Once on this page, you’ll be met with 3 logos in the middle of the screen; Windows, Mac, and Linux. Click on the Mac logo so that it goes blue and opens up a download menu below.
You currently have two ways in which to download the application; via the OBS installer or Bittorrent. The OBS installer is a small program that will fully install all of your files for you and is the recommended user-friendly installation. BitTorrent is a file-sharing program that can be used to share software online. It can also be a security risk to your system. Best to stick to the standard installer!
Be Sure to Download OBS Studio and Not Streamlabs!
You’ve probably heard people talking about streaming software called OBS, Streamlabs, SLOBS, Streamlabs OBS, etc. but aren’t these all the same application?! The short answer is no, they are two separate applications.
OBS Studio is open-source software that allows plugins and NDIs whereas Streamlabs is a full release software that is more user-friendly but has far less feature compatibility.
Both are brilliant for streaming and recording but for the purpose of today’s guide be sure to download OBS Studio and NOT Streamlabs OBS!
Step 2: Install The Application

To setup OBS Studio on your Mac, locate the downloaded DMG file and double click it to extract the files. The downloaded file should be named something similar to obs-mac-27.0.1dmg, with slightly different numbers depending on the version.
Your mac will start performing some processes and then open up a new finder window with the OBS application and your applications folder in view. Simply drag the OBS application over to the Applications folder and it will install itself.

Once done, you can click on your launchpad in your toolbar (the icon has lots of small colorful squares inside) and you will see OBS has been installed as planned and is ready to start!
In theory, you are all set up and ready to use OBS for streaming or recording. But we have a few more tips for you below.
Step 3 (Optional): Select the Recommended Settings on Mac
For each of these subheadings, see the sub menus in the OBS ‘settings’ window.
Although the specific OBS studio settings will differ from user to user, there are a few default settings you need to be aware of to correctly setup obs studio on Mac.
Output

Your output settings are going to determine the quality of your video files. For streaming, make sure your bitrate is around 4500. This value is suitable for most internet speeds and streaming platforms.
Set your encoder to Software x264 (On Mac, there should ONLY be this option available!
The audio bitrate can be set to 128. Any higher than this and you won’t notice any difference but it will take up more bandwidth and CPU.
For recording, your ‘Recording Quality’ will be set to Same As Stream by default. Switch this to high quality and set your format to MP4. MP4 files are widely recognized as the most flexible and supported format to work with on both PC and Mac.
If you’re using OBS Studio to record video files and save them locally, it’s not uncommon to be confused about where those files get saved to.
To choose your own file path, click Settings in the bottom right-hand corner and go to the ‘Output’ tab.

There you will see the ‘recording path’ setting. Click browse and choose the folder on your system where you would like to save all of your OBS recordings. We’d recommend your default video location on your mac or creating a new folder called ‘OBS Recordings’ so you don’t get confused in the future!
Video
If you’re trying to stream at a higher resolution than your native desktop resolution, you’re going to have a bad time.
Most monitors and Macs these days run at 1920×1080. If you try to then record in 4k, your output file is going to be extremely blurry and pixelated.
Make sure your output resolution either matches or is lower than your native resolution. For example, if your native resolution is 1920×1080, select the same or 1280x720p for a downscaled version.

Your aspect ratio should also match. If they do not, your recording will appear stretched and distorted either horizontally or vertically.
Stream
For the smoothest streaming experience, if you’re using OBS to stream, it’s best to connect your account directly with OBS. What this means is that you are essentially logging into OBS with your streaming account in order to have a direct connection between your stream and your software.

To do this go to settings and to the ‘Stream’ tab. Choose your streaming platform of choice from the ‘service’ drop-down menu and click ‘Connect Account (recommended)’. This will open up your internet browser and ask you to log in using your stream account details.
Once done, you’re all hooked up and ready to stream.
FYI: Settings such as bitrate and resolution/fps settings depend entirely on your internet speed and connection. For faster and more stable connections, you may be able to increase these values. With slower internet, you’ll want to decrease them. Start out with these default settings and alter the values slightly if you experience issues during your streams!
Step 4: Change Mac Permissions to Allow Screen Capture
We’re going to go ahead and assume that at some point you are going to want to perform some sort of screen or window capture on your mac to show your viewers what you are doing on your screen in live-time.
Unlike using OBS Studio on PC, Mac requires you to specifically give permission to the application in order to capture on-screen action.
To allow OBS these permissions, simply add a new display capture source in OBS studio by pressing the ‘+’ button under sources and choosing ‘display capture’. When you do this, a prompt window will appear looking like this:

Go ahead and click ‘Open System Preferences’. This will take you to your privacy settings. You’ll see that the OBS Studio logo is on the right-hand side and is greyed out. We’re going to want to check that box to allow screen recording.

To do this, click the lock in the bottom left-hand corner and put in your security login details. This is in place to stop external software from accessing sensitive information on your system. Don’t worry, OBS Studio is completely safe and reputable!
Once you’ve unlocked the padlock, click the small box next to OBS to check it and you’re all set up for display capture!
If the prompt didn’t appear for you when adding a display capture, navigate to your system preferences and click ‘Privacy and Security to bring up the same menu.
In Conslusion
And that’s that! Now you know how to setup OBS Studio for Mac. Be sure not to remove permissions for OBS in your security settings at any point and you will be able to run it perfectly every time you open it up. Happy streaming and recording!
I can’ get the OBS icon to appear in the right panel of Privacy screen.