
OBS is filled with complicated settings. Opening the settings menu can sometimes be overwhelming, but that long list of checkboxes and drop-down menus can exponentially improve your experience with the software. Knowing how to enable NVENC on OBS Studio is a valuable tool in your arsenal for many reasons.
We will take you through NVENC encoding step by step, including why it’s important, how it affects streaming and what you can do to turn it on or find an alternative. Strap yourself in. The world of encoding is right at your fingertips!
What Is Hardware Encoding?

Hardware encoding is a term that you will see dotted around computers in general, not only in OBS Studio. Usually, users will turn a blind eye to encoding settings because they seem complicated, but knowing exactly what that setting does can improve the user experience.
Essentially, hardware encoding refers to the processing of data on your system. In this case, particular data must be encoded by a specific hardware part of your computer, usually your processor or graphics card. This is because the encoding of that information is an intensive process, and the software alone does not have the memory requirements to perform the action.
For example, say you are rendering a video in Premiere Pro. Rendering video takes up a lot of CPU, and for some older systems, it might be too much and cause a crash. What if you could share the load of the rendering across your system and send the rendering process to your GPU instead of your CPU? Your CPU is already handling standard system processes plus other open applications, so sending the rendering encoding to your GPU will free up a lot of space on your CPU. This is what hardware encoding allows you to do.
What Is Hardware Encoding In OBS Studio?
OBS Studio is a tool for streaming and recording, but it cannot perform everything by itself. It relies on the hardware of your system to receive and manipulate the data from your video sources.
In the OBS Studio settings, you can choose which part of your computer will be responsible for processing this information and take the brunt of the load. Doing so can help free up RAM and CPU space and keep your streams looking professional and visually reliable.
Why It’s Important To Enable The Right Encoder
Picking the right encoder for OBS Studio depends entirely on you and what you use your system for.
First up, you’ll want to do some system checks and find out what you are working with. We suggest using HWInfo, a free and simple system benchmark program. With this, you’ll be able to see what parts of your system stand out from the rest. Be sure to check to see the quality of your CPU and GPU parts and make a note of which is higher quality.
If you regularly use background applications such as music players or download clients, they are most likely using your CPU to perform their operations. This will mean your CPU is taking a heavy load, and you should set your OBS encoder to your GPU instead.
Alternatively, if you are recording gameplay of a AAA game like CyberPunk or Elden Ring, your game will be using up the majority of your GPUs RAM. In this case, you should use your CPU as your OBS encoder.
A Bad Encoder Equals Bad Streams
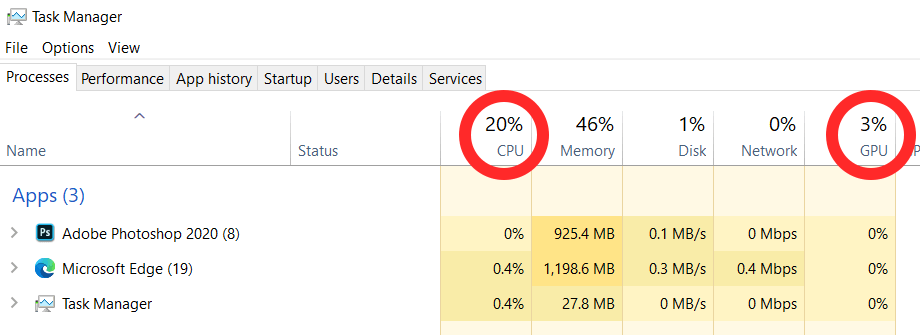
Picking the wrong encoder will result in choppy, laggy, and crashing streams. When your encoder overloads, it becomes impossible for your system to process the video and audio data, so your stream will just stop! You can check the status of your CPU and GPU load during your OBS session by going to your Task Manager or downloading a system monitor software such as GPU-Z. If your CPU or GPU percentages are persistently above 95% or even maxing out at 100%, it is overloaded, and the encoding needs to be done elsewhere.
The best way of choosing the best encoder for you and your streams is through trial and error. Hopefully, you are reading this at the start of your streaming journey. If so, you can go live and end streams without notifying any viewers and test each encoder as you go. If you are already a streamer with a large fan base, go live through a dashboard such as YouTube studio so you can test the new elements without going public.
Keep an eye out for lag, dropped frames, audio cut-outs, and screen tearing. These are all indicative of encoder issues.
What Are The Encoder Options In OBS Studio?
OBS Studio features a few main encoder options depending on your device’s OS and age. Below is a list of just a few of the encoders you might be able to choose from:
- x264 – The x264 encoder is built into your computer’s CPU (Central Processing Unit) and is the most popular choice for streamers of basic content. It handles all of the data encoding and communication locally, through your computer’s processor, and bears all of the load by itself. In recent years, CPUs have become powerful enough to easily handle real-time video encoding, but if you have other applications open at the same time it might cause lag and dropped frames.
- NVENC – This encoder is the built-in encoder in your GPU/graphics card which works with both NVIDIA and AMD products. It puts the encoding load onto this external card and removes the processes from your CPU, freeing up space for other applications to run smoothly.
- NVENC (New) – This NVENC encoder is essentially identical to the standard NVENC, but it relies solely on the RAM from your GPU for memory. If you have a graphics card with low memory, you might want to stay away from using this encoder.
- Apple VT H264 – If you own an Apple product, this is the in-built video encoder for the Apple GPU. Although it appears in the list, it’s better to use x264 in 99% of cases! It’s far more reliable and powerful than its GPU counterpart.
- Hardware QSV – This is an encoder that comes with some newer Intel and NVIDIA systems. It’s incredibly fast and reliable but produces huge file sizes. Only use this encoder if you plan on streaming at a very high bitrate or recording very high-resolution videos.
How To Enable NVENC On OBS Studio
Enabling the NVENC encoder on OBS Studio is simple:
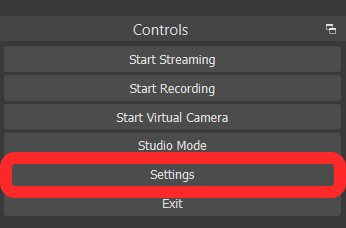
- Go to your OBS Studio settings by clicking settings in the control dock. You can also get to your settings by clicking the file tab and then settings in the dropdown menu that appears.

- Once in the settings menu, click the output tab on the left-hand side.
- You will now see a sub-menu on the right-hand side named streaming. Two settings down you will see the dropdown menu for the encoder settings. Click on it and select Hardware NVENC as your encoder.
Your OBS Studio application will now use the NVENC encoder to encode your video and audio data, redirecting it through your GPU rather than your CPU. You now know how to enable NVENC on OBS Studio.
In Conclusion
Having a good foundation of how encoders work on your system is critical to keeping your stream quality high. Knowing how to enable NVENC on OBS Studio is part of that process.
By taking in all of the information above, you should now understand why certain encoders are better than others in specific situations.
Streaming using a CPU-based encoder is excellent for those who don’t require many apps running in the background. Use your GPU-based encoders for instances where your CPU is too loaded and causing glitching and lag.
Are you still having problems with your streams? Check how to fix encoding overloading issues right now!