

OBS Studio is one of the most popular streaming software for one very precise reason; customizability. Due to its open-source nature has an extremely long list of plugin possibilities, and new downloadable features are released online almost daily.
Inevitably with such incredible flexibility comes bugs and issues. Fortunately, these problems in OBS can all be resolved by making sure you have the correct internal and external settings.
One of the most reported issues in OBS Studio is the OBS Encoding Overloaded warning.

If you do see this at the bottom of your screen, don’t panic! There are many ways to try to resolve this and get back to a smooth streaming experience. Unfortunately, the OBS wiki can be pretty vague about this issue, so we made this tutorial to help you out!
You can fix the OBS encoding overloaded issue by changing the settings in OBS and your computer with the 10 following methods:
OBS settings:
- Downscale your output resolution
- Lower your frames per second
- Change your default encoder
- Change your encoder speed
Computer settings:
- Reduce unused CPU usage by closing unused applications
- Turn off Game Mode
- Change process priorities
- Free disk space
- Check your system for updates
- Upgrade your hardware
Optimize Your OBS Settings To Reduce Encoding Stress
This warning message means that your chosen encoder is struggling to process the amount of information being sent its way from OBS studio. In very basic terms, this means we need to reduce the amount of data being sent.
The first way you’ll want to try and fix this issue is by making some changes inside the OBS Studio application itself. Head over to the settings menu in the bottom right-hand corner of your application under the “Controls” dock to try the following changes:
From our OBS Mastery Course – Check out the whole 7-hour video course on our YouTube channel.
1. Downscale Your Output Resolution
In the “Video” tab of your OBS settings, you’ll find your resolution settings. Your Base resolution should be set to your native display resolution, and usually, your Output resolution will match that.
However, if you are having encoding issues, it might be better to downscale your resolution. This means having an Output resolution smaller than your Base resolution. In simple terms, your stream will have the same aspect ratio but slightly less pixel quality.
Usually, this means setting your Output resolution to 1280x720p. Whatever you choose to downscale to, ensure your aspect ratio stays the same (seen to the right-hand side of the setting); otherwise, your stream will appear stretched and distorted.

2. Lower Your Frames Per Second
Your stream is uploaded to your streaming platform as a video file, but that video file is made up of hundreds of thousands of individual images. The more images uploaded per second, the smoother your stream appears. This can be measured in FPS or frames per second.
The more FPS you stream in, the more stress on your encoder. Try lowering this value incrementally to try and avoid your overloading issues. If it’s set to 120, try 60 and then 30. Any lower than 30FPS and your stream will be unwatchable.
3. Change Your Default Encoder

For most systems, there are two Encoder options; Software (x264) and Hardware (NVENC). Any encoder prefixed with Software utilizes your CPU to process all streaming information, whereas any prefixed with hardware uses your Graphics Card. If you’re experiencing encoding overload, try the second unused option here to reduce stress on the original encoder.
4. Change Your Encoder Speed
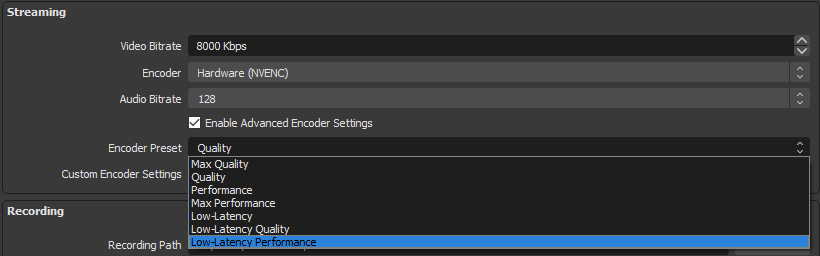
In the “Output” tab of your settings menu, you’ll find your Streaming encoder settings. Your Encoder Preset determines the speed at which your encoder processes information and sends it out to your chosen platform. The faster the preset, the less CPU the encoder will use, but the more pixelated your stream will look.
Try reducing the preset quality one by one, going down the list until your overloading warnings disappear.
Optimize Your System Settings To Reduce Encoding Stress
On top of the above fixes, you might want to address a few things outside of OBS Studio to reduce encoder load.
5. Reduce CPU Usage By Closing Unused Applications
Any applications running while streaming that aren’t vital to your content use up vital CPU processing power. Some apps even use up to 30% of your total available capacity, including popular internet browsers and media players.
Put simply, if you’re not using it during your stream, close it down!
6. Turn Off Game Mode
Some PCs allow you to turn on “Game Mode,” which automatically turns off needed applications in the background and redirects resources to give you the best gaming experience possible.
But this is not ideal if you want to game and stream simultaneously, as this can hurt OBS running in the background. Luckily, this is a straightforward fix.
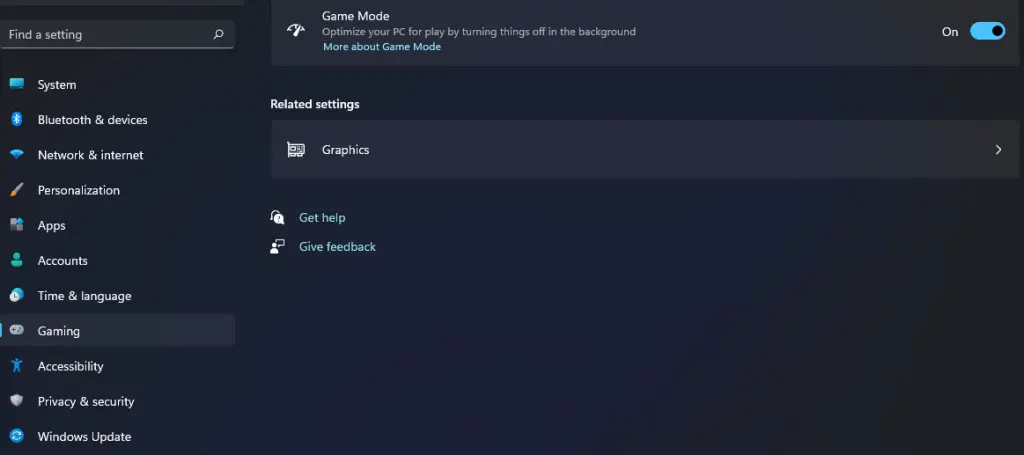
To turn it off, go to “Settings” and then search for “Game Mode” in the search box.
Once you are in the “Game Mode” menu, turn it “Off.”
7. Change Process Priorites
Your CPU only has so much power it can distribute among all processes. This is why it is running on a priority-based system. It can be that OBS has fallen into a low priority, not giving it enough recourses to function smoothly.
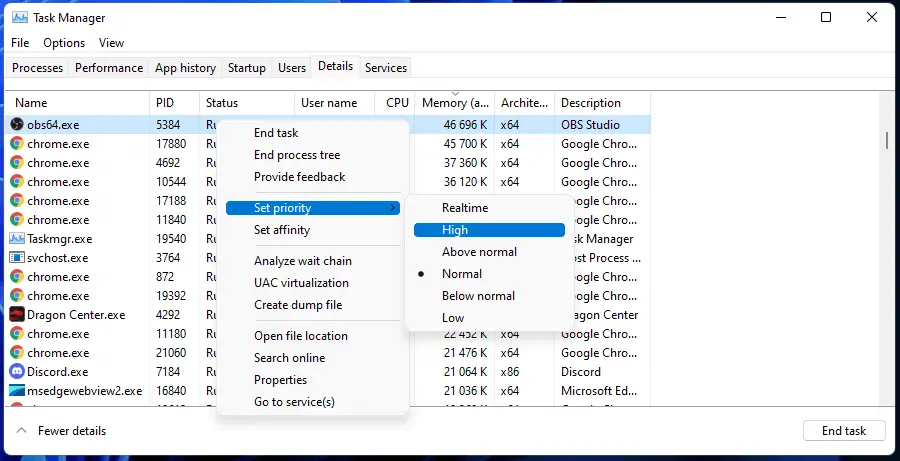
To change this, go to “Task Manager” and select the tab “Details.” There, a list of running processes will appear.
By right-clicking on a process, you will see the option to change its priority. Make sure OBS is set to high priority (maybe not a priority over a game you want to stream).
8. Free Disk Space
OBS does not just use RAM but also local storage on your computer to write temporary output and configuration files. While not likely, freeing up space on your hard drive can cause the fixed encoding overloaded issue in OBS.
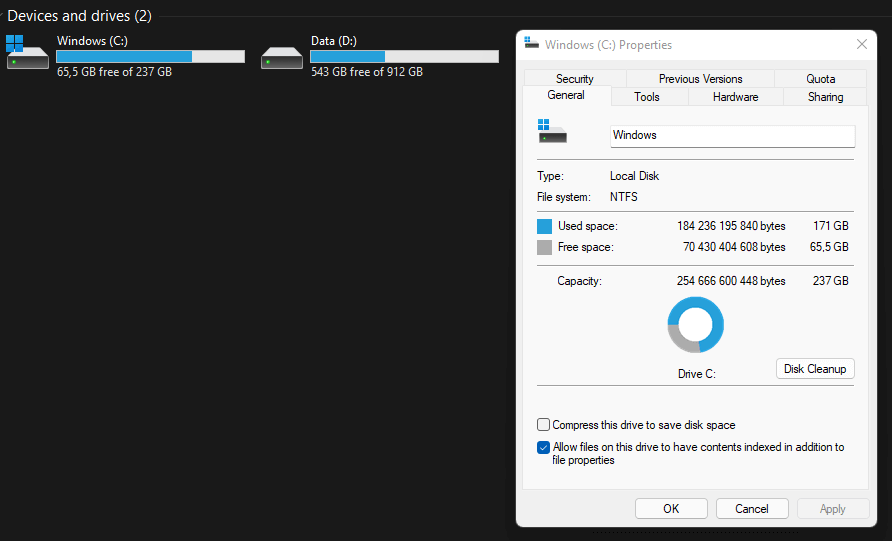
This should only apply if you are really low on storage. But to do this, you must free up space by removing unused Software and files.
9. Check Your System For Updates
Using outdated OS software can be detrimental to your system’s health but also application performance. When an OS updates Software, developers change their applications to ensure they are working best with the newest OS version.
If you’re behind on your OS updates, you might also be behind in software performance! You can check your Windows device for updates by going to Update & Security and a Mac device by going to Software Update.
10. Upgrade Your Hardware
If you have tried everything above and you still run into the OBS encoding overloaded issue, the fix might be to upgrade your hardware. Gaming while using a recording software like OBS Studio requires a lot of resources from your computer. And no method can help you above if you don’t have good enough hardware.
So what are the recommended requirements for running OBS Studio? Well, there are the basic ones straight from the OBS wiki:
- Windows: DirectX 10.1 compatible GPU, Windows 8 or later.
- MacOS: Intel CPU, OpenGL 3.3 compatible GPU, macOS High Sierra (10.13) or later.
- Linux/Unix: OpenGL 3.3 compatible GPU, X window system.
But in addition to that, you can add the following recommendations if you are planning to record gaming:
- A dual or 4-core, AMD FX series or Intel i5 2000-series processor.
- Preferably 8 GB of RAM or higher
In Conclusion
A single fix from the above list or even a combination of a few should be enough to fix the OBS encoding overloaded warning at the bottom of your screen and get you back on course with uninterrupted and smooth streams! For more OBS fixes and streaming tips, check our other articles.