
Customization is one of the main reasons why many creators use Twitch. It brings a level of relatability to a channel that viewers find fun and engaging. Learning how to add a sub badge on Twitch is one of the many things you should know to help your channel rise above the rest. Read on to find out exactly what sub badges are and how to add them on Twitch!
What Is A Sub Badge On Twitch?
Subscribers are viewers that choose to sign-up for a paid membership on your channel. They pay a monthly fee in return for increased recognition and privileges in chat.
When a subscriber signs up, they automatically receive a sub badge. This badge is a small icon next to their name in chat.
Sub badges change automatically the longer the viewer stays a subscriber. They usually get more colorful and extravagant the longer the viewer has been subscribed. This helps them stand out more in chat and elevates their status above standard viewers.
Account Requirements For Sub Badges
Sub badges are not immediately available to Twitch creators. They can only be accessed once a streamer has achieved affiliate or partner status.
The most accessible of these two levels is the affiliate level. To become an affiliate, you need to meet the following requirements:
- A minimum of 500 minutes broadcast in the last 30 days
- 7 unique streams in the last 30 days
- An average of 3 concurrent viewers or more
- At least 50 Twitch followers
You can find out more about Twitch affiliate and partner requirements here!
Uploading Sub Badges On Twitch
Although they are a fan favorite, sub badges need to be uploaded manually by the channel owner. There aren’t any default badges that immediately appear when you unlock the feature.
Below you’ll find everything you need to know about sub badges, including how to find the menu, where to upload your images, and even how to design your own!
Find Your Creator Dashboard
You can access all of your channel settings through your creator dashboard. Every Twitch channel owner has access to a dashboard where they can edit all of their channel settings, including sub badges.
To access the creator dashboard, follow these steps:
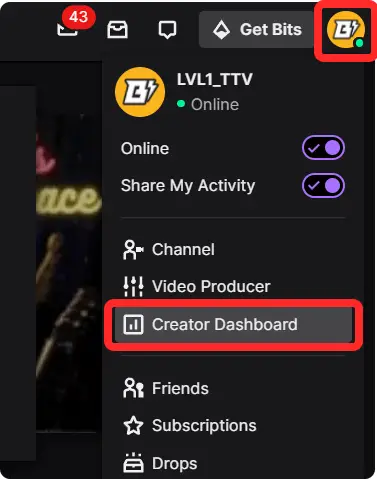
- Go to Twitch.tv
- Log in to your Twitch account
- Click the profile picture in the top right-hand corner of your screen
- Select creator dashboard in the drop-down menu that appears
Clicking this will take you to a whole new page where you can access all of your creator dashboard settings.
Locate Affiliate or Partner Settings
As previously mentioned, you need to be a Twitch affiliate or partner to see the sub badge settings. If you don’t qualify for either of these two account types, you’ll need to grow your channel a bit more!
Once you qualify and register for one of these titles, you will see an affiliate or partner settings menu under the settings tab on the left-hand side of your creator dashboard.
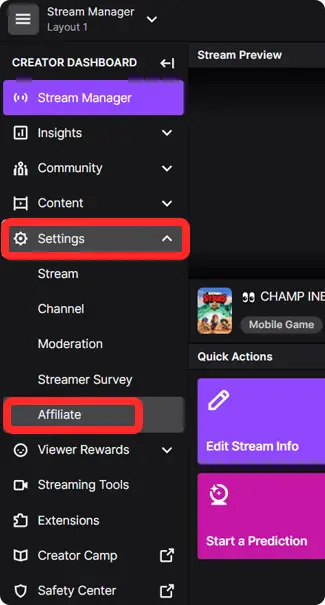
The above example shows what it looks like to affiliate members. Partners will see the same except the word affiliate replaced by the word partner.
Top tip: You cannot access your affiliate or partner settings from the official account settings tab on Twitch. You must go to your creator dashboard first.
Understand The Sub Badges Page
The sub badges page is where you upload and edit each of your custom badges. There are different sections on the page, each serving a different purpose.
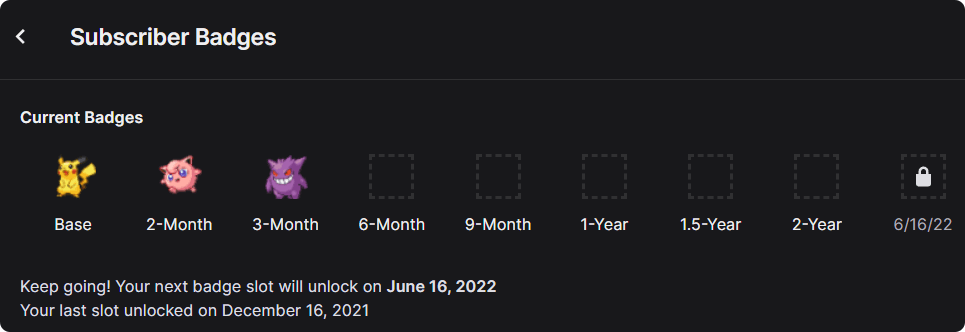
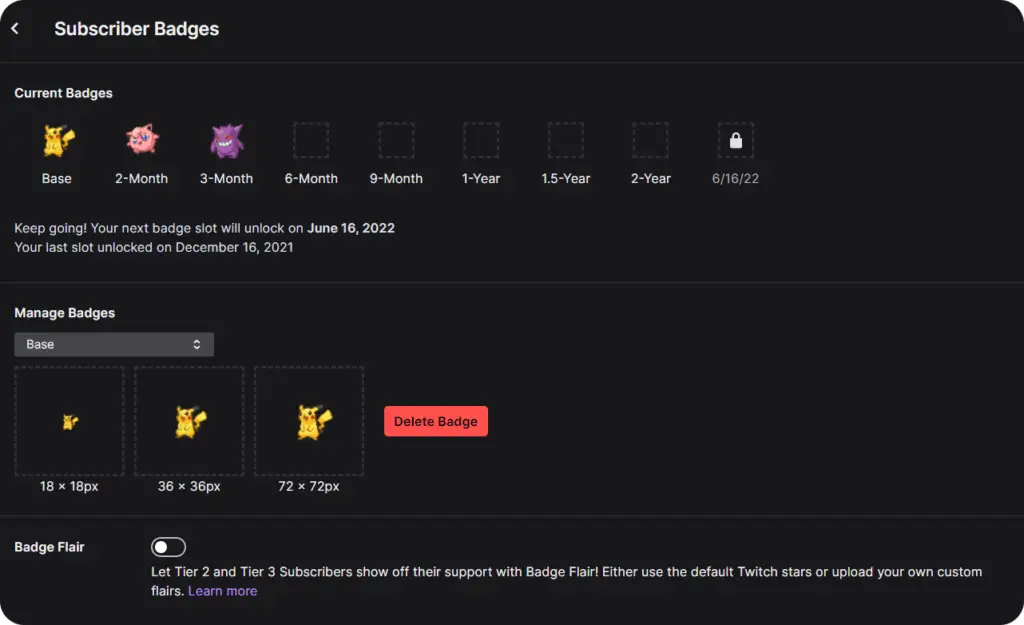
At the top of the page, you’ll see the current badges line. This section displays the badges you have previously uploaded and the available empty slots for new designs.
Each slot is assigned a subscription length. This denotes how long a viewer must subscribe to unlock that specific emote. In the example above, viewers will unlock the yellow Pikachu badge as soon as they subscribe to the channel. After 2 months, they will unlock the pink Jigglypuff, and after 3 months, they will unlock the purple Gengar.
Twitch affiliates start with 1 year’s worth of badge slots available, broken down into these durations:
- Base
- 2 months
- 3 months
- 6 months
- 9 months
- 1 year
Every 6 months, Twitch adds a further slot to your available badges. In the example above, the channel has been active for a year after receiving affiliate status and so has two extra slots.
Add And Manage Sub Badges
The second area on the page is where you upload and edit individual badges.
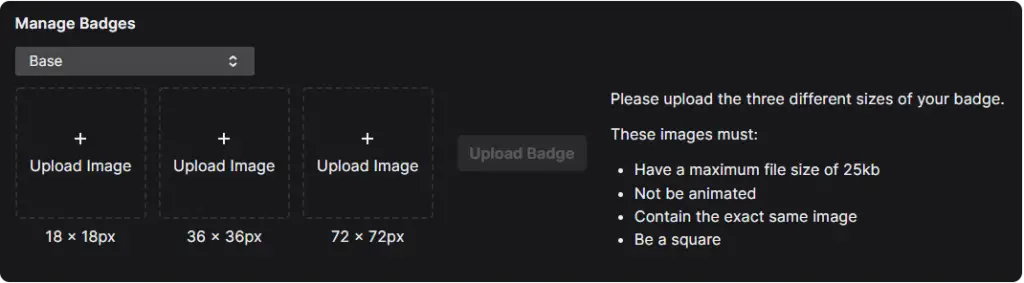
Immediately you can see three boxes where you can upload three images. Each image should be a different size of the same icon. These are used in different locations on Twitch.
The three badge sizes are 18×18 pixels, 36×36 pixels, and 72×72 pixels. They can be a maximum file size of 25kb and cannot be animated. If you try to upload an image outside these specifications, Twitch will reject it and ask you to resize or edit it.
If you have a badge ready but need to resize it, we recommend using a free image editor such as GIMP or Pixlr.
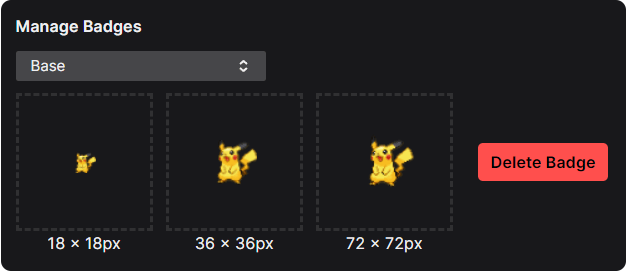
In the example above, we uploaded three icons of the same image but in different sizes. They were accepted and are now ready to be used as the base badge selection. But what about the other badges for longer subscriptions?
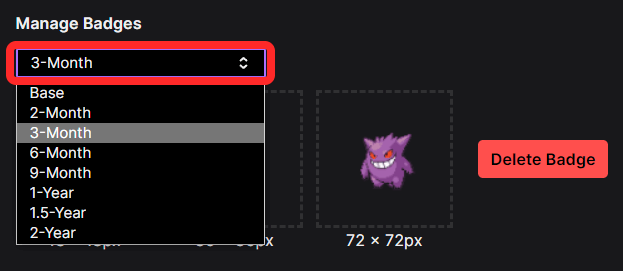
If you click on the drop-down menu where it says base, you will see a list of the available subscription lengths. Clicking on one of them will bring up three more empty image boxes where you can upload an image for that length of membership. After uploading all three sizes, the badge will appear in the current badges line at the top of the sub badges settings page.
Finding And Designing Sub Badges
Depending on the software available to you and your skill sets, you’ll need to either find suitable badges on the internet or create some yourself. There are quite a few ways of doing both relatively easily.
Find Sub Badges For Twitch
Sub badges are essentially just image files. It’s easy to find pictures on the internet these days, but it’s important to make sure you have the right to use them. Here are a few sites where you can find copyright-free images and icons to use as your sub badges. Keep in mind you might need to resize them using an image editor:
- Flat Icon – A huge online library of copyright free icons. Most are transparent and already sized down to small resolutions making them perfect for Twitch badges.
- Creative Commons – The largest collection of copyright-free shared images. CC offers a wide variety of free graphics, but isn’t limited to only small icons.
- Fiverr – Fiverr is an online directory of freelancers with skills ranging from technical support to personal assistant. There’s also a huge selection of graphic designers on the platform specialising in Twitch graphics. Search ‘Twitch Badges’ in the search bar to find a list of suitable freelancers.
- OWN3D – OWN3D is a solid go-to for stream widgets and graphics. Their sub badges aren’t unique and can be expensive but they do look fantastic when uploaded to Twitch. Their resolutions are perfectly optimized and the graphics are high-end.
Create Sub Badges For Twitch
You don’t need to be a Photoshop expert to make your badges for Twitch. Plenty of online editors and solutions make creating badges quick and easy. Here are a few of your options:
- OWN3D Badge Creator – Unlike the pre-designed badges for sale, the Badge Creator let’s you create your own badges by using a user-friendly web bases software. Take stock images and icons and layer them on top of each other to create a set of unique badges.
- EmotesCreator – A very similar and cheaper option to the OWN3D creator, EmotesCreator is another fantastic web based creation service.
- Canva – If you have a little bit of experience in graphic design but don’t want to spend a lot of time on your badges, Canva is your answer. With an in-built library of copyright-free icons, Canva helps you create simple but effective images.
- Photoshop – If you have the expertise and the software, Photoshop is the way forward for any graphic design. It gives you the freedom to create and edit all aspects of an image and has hundreds of features to create immersive effects.
In Conclusion
Uploading an attractive set of sub badges not only encourages engagement but can be a huge financial boost to your channel. Well-designed badges give regular viewers an incentive to sign-up for membership programs and continue to give you monetary support.
The process is simple to navigate and set up, while getting badges is also easy via free and cheap online solutions. Get yourself some engaging badges uploaded to your Twitch today and watch your engagement analytics soar!