
Streamers always look for a leg up on the competition by adding complex overlays and plugins to their streams. Still, it’s super important to have the basics together first, like high-quality stream audio.
As a streamer, there are many ways to capture your audience’s attention and excite them about your content. A good microphone and sound quality are CRUCIAL in keeping viewers around for the remainder of your stream. Any grainy, muted, or noise-dominated audio can damage your viewer retention.
Luckily enough, Streamlabs OBS has a decent catalog of audio filters that you can add to your sources to make you sound like an absolute pro. Whether your dog won’t stop barking in the other room or your desktop fan can be heard from a mile away, these filters can help you eradicate your sound issues!
Here are the 5 best audio filters for Streamlabs OBS:
- 1. Noise Suppression
- 2. Noise Gate
- 3. Compressor
- 4. Limiter
- 5. Gain
From our OBS Mastery Course – Check out the whole 7-hour video course on our YouTube channel.
How to Add Audio Filters in Streamlabs OBS
Before we get into the filters, let’s take a quick look at how to enable them.
For the sake of this article, let’s say you’re adding all of your filters to the same audio source (most commonly, your microphone source). In the bottom right corner of SLOBS, you’ll see your mixer. Find the line in the mixer, your microphone audio source, and click the ‘cog’ settings button at the end of the line.

When a menu pops up, click on ‘Filters’. A window will open called ‘Source filters’, and you should see a + button on the left-hand side.
Click that, and the list of filters will open up. You’re now ready to apply a filter to your microphone to make it sound pro!

You’re all set! Let’s start adding some filters!
Top 5 Audio Filters for Streamlabs OBS
1. Noise Suppression
Unless you’re recording in a professional audio studio, chances are you have some form of background noise being picked up by your mic. It even sounds that seem unintrusive to you, like GPU fans, children playing outside, or even typing on your keyboard, can be SUPER sensitive to your microphone!
Luckily enough, the noise suppression filter helps remove the majority of your background noise. The great news is, it is effortless to set up too.
Once you’ve selected the filter, you’ll see a drop-down menu with two options; Speex or RNNoise.

The difference between the two is slight but can make a huge difference. Although Speex says it uses a lower amount of CPU usage, it is still the most reliable of the two suppressors, with RNNoise bugging out fairly regularly.
Choose Speex and set the suppression level somewhere between -40 and -25. This will differ depending on your microphone, but you can monitor your audio (see the previous article ‘Best Streamlabs OBS Audio Tips & Settings’ for how to do this) and listen in real-time to see what suppression level sounds best.
Be careful not to set the suppression level too high, or it will begin to cut out your vocals!
TL;DR: A noise suppressor can cut out background noise very effectively. Use the Speex suppressor for best results!
2. Noise Gate
If noise suppression doesn’t entirely solve your background noise issues, then a noise gate filter might be your answer!
Noise gate provides a pretty straightforward service; any noises under or over a certain decibel level will not be received by your microphone. This is a handy filter if you have a constant, quiet background noise that you want to get rid of or if you breathe fairly heavily down your sensitive mic!

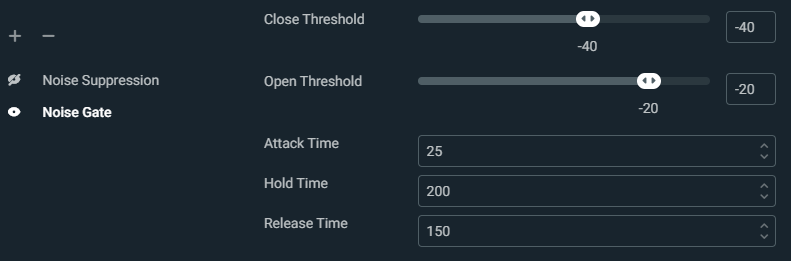
Once you apply your noise gate filter, there will be a long menu of complicated settings. Let’s go through these ones by one and analyze what they individually bring to your noise gate:
Close Threshold: This is the decibel level at which your microphone will effectively ‘close’ or turn off.
Open Threshold: This is the decibel level at which our microphone will ‘open’ or turn on.
Attack Time: This is how long it will take once the ‘open’ level is detected for your mic to turn on.
Hold Time: This is how long your mic will wait for more sound before it cuts off.
Release Time: This is how long your mic will fade out for once it detects no audio above the ‘Close Threshold.’
In most circumstances, you should set your close and open thresholds to 40 and 20, respectively, but this, as any of these audio filters in Streamlabs OBS, depends on your microphone settings. The below settings will provide you with a high-quality gate output but will probably need to be slightly altered for your own audio source!
TL;DR: Noise gate will silence sounds below or above a certain level. Use the above settings for a standard result!
3. Compressor
Have you ever wondered how radio presenters have such a smooth, deep vocal? It’s all down to their compression settings. They sound like they’re wrapped up in a blanket and are speaking directly into your eardrums! Welcome to the world of compression!
A compressor basically limits the dynamic range of your audio input. If you have really loud ‘louds’ and extremely quiet ‘quiets’, a compressor balances all of these out to a similar level to make it sound smoother to the viewer.
In terms of specific settings, compression settings can vary considerably. However, the settings below should provide you with a clearer, slightly “bassier” sound.
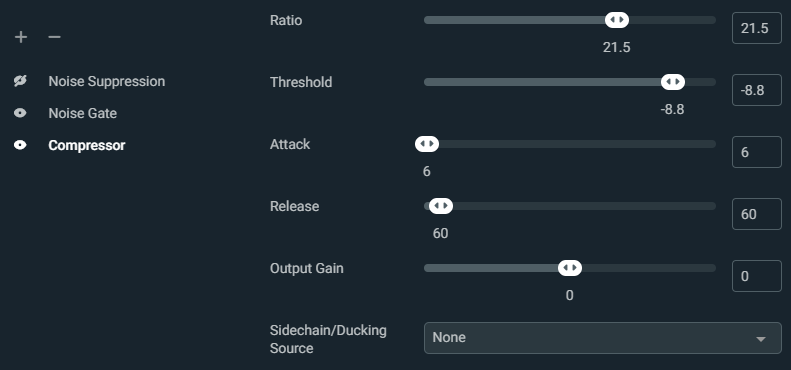
Your compression ‘Ratio’ is the amount of compression to add to the audio above the threshold. Typically you want to keep this as high as possible.
The ‘Threshold’ is the decibel level at which to apply compression. -10 to -5 is usually a good range for this value.
‘Attack’ and ‘Release’ are how quickly or slowly your compressor activates once it detects audio input. Leaving these at the default values is generally a good idea but of course, make sure to listen back to your microphone after applying the compressor to confirm it sounds okay!
It’s not uncommon for compression to reduce the volume of your audio source, so you might want to add 1 or 2 decibels of ‘Output Gain’ to your compressor to keep the volume stable!
TL;DR: Compression makes you sound like a radio DJ! Use the above values to make your audio sound deeper and to normalize the dynamic values.
4. Limiter
The limiter filter is exactly what it says on the tin; it limits the volume of audio allowed to pass through to your stream.
Applying a limiter is fantastic if you tend to shout or scream at headshots or open goal misses during your stream! It will allow your normal voice to pass through as usual, but as soon as the decibels pass a certain maximum level, it will equalize the volume to break your viewers’ headsets!
Regarding the second setting, ‘Release,’ you will want to run this as close to 0 as possible. Your release value determines how long your sound will be limited. If you’ve followed our advice and are streaming in a room with no echo or reverb, then a value of 0-5 would definitely do the job!
A limiter value at around -8 is considered an industry standard to avoid scream clipping. You might want to set it even lower, but if you do, you may also want to add the next filter.
TL;DR: A Limiter will stop your really loud sounds from passing through at a high volume!
5. Gain
Gain is probably among the simplest audio filters in Streamlabs OBS. Put simply, it controls the volume of the audio source. Increase the gain, and your audio will be louder than its raw value. Decrease the gain, and it will be quieter.
A vital factor to note is that if you have any background noise, increasing the gain will boost the audio issues you already have. You should address sound quality issues before changing the gain value on your microphone source!
An alternative to adding or decreasing gain would be to just use the ‘slider’ in your mixer section of Streamlabs OBS, particularly if you are reducing the volume of your microphone input! You can see how much you are adjusting the volume by keeping an eye on the live decibel level in the top right-hand corner of the mixer.

TL;DR: Gain controls the volume of your input. Be careful not to increase gain before sorting out your other audio issues!
In Conclusion
Streamlabs tips and tricks are always valuable but having a good knowledge of how audio filters can improve your sound is priceless! We also have another article on more about audio settings and optimization in SLOBS you can check out here.
Putting together a combination of correctly optimized audio filters in Streamlabs OBS can drastically increase the quality of your microphone and provide your viewer with a professional sounding stream!