
Understanding lighting is essential to be a successful cinematographer. And there is one standard film lighting setup, known as a three-point lighting system, that is the groundwork for everything else.
If you understand the mechanics of how this setup works, you know how to light a scene. Therefore, it is imperative knowledge for every filmmaker to possess.
There are many creative takes and experimental approaches to using this lighting setup that we will cover later. But at first, we need to understand:
What is a three-point lighting system anyways? And how can you use it for your next project?
What is a Three-Point Lighting System?
A three-point lighting setup is a conventional way to light a subject in film production, video making, and still photography.
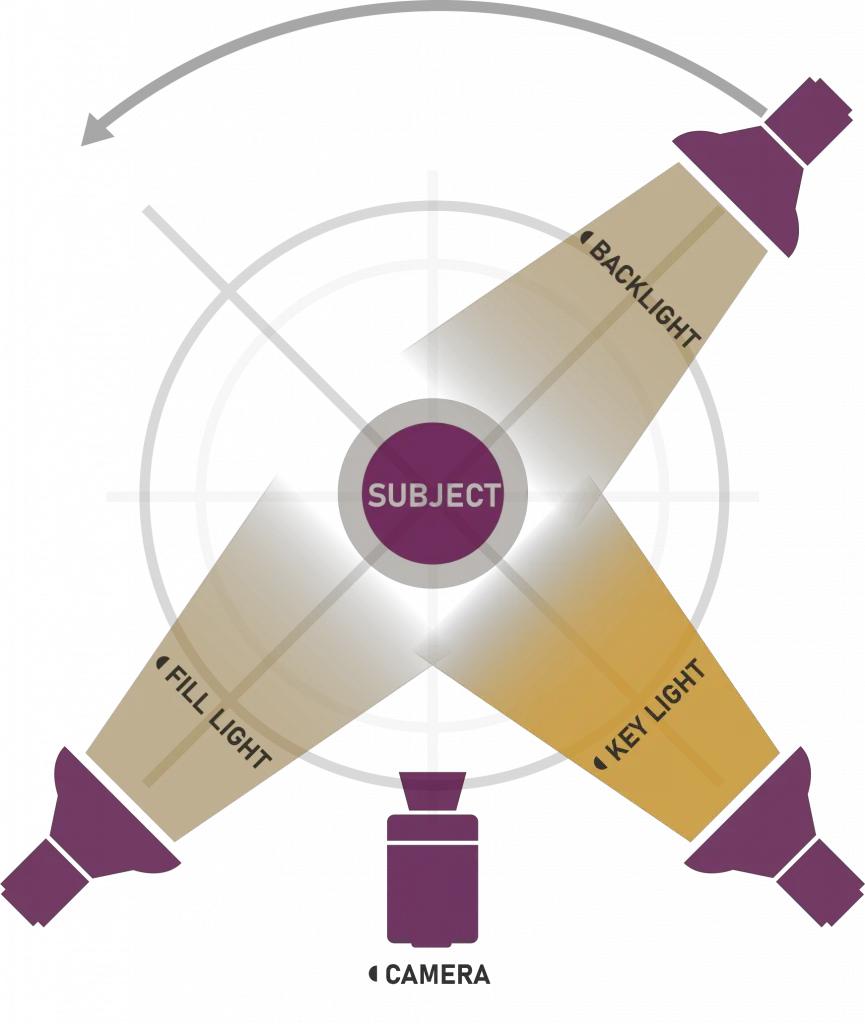
We call this setup a three-point lighting system because it uses three light sources placed in different positions. You can manipulate the size of the light source, the distance of lights, intensity, position, and angles, to create different atmospheres and moods.
The three light sources used in the three-point lighting system are the: “Key light,” “fill light” and “back light.”
The key light is your primary source of lighting directed at your subject.
The fill light is a less powerful light to eliminate unwanted shadows that the key light creates, softening your image.
The back light is added to light the back of your frame, to separate your subject from the background.
Now, we are going to go over each one of the light sources in detail.
Key Light
As we mentioned before, the key light is the primary source for lighting your subject.
This light is usually the strongest and has the most influence on the scene’s look; this is the light source that gives your scene the look, feel, and atmosphere you want as a filmmaker.
The key light is usually placed 45 degrees away from the camera. However, there is no right or wrong way to about it as with everything in the film.
Another important rule to consider is never to put your key light too close to the camera. This can make your shot too basic, flat, and without any dynamicity. The position of your key light to the camera is vital, as every angle creates different tones and atmospheres to the final result.
Once you understand where and how to place your key light, you can start thinking about where to put your fill light and back light.
Fill Light
The fill light is your secondary source of light. The reason why it is called fill is that it fills the shadows cast by the key light. Thus, you should place the fill light on the opposite side of your key.
Fill lights are usually softer and less intense than your key lights. To achieve this, you can either use a diffuser, move them away, or use less harsh light. The fill light is often used as a floodlight, which kills off the shadows but floods the entire scene with the light.
Since the main task of the fill light is to soften the shadows created by the key, it mustn’t stand out and create its own. The intensity of the fill light is expressed by the “fill light ratio,” also known as the “key to filling ratio.” For example, a ratio of 1:2 means that the key light is twice as bright as the fill light.
The closer the fill light is to the camera, the fewer shadows it creates. Fill light is easy to recreate even if you don’t have an extra light source. Just place a reflector on ¾ in front of the key light. The light flux will hit the reflector and end up on the subject.
Back Light
Back Lights, also known as Head Lights, are usually placed at the back of your subject and light it from the rear.
In many cases, practical lights (lights used as props and set pieces in the mise-en-scene) and their purpose are to provide definition and subtle highlights around the subject’s outlines. Back lights separate the subject from the background and give a three-dimensional look to your scene.
In addition, you can use a back light to create silhouettes and shadows. If you would like to make a silhouette for your subject, it is enough to turn on the back light and kill the key and fill lights.
If the background light is placed directly behind the actor at such an angle that some light hits his face, this background light is called a “kicker.”
Working With Natural Light
But how do you approach a three-point lighting system using natural light?
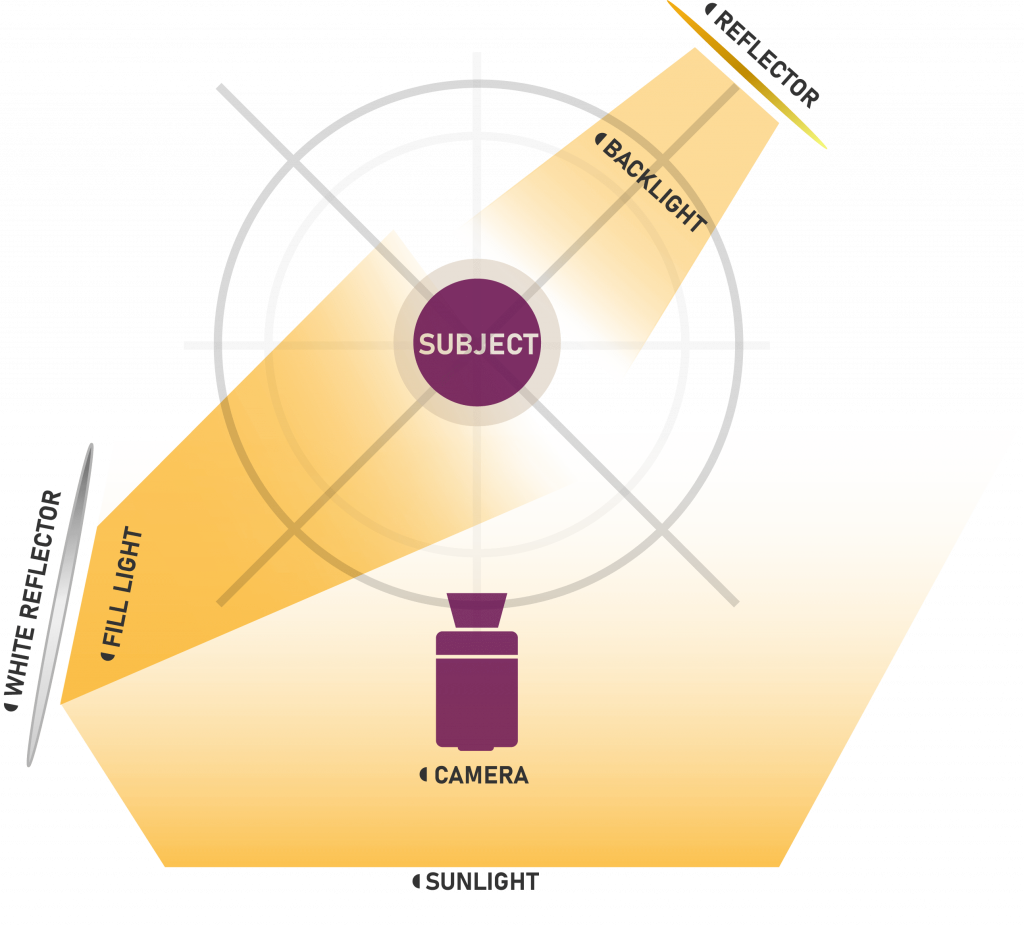
Working with natural light is both a blessing and a curse. On the one hand, it is the most available and most substantial light source there is.
However, working with natural light can create unwanted results; it can cast unnecessary shadows, spill your image with highlights, and as the sun (and therefore the direction of the light) moves throughout the day, it can ruin your continuity! But if you know how to approach natural light for your shooting, you won’t encounter those issues.
You need to know two handy techniques to master a three-point lighting system with natural light: diffusing and bouncing.
Diffusing
There are multiple diffusion materials that you can use to soften your light and thus give it a nice spread over your mise-en-scene.
You can create diffusion with the use of silks, scrims, and diffusion paper. Place them on your key light, and its harshness is dispersed. These tools are usually rigged on separate stands that stand in the direction of your key light. Thus, when you work in natural light, placing a stand with a large silk frame against the sun will help you diffuse the light over your subject’s face.
Bouncing
Bouncing is a technique that you use when you want to bounce your key light back onto your subject as a fill light. This is usually achieved with the use of foam bounce boards, flags, or reflectors. You can either have some people hold the bounce board while the scene is being filmed, or you can rig it to a stand that will bounce the light back into your subject.
Interesting Use of Three-Point Lighting in Films
“The rules are made to be broken.” This saying also applies to the three-point lighting system.
Filmmakers attempt different lighting styles within the three-point lighting setup. Perhaps there is no other filmmaker like Martin Scorsese. He has tried to change the game rules and found his own ways of lighting the scenes for his unconventional storytelling.
We will take three of Martin Scorsese’s films and analyze exciting ways of using a three-point lighting system.
Practical Light as Key Light
In Scorsese’s GoodFellas, the practical light is used as a key light in many interior scenes. Practical light is the “real” light, part of the production design present in the mise-en-scene according to the script: household lamps, TVs, candles, police flashers, and so on. Practical light can often be found in classic Hollywood movies, as it helped establish a more realistic style and looked like an exciting piece of production design.
A common practice for such lighting is a dimming device. If that’s not your case and the set doesn’t have a dimmer, you can adjust the brightness by placing some colored gel around the bulb.
Unless you’re shooting with a Carl Zeiss Planar 50mm f/0.7 like for Stanley Kubrick’s Barry Lyndon, the brightness of the candles won’t be enough to illuminate the scene enough for a practical shutter speed.
The contrasting use of Three-Point Lighting and Low-Key Lighting
In Scorsese’s magnum opus Raging Bull, the filmmaker establishes a contrasting use of both a well-balanced three-point lighting system and more stylized low-key lighting.
Most of the fight scenes are shot using a three-point lighting setup with an emphasized backlight. Thus, the fighters pop out from the background and symbolize the protagonist’s public persona, exposed to the masses. In contrast, most of the dramatic scenes representing the character’s personal life are shot using low-key lighting; lowkey lighting casts more shadows, amplifying the protagonist’s darker aspects of personality.
Back Light as Key Light
One of the most interesting uses of back light comes from Martin’s Scorsese fantasy film Hugo (2011). Hugo has won an Academy Award for the best cinematography. Partly due to its acclaim for its use of a back light as a key light.
A tungsten light, often used as the primary source for a back light, emphasized a dreamy atmosphere and created a warm aura around the main characters. This effect helped the characters preserve a child-like sense of wonder and a continuous sense of adventure.
A lot of practical light and reflections ended up actually lighting the font size of the subject as well due to the positioning, framing, and set pieces.
In Conclusion
Understanding the basics of a three-point light system is the first step to becoming an advanced cinematographer. The experience of other filmmakers shows that you can adjust the knowledge of this setup for even more memorable results.