
OBS Studio is by far the most popular streaming software out there. Setting up a stream is fairly straightforward, but the software has many tips and tricks not many people make use of.
This article will show you 10 OBS tips and tricks to bump up the quality of your streams and ensure everything runs smoothly.
If you want to learn more about live streaming, check out our other guides as well:
- How to Become a Streamer: The Ultimate Guide
- The 10 Best Cameras for Live Streaming in 2024
- OBS Studio Tutorial for Beginners
Why Use OBS Studio
Open Broadcaster Software is the standard software used by streamers today. It does what it is supposed to do really well. OBS also has an engaged community providing useful tutorials, tips, and 3rd party plugins.
For any streamer starting out, we recommend OBS, simply because it is entirely free and easy to learn.
10 OBS Studio Tips and Tricks
1. Use Your Graphics Card for Encoding
A common problem many streamers face is performance issues. OBS by default uses the CPU for encoding, but high CPU usage may affect stream quality on some devices, leading to dropped frames and less quality.
If recording with OBS leads to high CPU usage, you might instead choose to do the encoding using your graphics card (GPU). This can improve the performance of your stream by relieving some of the strain on the CPU.

To change to hardware encoding, simply go to Settings > Output. From the drop-down menu, you can select the GPU you are using.
2. Adjust the Video Bitrate
Bitrate is the quality of the video OBS uploads to the streaming platform. You can adjust the Bitrate in Settings > Output. Finding your ideal bitrate can ensure your streams run smoothly on the viewer’s end.
To find your ideal bitrate, you first have to know your upload speed. You can use a tool like speedtest.net to find information about your internet connection. Theoretically, you want a bit rate that is a bit lower than your upload speed.
But if you have amazing upload speeds, why not go ahead and use crazy high bitrates? Well, that’s not always such a good idea.
A bitrate that is too big will cause issues for viewers of your stream. While some streaming platforms transcode the video for the audience, you cannot always trust that that will work correctly. On the other end, it is recommended to have a bitrate that is not less than 2000 kbps, as anything below that will probably cause pixelation in your video.
The key takeaway here is to know your upload speed and adjust your bitrate accordingly, and avoid super high bitrates altogether. Lowering your bitrate can also ease the pressure on the CPU encoding, so it’s a good measure against performance issues.
3. Use Audio Filters to Improve Audio Quality
One of the best things you can do for your stream is to improve your audio quality. You might not have a professional, studio-grade mic. In that case, you can use audio filters to improve the quality of the audio.
The noise suppression filter blocks out unwanted background noise. We recommend adding the suppression filter as a default setting for your setup.

Other useful filters are the Noise Gate and the Gain Filter. Both can improve your audio significantly if used correctly.
4. Use Filters to Improve Webcam Video
You can also use filters in OBS to improve your video feed. It is common for streamers to use color correction and grading filters to improve the esthetic of the image.
5. Overlay From a Single Browser Source
If your setup has several overlays, you could use a tool like stream elements to combine them into one single browser source. This improves performance as your CPU now only has to load a single browser source. You also have the added benefit of keeping your OBS layout cleaner and more organized.
6. Downscale Your Resolution
If you find your stream’s performance suffering, you might want to downscale the resolution. For example, you can choose to downscale the resolution from 1080p to 720p. A lower resolution means your CPU has to do less work by encoding fewer pixels.
To change the resolution of your stream, go to Settings > Video.
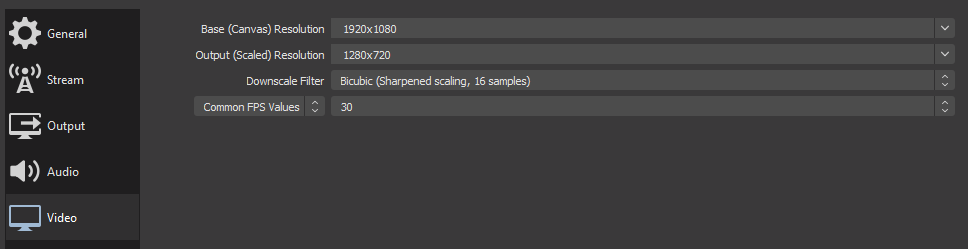
You also have the option to choose what downscaling filter you want to use to lower the resolution. We recommend selecting Bilinear if you are streaming on a less powerful device.
7. Use the Right Frame Rate
For most people, when it comes to what frame rate to stream in, the choice usually falls between 30 fps and 60 fps.
If you are dealing with limited resources on your computer, you need to find the right balance between frame rate and resolution, and which one to prioritize.
What framerate you decide to go with will depend on what you are streaming; A fast-paced action shooter might really need those 60fps compared to an open-world single-player where you might get away with 30 fps.
8. Use Hotkeys
To make the streaming process simpler, make use of the hotkeys feature in OBS. You can access the hotkey settings in the general settings menu. From there, you can assign different hotkeys for different actions or tools you want to use.
You can create hotkeys for switching scenes, transitions, video sources, and many other tools and features.
9. Test Your Stream Before You Go Live
A simple and yet very important tip; Make sure to always test your streaming setup in OBS Studio before going live. Mistakes still can and probably will happen, but you do not want to be caught unprepared.
Before going live, make a habit of checking that all the gear is running correctly.
10. Learn More
There is, of course, a lot more to learn about OBS. Fortunately, you do not need to be an expert to get started with streaming. A simple setup will do in the beginning, and as you go, you can improve and tweak the settings with time.
If you want a more in-depth tutorial on setting up and using OBS Studio, we recommend you check out this article: OBS Studio Tutorial for Beginners
In Conclusion
We hope you found these OBS Studio tips and tricks useful for your next stream. Remember to check out our other articles if you want to learn more about OBS, Twitch, PC setups, or anything other streaming-related.
Summary of 10 OBS Tips & Tricks:
- Use Your Graphics Card for Encoding
- Adjust the Video Bitrate
- Use Audio Filters to Improve Audio Quality
- Use Filters to Improve Webcam Video
- Overlay From a Single Browser Source
- Downscale Your Resolution
- Use the Right Frame Rate
- Use Hotkeys
- Test Your Stream Before You Go Live
- Learn More
To get the most out of OBS, you will have to give it some time. Start with simple setups as you adjust and improve with time.
Just a quick question, as my audio source I am using an Apollo Twin from Universal Audio,, I am getting sound to register on my computer however I am not able to get obs to pick it up. When I engage Start Record; it will record my video from my web cam but nothing from audio, the VU meters register zero, zilch, nada. Any advice?
Hello, it is common to have issues connecting interfaces to OBS Studio since the software has some limitations. But it can be easily fixed.
If you have a PC, I recommend watching these video to help you out:
https://www.youtube.com/watch?v=o_yGke-rWg4&ab_channel=TanoBrock
https://www.youtube.com/watch?v=QlgY9uiTW3w&ab_channel=J.Behr
Hi I do a lot of live streaming for church and just started obs. Is there a way I can upload a prerecorded video to a live stream
Hi there! You can upload any video file to play on stream by adding a Media Source and choosing your file by clicking ‘browse’ and selecting it. It will play once by default when made visible, if you want it to loop just click the ‘loop’ box in the source settings.