
The days are gone when there were only one or two streaming platforms. Creators now have a large choice of platforms to broadcast their content on. Not only are there obvious choices such as YouTube and Twitch, but there are now forum-based applications such as Discord coming to the forefront of streaming. Knowing how to stream to Discord with OBS Studio could help you take your content and community to the next level!
We’re here to talk you through how to set up OBS Studio streaming in Discord and the benefits it will bring to you and your followers. Follow the simple steps below, and you’ll be streaming your OBS collections to Discord in no time at all.
What Are Discord And OBS Studio?
You don’t need to be a streaming veteran to have heard about both Discord and OBS Studio. Over the years, they have developed into must-have software for content creators. Here’s a short breakdown as to what they do and why they’re essential:
Discord
Before Discord arrived, followers of a popular show or game were forced to use browser-based forums to discuss their passion. These web forums usually had limited storage and were incredibly slow, even painful to use! Enter Discord, a dedicated forum application where users can join channels based on their passions and hobbies.
As a creator, Discord provides a platform where you can gather your extended community. It gives them a safe space to discuss your content and meet one another.
Not only are there text channels where users can chat, but there are audio and video channels too. In these, creators can share their screens, webcams, or in this case, OBS Studio setup to share streams, new releases, and much more.
OBS Studio

If you’re reading this article, chances are you are already a user of OBS Studio! OBS is an open-source, plug-in-compatible streaming software. In it, users can design collections of scenes to stream to viewers via an online platform such as YouTube or Twitch. Thanks to its open-source nature, it is the number one choice of large streamers.
Why Stream To Discord With OBS Studio?
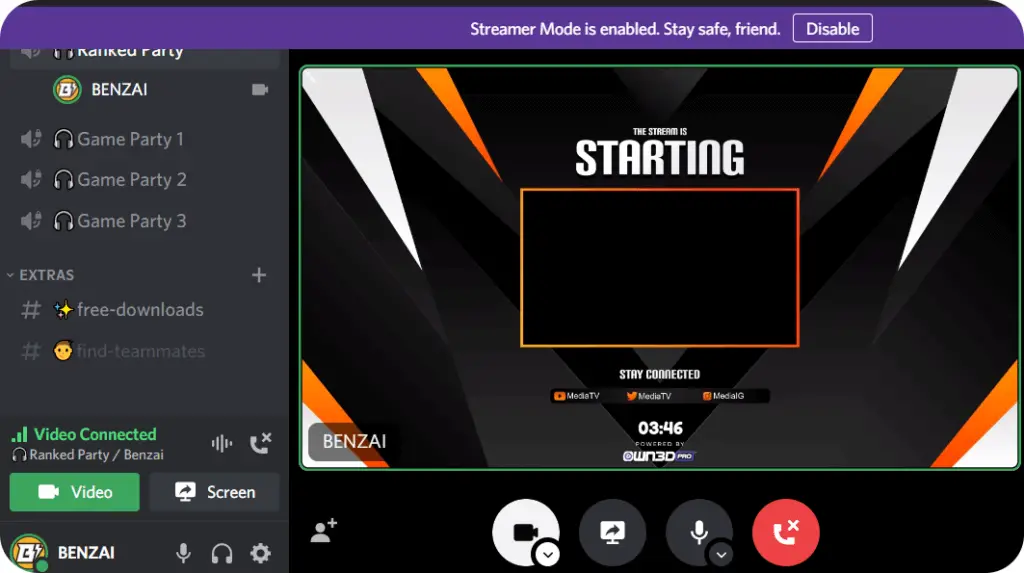
When you first download Discord, your video streaming options will be very limited. When you go to your video and audio settings, you’ll see you can only choose from in-built or external webcams. Further still, when you share your screen, you can only choose specific applications or the entire screen. There is no option to enable virtual cameras.
Using OBS Studio to stream to Discord, you can stream your entire stream as you usually would online. All of your scenes, sources, transitions, and effects will appear as usual and occur in real-time without latency issues.
One of the main reasons streamers might want to do this is to stream privately to members or subscribers. In Discord, you can assign users specific roles and permissions based on their community status.
For example, followers who buy membership can unlock a special role in Discord, giving them access to a video channel. You can stream additional content on top of your normal streams as a reward to your members in that video channel. If you were to stream on your main platform, everyone would see it, but doing so through Discord helps you manage and control your audience.
Discord takes its place as a complementary platform to more significant streaming sites, but broadcasting additional content on it will encourage more interaction and regular engagement from your loyal community.
How To Stream To Discord With OBS Studio: Step By Step
Using OBS to stream to Discord takes a few simple steps. The setup also depends on whether or not you want to use a single microphone for audio or the entire audio from OBS Studio. This changes the setup procedure a little bit, but we’ve got both covered! Follower the easy steps below to get started.
Step 1: Prepare The Scene Collection You Want To Stream
This process will stream whatever collection is appearing on OBS Studio at the time. Be sure to load in the correct scene collection for what you want to stream to your audience.
Check all of your scenes and sources to make sure they’re working and navigate to the opening scene you want your viewers to see when they first join.
Step 2: Start Virtual Camera In OBS Studio
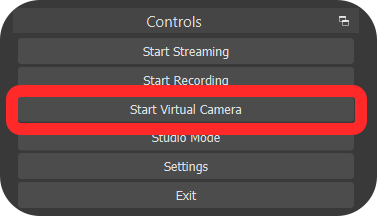
In the bottom right-hand corner of OBS Studio (or wherever you moved your controls dock too), you will see a button that says start virtual camera.
Once you click this button, it will turn a darker shade of grey, and the text will change to stop virtual camera. This is how you know your virtual camera is on.
Note: Previously, there was no virtual camera option. Users had to install the virtual camera feature themselves using this plugin. You may see some guides telling you to do this, but it’s outdated and unnecessary.
Step 3: Change Your Webcam Settings In Discord
Click the gear icon in the bottom left-hand corner of the Discord application. It is located next to your username and tag.
In the next menu, you will see a long list of options on the left sidebar—select Voice & Video.
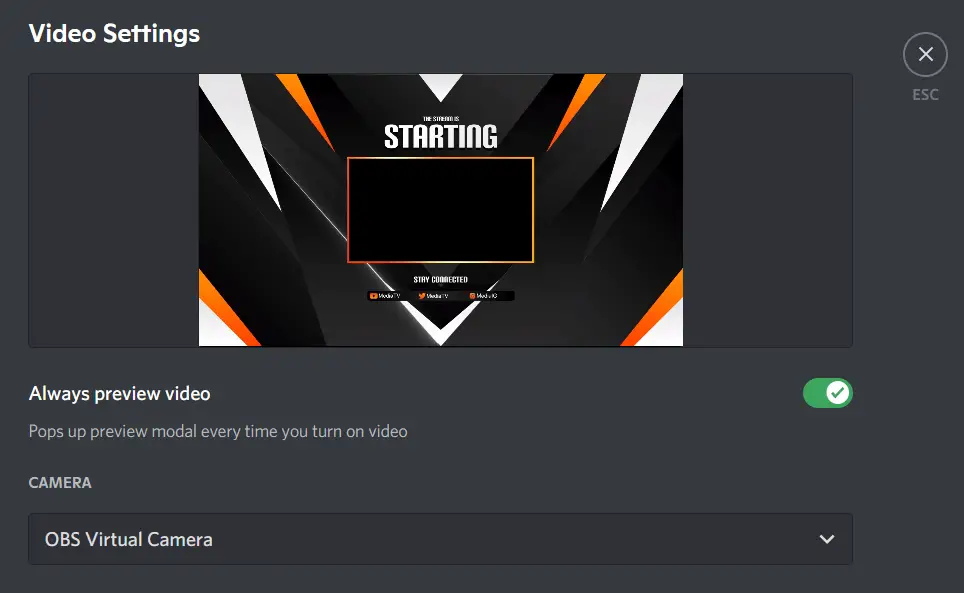
Scroll down to video settings and select the drop-down menu for selecting your camera. If your OBS Virtual Camera is running, you will see an option called OBS Virtual Camera. Select it and exit the settings menu. Your OBS Virtual Camera is now being used as your Discord webcam.
Step 4: Configure Audio Depending On Your Inputs
Setting up OBS video streaming in Discord is pretty simple, but the audio is not quite that easy. When you select your virtual camera as a camera device, Discord only receives the video footage, not OBS Studio’s audio.
There are two main ways you can go about setting up audio for OBS streaming in Discord.
Leave Your Microphone As Default
This is the simplest way of setting up audio because it doesn’t bring in any audio from OBS Studio! If what you want to do is just speak over your OBS virtual camera footage, then you can leave the microphone set to default or choose your plugged-in microphone.
This is great if you don’t require your system sound in your stream and just want to talk over the top of it. If you do want all of your OBS and system sounds, you’ll need to adopt a slightly different approach.
Set Up VoiceMeeter To Capture OBS Studio Audio
So you want to capture all of the audio that OBS normally captures in your Discord stream? Not a problem, but the setup is a little complicated.
You need to use a software called VoiceMeeter to set up a virtual audio cable. This will host all of your OBS audio as a virtual ‘microphone,’ so to say. Your system will recognize it as a mic, and you’ll be able to select it as an audio source in the Discord audio settings.
Unfortunately, there isn’t a more straightforward way to reroute all of your audio to Discord from OBS. Luckily enough for you, we have a very in-depth tutorial on setting up and using VoiceMeeter banana! It’s all free to use, and with a little bit of time and patience, it will become a powerful tool in your streaming arsenal.
Step 5: Manage Your Stream As You Usually Do
Once you are streaming to Discord, you can manage all of your stream features as you usually do in OBS Studio. Select different scenes to transition to, play sound effects, and it will all be mirrored identically in Discord.
One thing to remember is that you are technically not live. You are just mirroring your OBS Studio preview area. With that in mind, none of your cloudbot or moderation services will be online, and any of those features will need to be engaged manually (if possible).
Both pieces of software are continuously evolving, and we expect there to be a ‘stream to Discord’ plugin for OBS very soon, but for now, this is a perfectly reliable method!
In Conclusion
Using OBS Studio to stream to Discord is an excellent way of including your community in extra content. Whether that’s hosting members-only streams or running exclusive content previews, you’re bound to get positive feedback using the two cohesively.
Discord is not yet a monetized alternative to larger streaming platforms, but it is possibly the best community-based and most inclusive social system. Use it regularly in tandem with OBS Studio and watch your viewers gawp in amazement at what you can achieve as a creator!