
Audacity is a nifty audio editing tool that is lightweight and easy to use. It is a common software for recording everything from music to podcasts.
At some point, that audio needs to be exported out of the program to be used in the real world, and since one of the go-to audio file types is the MP3, we will take a look at how to export an MP3 in Audacity using the best settings for your purpose.
Yes, the purpose of your MP3 is important in determining what the best settings will be. In a sense, ‘best’ means ‘highest quality,’ but the highest quality might not be ‘best’ for your purpose.
Let’s investigate.
Which Bitrate to Use
The quantity of data that gets converted into audio is known as bitrate. In general, higher bitrates result in higher quality audio. You may have the greatest-sounding recording of all time, but if you convert it to a low bitrate, the sound will be poor.
And conversely, if you are using a $2 microphone and you record in your bathroom, it will not matter how many bitrates you throw on the MP3 to get a good result.
If you are working with music, you generally need a higher bitrate than spoken word recordings, such as voiceovers or podcasts. Music has more complex data and is a stereo track, which means it will need a higher bitrate to sound ‘good,’ while a podcast, with just a voice in mono, is not as complex.
With spoken word, you can get away with a much lower bitrate without your listeners noticing any difference.
What this means is that you will have different priorities depending on what your sound mix consists of.
So without further ado, let’s head into Audacity to look at the settings available for exporting MP3.
Exporting MP3 in Audacity: Step by Step
Firstly, you might need to ensure that your version of Audacity can export MP3 in the first place. If you have an updated version, this is not an issue, but in the past, you needed to download a separate software, called LAME, to be able to export MP3 in Audacity.
Audacity has baked in its MP3-export capabilities into the program for years. Still, if you, for some reason, are working with a relatively outdated version of Audacity, you will need to update it.
Open the Export Window
Let’s say you are done editing your file in Audacity, and it’s time to export. Please note that saving your file and exporting it are two different things. If you simply save your work by going to ‘File’>‘ Save’ or doing a classic ‘Ctrl+S’ or ‘Command+S,’ your file will be saved as an Audacity file, which can only be opened in Audacity.
To convert your audio to other formats, you need to export it. Follow the steps below:
- Go to ‘File’ > ‘Export’ > ‘Export as MP3.’
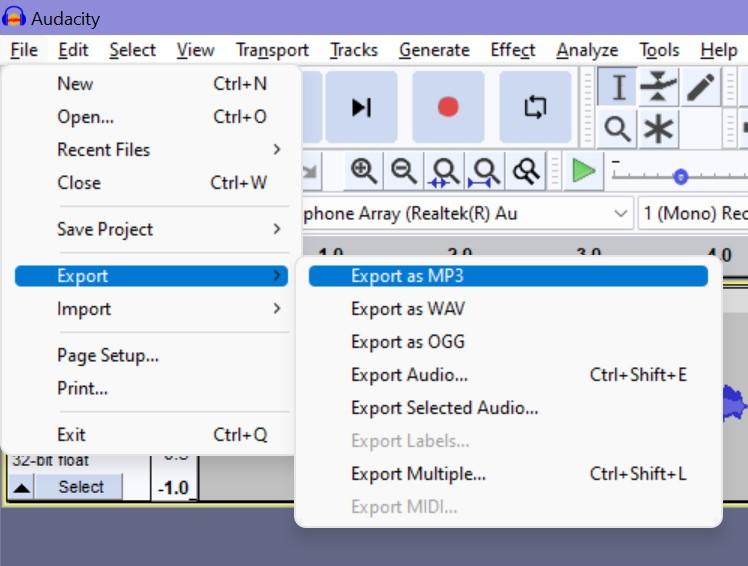
- Name your file, and select where to save it.

- Below the ‘Save’ settings, you will find a section called ‘Format Options.’ Now it’s time for the more complicated settings. Read on below:
The Best Settings For Mp3 Exporting in Audacity
There are four options to choose from when selecting bit rate mode. Preset, variable, average, and constant. You will basically be choosing between different quality renderings resulting in different file sizes. And as we mentioned, there is no one-size-fits-all.
1. Preset
If you have a music recording or a podcast in which you are talking a lot but also features music or extensive sound effects, you will want to select ‘Preset.’
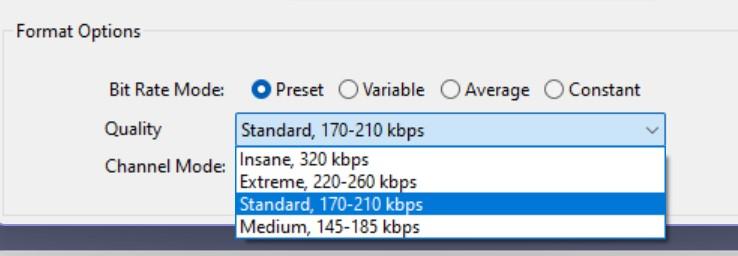
Under ‘Preset,’ you are presented with another four choices:
- Standard (170-210 kbps)
- Medium (145-185 kbps)
- Extreme (220-260 kbps)
- Insane (360 kbps)
There might be a reason why Audacity decided to call the highest quality ‘Insane.’ Just because it’s the highest quality doesn’t mean it’s recommended to use it. It is premium, yes, but the file size is also a premium size. If your file is spoken word, you don’t need that, especially if people will be streaming this on their phones. That’s an insane phone bill.
The ‘Standard’ setting will be perfectly sufficient for spoken word, and ‘Extreme’ will be a good mix of quality and size.
2. Average Bitrate
This setting will give the file an average bit rate, but there will be some give and take depending on the complexity of the file. The quality will not be as high as a Variable bit rate, but it is a good choice if you need to know how large your files will be.
You can select quality between 8 kbps to 320 kbps.
3. Variable
In this setting, there is no set bit rate throughout. Instead, the bit rate varies depending on the complexity of the recording to try to consistently achieve high quality. 0 means the highest quality (extreme), and 9 is the lowest quality.
4. Constant
The other mode to consider is Constant. This setting will encode the audio in a constant bit rate instead of the variable. It will give you inconsistent quality.
So again, with music, this is not recommended. With spoken word, it is.
The file size is manageable, and the file will play nicely when streaming online.
5. Channel Mode
Channel mode has to do with if you want stereo or mono export.
For recordings with music, you are likely to choose ‘Stereo,’ as there will usually be differences between the left and right channels that cooperate with each other.
For spoken word, there is no need for stereo, and you can keep the standard setting, ‘joint stereo,’ or even go ahead and click ‘Force export to mono.’

Click on ‘Save‘ to export your Mp3 audio file in Audacity.
Metadata
As you click save, you will be met with the metadata window.
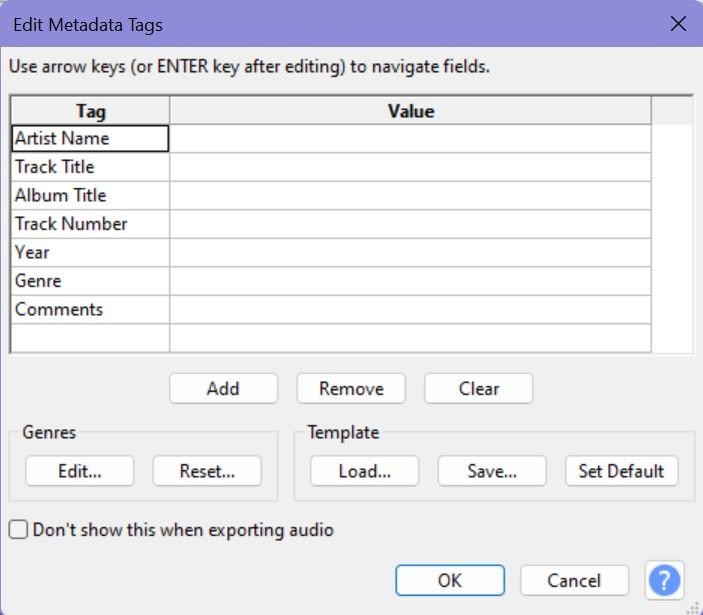
Metadata is the information about your audio, such as artist or title. Here you can choose not to enter any information at all. Likely, you won’t need it, or you might be entering metadata wherever you intend to use it. For instance, when you upload a podcast.
If you do enter metadata, it will display on your device or media player. This could be a good feature if you are offering your audio files for download and would like the audience to have this information.

You can click ‘Set Default’ to save your information to load every time you export MP3, or you can tick the ‘Don’t show this’ box to exclude this step in future exports.
Which File Type is Best For You?
While dabbling with exporting MP3, you may have noticed that there are other file types to choose from when exporting audio in Audacity.
A very common file type is WAV, and the WAV format is one that you should know about and use if you intend to edit the audio further.
For instance, if you are making a video and you import the audio file into your video editing program, your file will essentially be processed twice. The quality difference might be noticeable if the MP3 file gets compressed continuously.
If you know your way around Photoshop, you’d know that this would be like exporting a JPG file and then importing it again into Photoshop to continue working on it.
Basically, it’s not recommended.
Lossy vs. Lossless
The difference between an MP3 and a WAV is that WAV is ‘lossless.’ That means that all of the information in the audio will be transferred completely and entirely to the WAV file.
MP3 audio files are ‘lossy.’ That means it is compressed and will always compromise a little bit (or a lot) of quality to be able to make the file smaller.
There is an additional file type that will give you compressed lossless files. These file types will provide you with a compressed file that includes all data with no lossy quality. They include FLAC, WMA, and ALAC. The advantage of these files over the lossless WAV is that they are smaller, though they are bigger than the lossy MP3 and AAC.
In Conclusion
That’s it. There’s nothing to it than to go ahead and export your audio as best fit for your purpose.
If you are recording voice, a mono export with a constant bitrate of standard quality will be just enough. For a musical recording, you are looking at higher bitrates and higher quality in Preset or Variable mode.
Whether for podcast editing or music recording, there are settings for everyone to get the best file size and quality balance.