
This is a no-nonsense guide on writing, producing, and shooting your very own short film.
We have created this step-by-step plan for people looking to make their movies with both bigger and smaller budgets. Either way, this guide will help you make the most out of every penny invested into the project.
This will be an enormous article packed with tons of resources and helpful links, so we highly recommend you bookmark it and return to it as you reach each stage of the production. Without further due, enjoy!
What is the Point of a Short Film
Let’s be honest; you probably won’t become rich making short films. In fact, you probably will not make any return on investment at all. So why do people still make them?
A short film is your business card; it shows others what you can do! If you put a lot of effort into making a great short, it has the potential to win festivals and get attention.
This means a potential investor or producer will know you can “pull it off,” so to speak. Many successful directors in the industry started with short films. And there are quite a lot of them, actually. Here are only some examples:
- Big Shave – Martin Scorsese
- Doublebug – Christopher Nolan
- Vincent – Tim Burton
- Next Floor – Denis Villeneuve
If a short film is sufficiently compelling, it can provide a launchpad towards feature film development. Australian director Robert Luketic, for example, made such an impression with his film school short, Titsiana Booberini (1997), that his next project was directing the acclaimed feature film Legally Blonde (2001).
But short films also have artistic value on their own merits, of course. A short can be just as powerful, moving, and enjoyable as a feature. In some cases, a story might even be a better fit as a short rather than a feature-length movie.
And talking of story, let us now jump into the first step of developing a film, which is arguably the most important.
Step 1: Developing a Story
Before starting anything, you need the essential element of a short film; the Story.
Even with striking visuals, great acting, or action, your short will fail if the story isn’t all there. That being said, you might need to take a more particular approach to story if you are making a short film,
Short Film vs. Feature Screenplays
This article will not be about writing a feature screenplay. Instead, it is about writing a film with anywhere from 1-30 minutes runtime. As you will notice when you keep reading, it’s critical to remember that.
It can be hard to get into that thinking if you have never written a short film before. We watch feature films all the time, so adjusting is difficult. But you can’t have lengthy character introductions or too many locations in a short film.
Restrictions often come with a negative connotation, but they can help creatively. Think about it; Can I tell this story in one location? Can I tell it without dialog? With only two actors?
This will force you to find creative ways to tell a story and create a unique experience for the audience. That’s what we want, after all!
Screenplay Structure
So now, let’s jump into the structure.
Starting with the fundamental ideas of story, we recommend you look into the three acts and Harmon’s story circle. Using both of those is more than enough to get you started!
The Three Acts
The three acts structure works on almost every component of storytelling, whether a feature, documentary, short film, scene, or tv-episode.
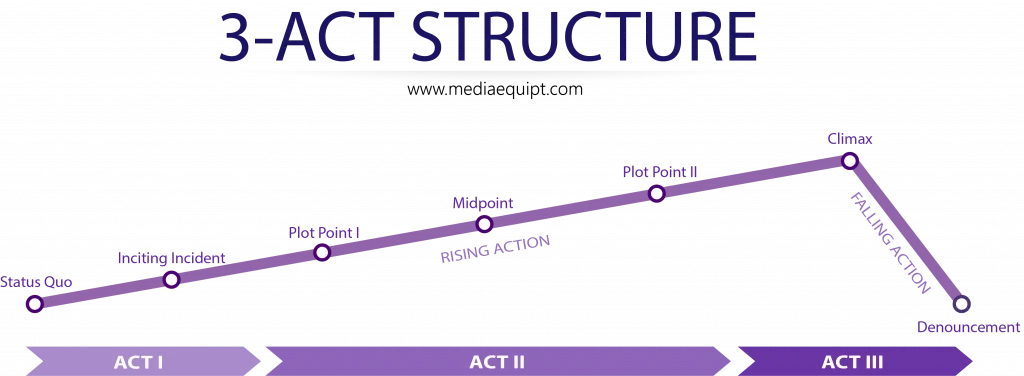
- In simple terms, the three acts divide the story into a beginning (1st act), middle (2nd act), and end (3rd act). A plot point marks each transition into the different acts.
- A plot point is a significant event in the story that forces the main character to make a choice and drives the story forward.
So how does this structure work in practice? Well, these are the beats you should hit:
Act I (Typically 1/4 of your story and about 1-2 scenes in a short film)
In act one, you set up your main characters, world, and conflict. Before there is significant change within your character and maybe the world they inhabit, we need to get to know them.
What do they want, believe, or feel? What is their background? How are they challenged or flawed?
In a short film, you don’t have the luxury of a long first act full of exposition and world-building. Instead, you must communicate these things quickly, in a scene or two.
Within act one, there is an ‘Inciting Incident,’ which comes very quickly in short films. An inciting incident is the catalyst of your protagonist’s adventure. It asks your character to leave their comfort zone and go on this journey. The protagonist often hesitates at first, but they will make the leap eventually.
As tension and conflict build, the characters must act. And so the story reaches ‘Plot Point 1;’ Here, the character crosses into the unknown, and we are now in act 2 territory.
Act II (Typically 2/4 of the story)
Act two encompasses the majority of your story. Here, your protagonist will encounter obstacles, and tensions will rise.
You can also think of act 2 as containing the main promise of your film. Is it a film about someone finding a black hole in an empty office? (The Black Hole – Future Shorts) Well, that should be in act two! Is your film about someone shaving? (The Big Shave) That should also be act two.
In the second act, you will also find the story’s midpoint. Naturally, it takes place in the middle of your narrative and is also known as a false victory or a false defeat for your protagonist. It’s a great place for a plot twist or a set piece.
At the end of the second act, your protagonist’s prospects of reaching their goal are grim. They will need to get a second wind to overcome the obstacle. This could be newfound motivation, a new strategy, or help from a friend. When they find it, they have reached plot point two.
Act III (Typically 1/4 of the story)
Act three is where the story’s climax and conclusion take place! The point in your story where your character either accomplishes or fails at his goal. It should also be the part with maximum tension.
Often, as the story ends, the remaining tension is subdued and loose ends are tied up.
You will definitely want to read up more on the three acts, as it is so fundamental to storytelling and screenwriting.
Harmon’s Story Circle
The second structure we are looking at is Harmon’s story circle.
The reason we recommend it is because it is a bit cleaner and simpler to use than Campbell’s Hero’s Journey format, although being partly based upon it. That makes it ideal to use for short films.
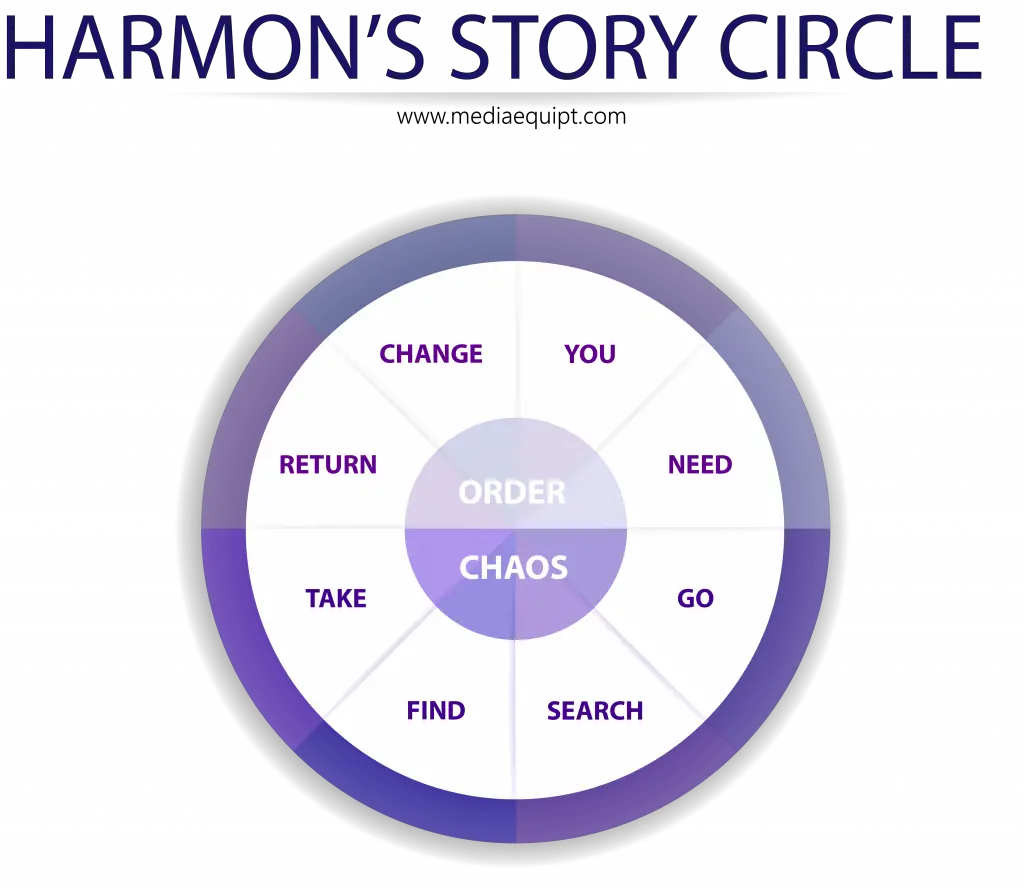
Unlike the 3-acts, Harmon’s Story Circle consists of 8 parts your protagonist must go through. Those are:
- You – As in act one, the character starts off in their comfort zone as we are introduced to them.
- Need – A need arises for your protagonist—a goal, a want, a problem that needs to get resolved.
- Go – To fulfill their need, your character must leave their comfort zone and leap into the unknown.
- Search – Your protagonist encounters obstacles, allies, and trials as they search for what they want. As they adapt, they grow and evolve as a person.
- Find – Eventually, the protagonist finds what he is looking for.
- Take – But they end up paying a heavy price for it. It is not what they imagined.
- Return – They return to their known world again, where we started the story off.
- Change – But they have changed. They are not the same person.
You want to take the time to define each of these eight beats and what they are.
There are, of course, hundreds of different story structures. Not even a dedicated article would be able to cover them all. But if you want to make a short film, we recommend these two to start. That way, you don’t get bogged down by all the different story structures out there!
That said, here are some other common screenplay structures for the curious:
- The Heros Journey
- Snyders Beat Sheet
- 8-Sequence Structure
We have a whole article covering screenplay structures in detail if you are interested. But now we jump to the next part of the screenplay; Character.
Character
Character and structure are interrelated in screenwriting. But writing interesting and compelling characters are key to a good story and therefore deserves its own section in this article.
In traditional storytelling, a protagonist wants something. Something that is unattainable or hard to get in the beginning. He will need to overcome an obstacle to accomplish his goal and fulfill his want.
Attaining that obstacle is where the conflict of the story lies. While that conflict can be external, like a natural disaster, or interpersonal, like a feud with a family member, it is often coupled with an internal conflict.
What character flaws or fears is in the way of your character? And how have they gotten them; what is their backstory?
Drawing from people you know or have met will help you do this, or even better, draw from yourself. There are so many interesting people around us, and we will all have to face feuds, disappointments, and issues. It might not all be pleasant, but it sure makes excellent screenwriting material.
Writing
Now to the writing process itself.
Here is where most people do give up. It is always more fun to work on your story outline or character arcs than actually sitting down and coming up with text on pages.
But remember that a screenplay is really written through revisions. This is true for almost all screenwriters, but especially beginners.
Our tip is this; Just write. The screenplay does not have to be perfect or even particularly good in the first couple of drafts. But as you are constantly re-writing, refineíng the dialogue if you have any, and incorporating feedback, you will truly start developing something worth reading.
Script Coverage Services
One thing you might come across as you are developing and working on your screenplay is script coverage and analysis services. These can be great for getting some much-needed feedback from a professional. But they should never be used as a crutch, and it is easy to fall into the habit of spending all your money on these services than on more valuable endeavors.
If you are thinking of using a script coverage service, there is nothing wrong with that. Just make sure to really do your research and homework on what you are buying to get the most bang for your buck.
Formatting and Software
Next, you probably want to start typing some words. To start writing your screenplay, you have a couple of options:
- Free screenwriting software
- Paid screenwriting software
- Use Google Docs
Free Screenwriting Software
You have plenty of options when it comes to free screenwriting software. Our top picks would be:
- Scenarist – This is an entirely free, open-source screenwriting software. It has all the basic features you would expect and some tools to plan and structure your story.
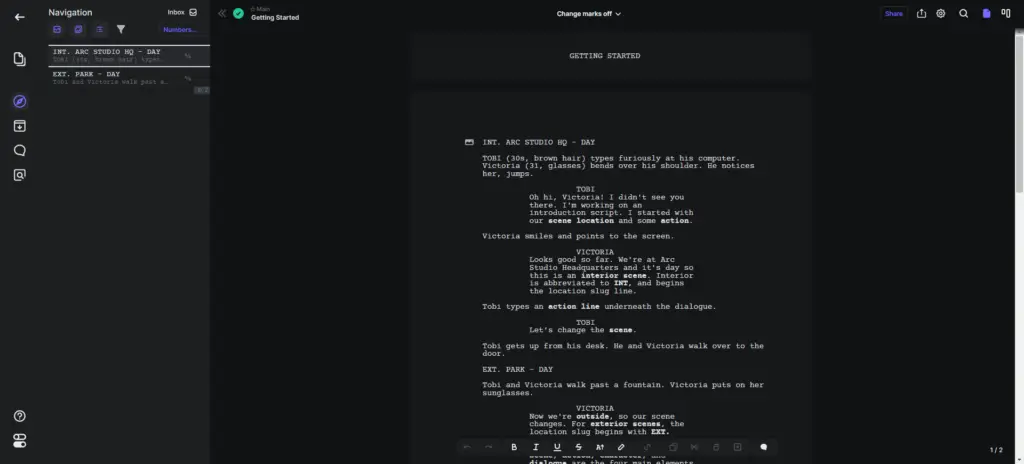
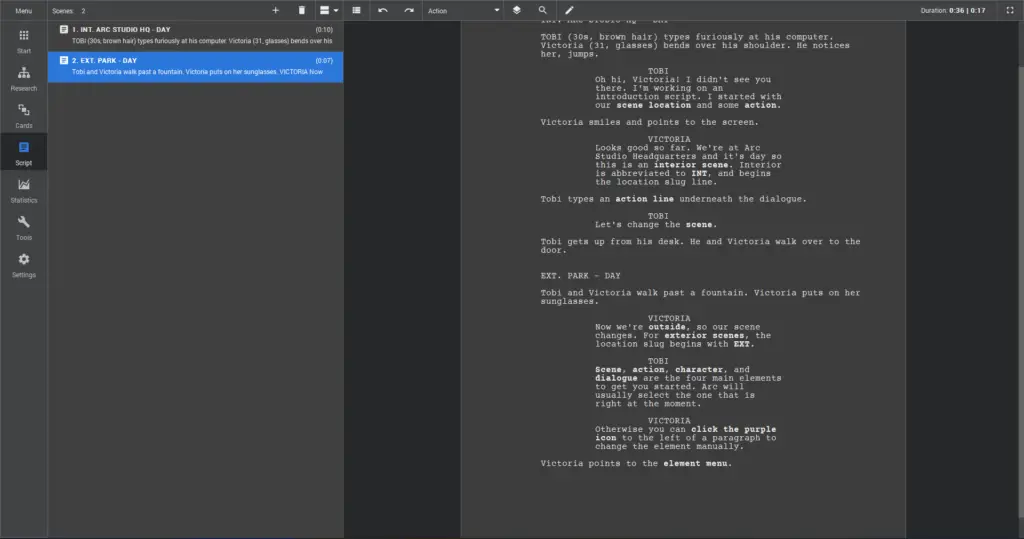
- Arc Studio – Arc Studio offers both free and paid versions. You can work both online and offline. All your are also projects are regularly backed up to the cloud. The free version does not offer all the great outlining and collaboration tools as the paid plan. And you also have to live with an annoying watermark on every PDF export of your script.
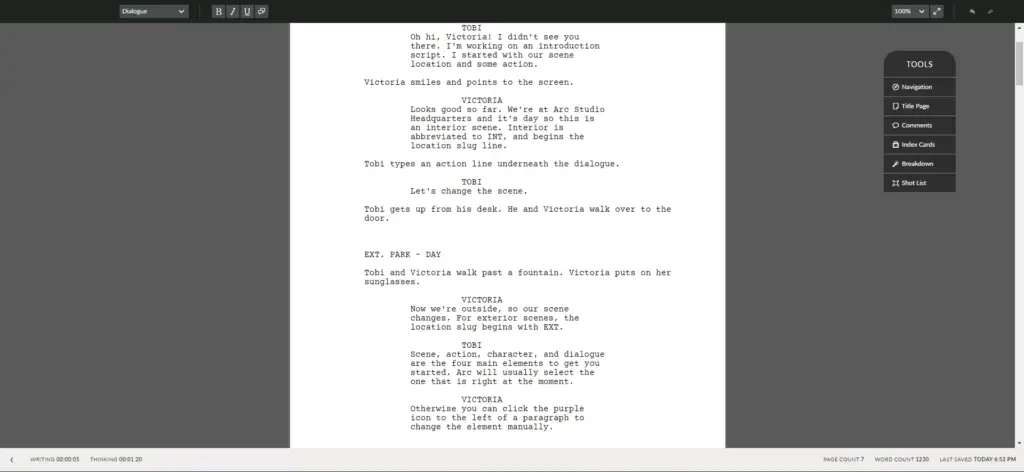
- Celtx – Celtx is a cloud-based screenwriting software, meaning you access everything from your browser. An accompanying mobile application is also great for writing on the go.
Unless you write a lengthy feature, use one of these three free Screenwriting software for a short script. Save your money for something else in your production.
Paid Screenwriting Software
But if you plan to write a lot and want to learn professional software, Final Draft is the standard in the industry. You can buy it for a one-time fee or start a 30-day trial to find out if it’s right for you.
It is pretty expensive, though, but worth it if you are seriously thinking about writing screenplays.
How to Write a Short Film Using Google Docs
Lastly, you can choose to format a screenplay in Google Docs with our guide. It is relatively easy but requires you to get a plugin for Google Docs called ‘Fountanize.’
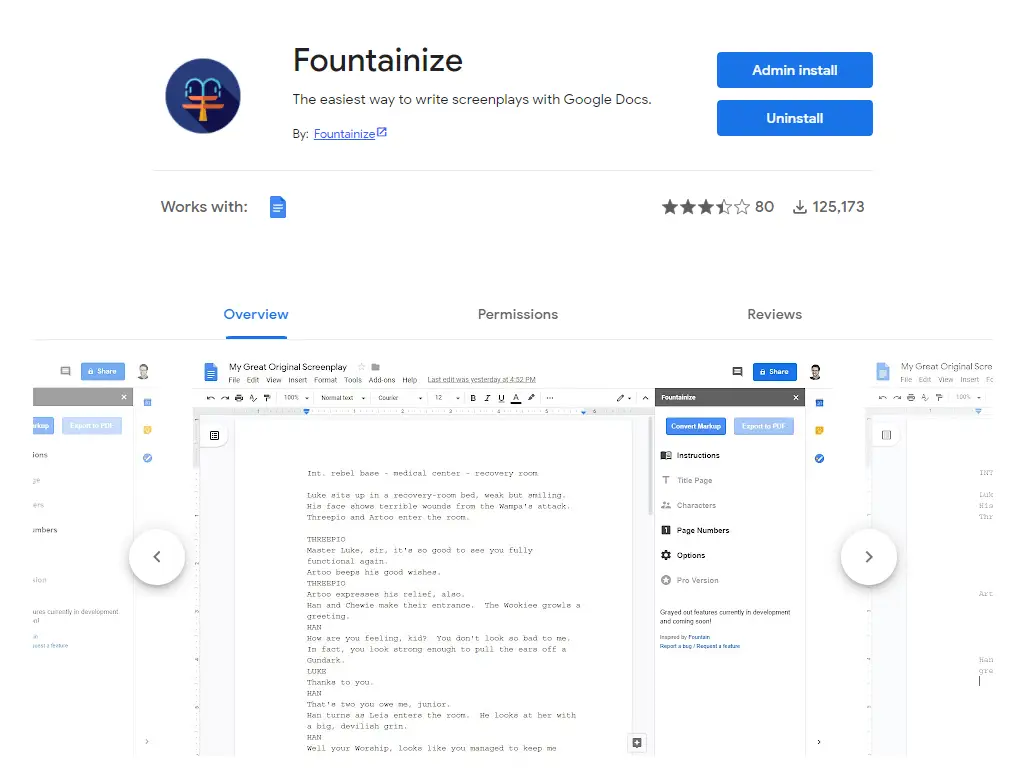
Doing it this way is a little more time-consuming, and you won’t get all of the tools that screenwriting software offer, like scene numbering, character lists, etc.
But one massive plus with Google Docs is that you can easily collaborate with others on a project remotely, a paid feature on most screenwriting software.
Step 2: Production
Now that you have gotten the story down on paper, it’s time to make the thing.
One thing you will quickly notice about filmmaking, especially, is you are indie-producing a movie; it’s all about logistics!
You have to plan for all the boring stuff; Food for actors and crew. Coordination so that everyone is on time. Weather, safety, transportation. You name it!
Our focus in this section of the article will be on all the preparation for shooting your short film.
Funding
Let us first start with funding, as it affects every other aspect of the pre-production process.
Funding for short films is often the director’s savings, friends and family, and sometimes grants.
For a short film, at least a couple of thousand dollars is recommended. However, people have succeeded with a lot less.
If you haven’t made anything before, getting funding from external sources like grants, Kickstarter, or even investors can be pretty hard. But that does not mean you shouldn’t try.
Search for grants that you can apply for. Many are available for underrepresented filmmakers to tell their stories.
Having said that, you must remember that the competition for these types of grants is enormous, so you need to spend time on the application process.
Whatever your budget and funding, remember to adjust your screenplay accordingly:
- Write about locations you know you can film at.
- Don’t use too many actors.
- Also, avoid a lot of complex dialogue if you can’t afford professionals. Sometimes it is even better to not have any dialogue at all.
Storyboard
One of the first things you want to do with a finished script is to create a storyboard. Outlining every shot in your film is super important.
This should be done with your cinematographer if you have one. As he heads the camera team, he must understand it and bring his creativity and expertise to the film.
One important note is that you do not need drawing skills to make a storyboard. You can use stick figures, images, or shorts from other films as long as you and any other member of the team can understand it.
You can begin by drawing out all shots, camera movement, and blocking. But when you have gotten your hands on locations, you should start taking pictures with stand-ins as actors. Ideally, with the same camera, you will use when shooting.
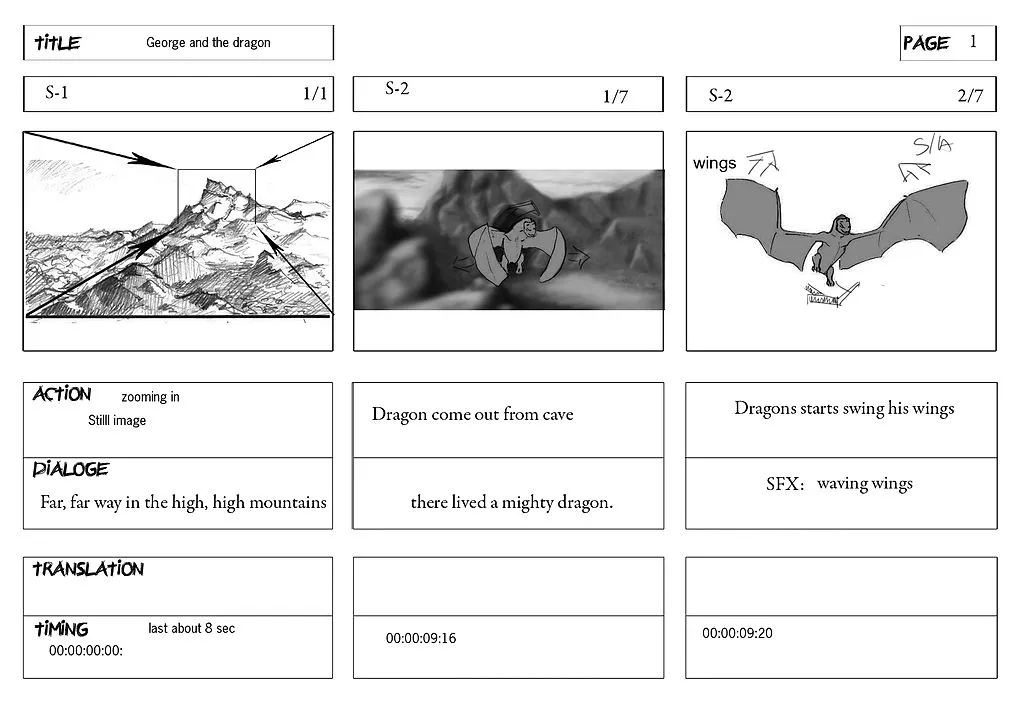
Even though there is no right or wrong way to make a storyboard, including these points below will make your life a whole lot easier:
1. Shot Numbering
You will need a straightforward way to organize a scene’s shots in your storyboard. We recommend you use a structure with ‘sequences’ and ‘shots.’
A sequence could either be a scene or all the shots in one location. A sequence is indicated with a whole number like; 1, 3, 10, etc.
Each sequence is made up of shots, which are indicated by a decimal, like 1.1, 1,2, or 1.25.
2. Shot Type
You also want to write down the type of shot you will be filming. Is it a Master shot? A Close-up?
This is so that you and everybody know what setup you should have when shooting. It also helps you and the cinematographer enhance the visual storytelling and ensure enough coverage for your scene.
Aspect Ratio
This is an important one; The aspect ratio.
You should decide what aspect ratio you should use for your film early in the process as it affects what gear you need and how your actors and scenery are blocked.
When you go out to take an image storyboard, don’t simply use your phone’s standard video aspect ratio but take time to use the same aspect ratio you will on the film.
As mentioned earlier, it is best to use the actual camera and lenses you will be using on shoot.
Most films have the same aspect ratio throughout. But you could also use different aspect ratios if that fits your story. Alternating aspect ratios can be used to communicate another time period or even your character’s emotions.
Camera Movement
It is also a good idea to include camera movements. This is often done with arrows indicating the direction of the movement. You can either draw them out or create them in editing software.
Short Description
Communicating all of your ideas with only sketches or images will be very difficult. You want to include text on what is happening; What is being said, and who is doing what.
You could just copy-paste sections of the screenplay or write a more condensed version if it does not fit each shot.
Logistics and Planning
Remember what we told you about film production? It’s all about logistics.
Plan, plan, and plan!
One way to do that is by creating documents everyone in the team can quickly access. It is recommended you complete the following documents for a shoot:
Call Sheet
A call sheet is a document you send to the team about when each person starts work, their contact info, and their role.
This way, everyone knows when they must be there and for how long they are needed. It’s also possible for other team members to quickly get contact details on anybody if they need to. It’s a really great document.
Schedule
You must set a precise schedule for every day of the shoot. This will help you keep track of time so you can make the right priorities.
The schedule should ideally start from the moment all team members meet for the day to the last shot.
Make time approximations for each shot, and remember to add time for rigging between shots as well. We have a great production schedule planner template in Google Sheets for you to use below.
Equipment List
List all of the equipment you will use for your shoot.
Also, add where that equipment came from. If it is from a rental, a friend, or yourself. In smaller productions, mixing equipment that came from you, friends, or rental is easy, so you have to keep all of that organized.
Floor Plan
A floor plan is basically a map of how each shot is set up. In a floor plan are all the different camera angles, lighting setups, and blocking of a scene. It’s a super important document for the lighting and cinematography departments.
Shot List
A shot list gives you all the shots you will film and in what order. This is vital to construct ahead of time, in order to visualize what level of coverage you need to secure, and to ensure that your time on set is spent efficiently. Of course, you can always choose to grab another shot type on the day, but if you are turning up to a location with no idea as to what you want or need to capture, blocking, lighting, lens selection, audio capture and production design will all take that much longer.
A shot list is not the same as your storyboard, as you might choose to film shots and sequences in a different order – usually dictated by location and/or the availability of certain cast or crew members. Indicate the size of the shot (close up, mid-shot, long shot, POV, etc), it’s general location (over-the-shoulder, through the window, bird’s eye, etc) and what you intend to capture in the frame.
Equipment
Filmmaking requires more gear than almost any other art form. And film equipment is generally expensive.
With that in mind, you got a couple of options:
- Using your own equipment (or buying)
- Borrowing from friends
- Renting
- Building your own DIY
Often many indie filmmakers rely on all four ways to get the gear they need. Focus on a good microphone/recorder and a proper camera with lenses. Preferably, cinematic lenses if you want to really get that film look.
You can get away with a lot of DIY stuff for lighting and camera rigs. But what you save in money, you will lose in time, of course.
What you need in gear depends heavily on what you plan to shoot. Here are some more essential things you will almost always want to have to make a short film.
Video Gear
- Camera
- Monitor (really good to have if your viewfinder is small)
- Lenses (or a lens kit)
- Lots of camera and mic batteries (Super important, often overlooked)
- SD cards with lots of space
Sound Gear
- Boom Microphone
- Recorder
- Boom
- Long XLR Cables
Lighting / Rigging Gear
- Tripod
- Steadycam
- Axel rig
- Clapperboard
This was a very general overview. It would be excellent if you could have someone with some know-how and technical experience to guide you through the planning to better meet your project’s needs.
Sound
Many underappreciate how vital audio is to film. You can film your movie in an IMAX camera, but it will barely be watchable with lousy audio.
We talked about some of the gear you need to capture sound in film. But even the best gear is useless if you don’t have someone who can operate it well.
Therefore, we recommend you get someone who has worked with audio before. Alternatively, if it is a friend, practice and train the person who will operate the boom mic first.
Crew & Actors
Your crew can be made up of friends or freelancers.
If you go with friends, you want to make sure you learn all the gear together beforehand. Everyone must know how to handle equipment to avoid costly mistakes or mishaps.
Casting
Important tip; Do not cast your friends in a film. Generally, it’s going to be much harder to give honest feedback and get good performances.
We found that you can actually get really far with Facebook groups. But you will also want to put up a listing on dedicated acting websites.
If you are looking for actors who must deliver complex emotions and dialogue, you will probably want to pay them. Most actors with some experience will at least want some pay for their work.
If the role requires less from an actor, you can ask them to do it for free if they get a showreel in return.
Street casting can also work as some people are just natural actors. But that depends on the person; you might have to go through many castings to find what you want.
Overall, casting is where you should put a lot of your time and effort during the production process. Finding the right people for a role with whom you can work well is critical.
Tips on Set
When the time has come to shoot your short film, there are some best practices to follow!
Don’t direct feelings – Avoid using phrases like “play more sad” or “you should play angry now.” This is bad directing. Instead, you want to give the actors facts about the situation, character, and, most importantly, a goal in every scene and interaction.
Having enough to work with, the actor can translate that information into feelings themselves, leading to a more natural performance. We really recommend you pick up the book ‘Directing Actors‘ by Judith Weston for more on this!
Direction should only come from one person – A common occurrence in indie-filmmaking, especially in film schools, is that everybody on set shares opinions about the directing out loud.
On a set, there should only be one director. One contact point for the actor to receive clear instructions and feedback. If many people give directions simultaneously, the actor will not know who to follow. If this problem arises, bring this up with your team before the next shoot.
Food & water – Always ensure you have enough food for everyone on set! Also, take into consideration any allergies your crew and actors might have. People work better when they have their basic needs met! This probably surprises no one!
Still, you might be surprised by how filmmakers overlook this essential thing!
Don’t speak more than you need to – This rule should apply to everyone on set, even between takes! A group can quickly get really loud if everyone starts talking or joking. This creates unnecessary stress and a challenging environment for the actors to work in. Keep the feeling on set professional.
Production Bible
This section was a LOT to cover. If you are feeling overwhelmed, don’t be.
Just chip away at one part of the production process at a time. Ideally, you will have people who can help you and take some load off your shoulders.
But to keep everything organized and in one place, we recommend having a production bible. In this live online document, everyone involved in the production can keep track of the progress and get the necessary information.
We have created a template for this document to get you started! Make a copy of it to use on your project.
Step 3: Post-Production
When you are done with principal photography, you will enter the next phase of the production process; Post-production.
In ‘post,’ as many call it, you will assemble the film, add music and effects, and color grade the shots. We will start with the most obvious one, editing.
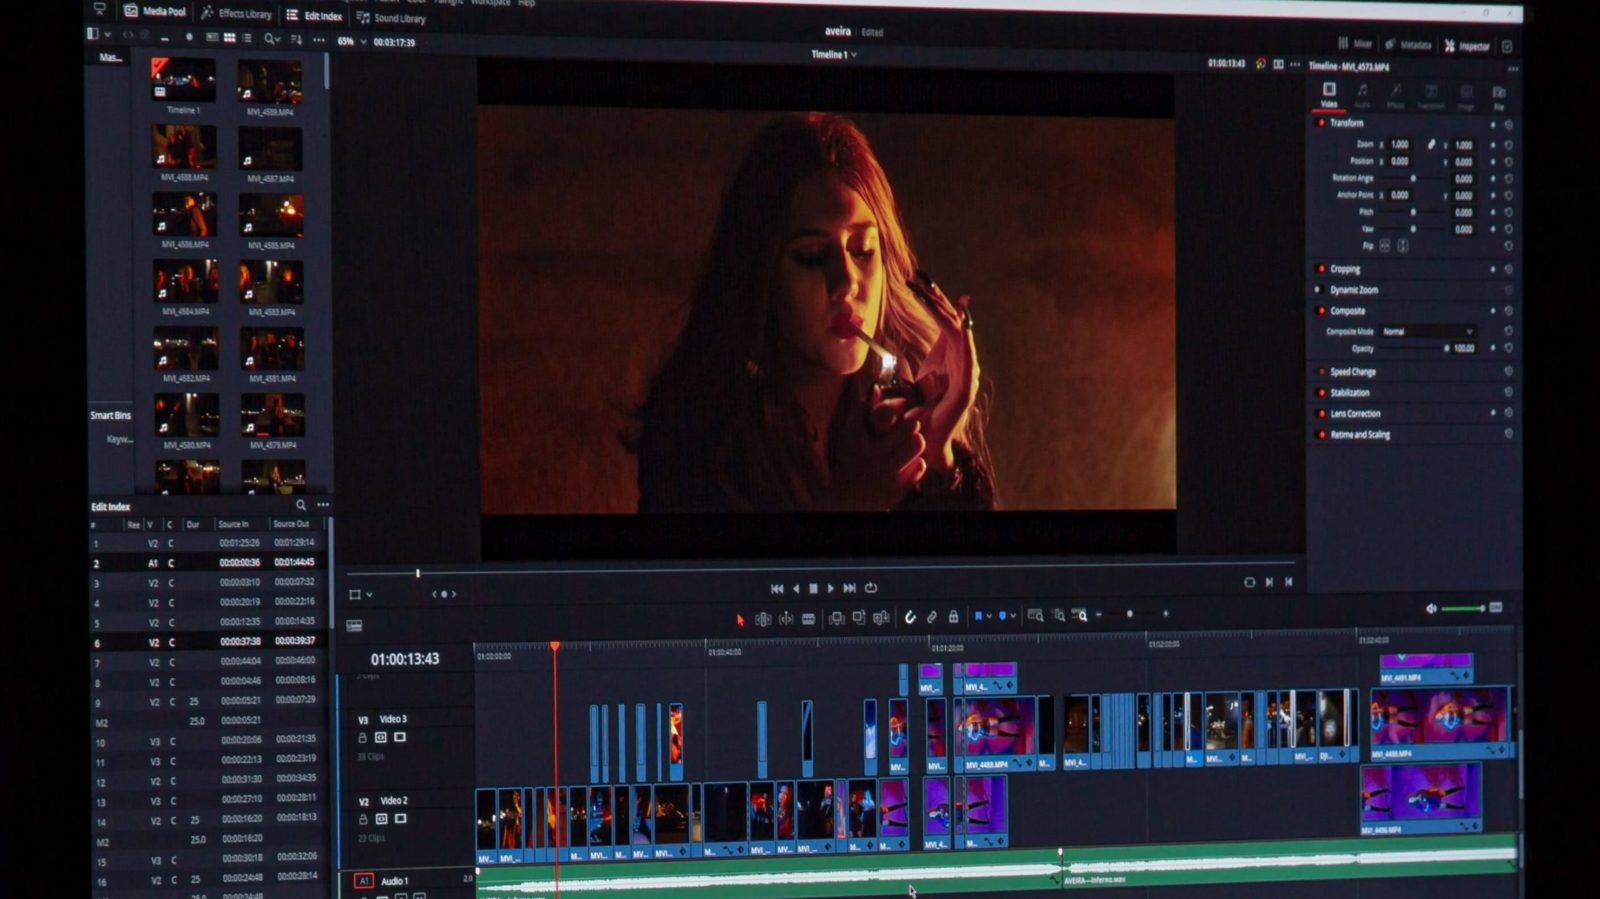
Editing
Before you start editing a film, you will want to organize everything in a neat folder system. Preferably, you want to edit from a hard drive and back up all your files. This ensures that you won’t lose anything if something happens.
Then, you will want to start by selecting the best takes and assembling them in rough order on the timeline of your editing software. Any audio syncing should also be done at this time!
After you have a complete rough cut, it’s time to go into each scene or section in more detail. Editing takes time, though, and it might require many versions to get to an edit you are happy with.
Always save the different versions during the process so you can return to them if needed.
Music, grading, and VFX are always applied last.
Feedback
As you or the editor works on the film, it can be challenging to remain objective during the process. That is why outside feedback is super important.
Make sure to bring in friends, family, or anyone who can see the different versions and give their honest feedback. Ask them if they really understand everything, if they find a scene unnecessary, or what they think about the pacing.
As the creator, it’s obvious you will understand the story, and it might be hard to get a more objective look at the film. A fresh pair of eyes ensures you can find and fix those problems in time.
Editing Software
To edit a film, you will obviously need editing software.
The two we would primarily recommend are Premiere and DaVinci Resolve. One will cost you a monthly subscription, while the other has a free version.
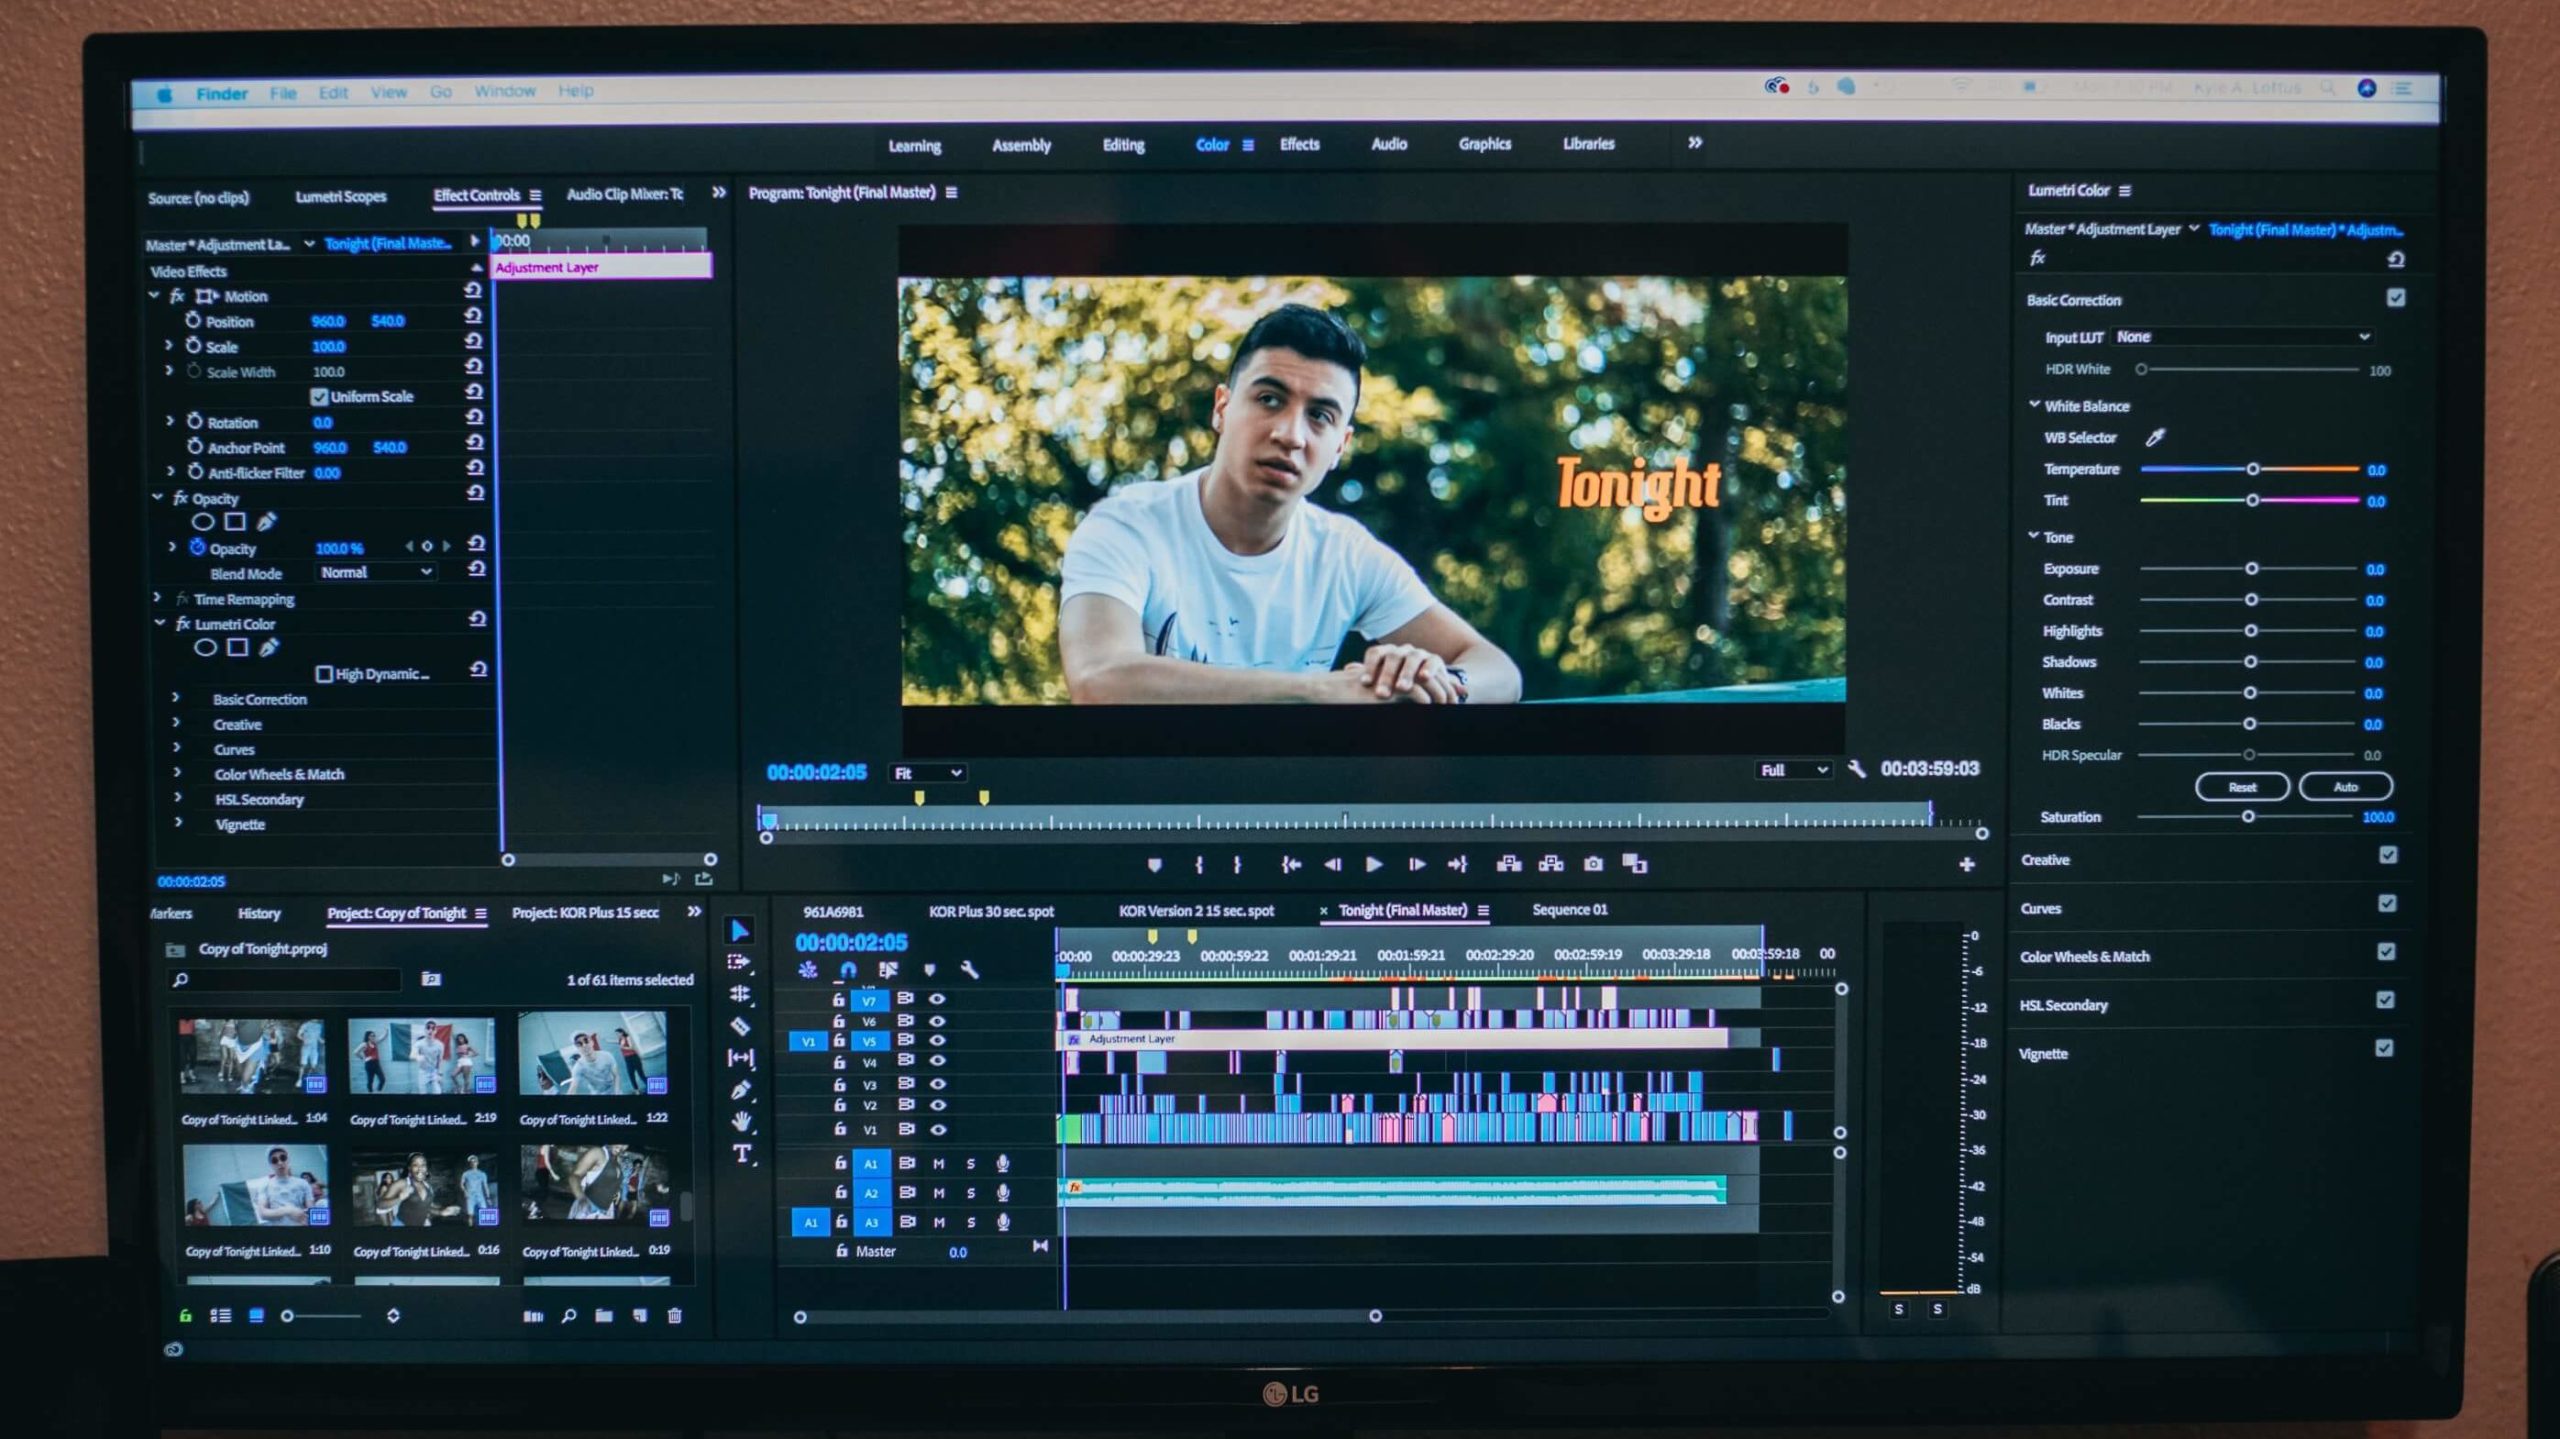
Premiere Pro: Premiere Pro is a great video editing software by Adobe. It is used by professionals in the industry as well as vloggers on YouTube. Even Hollywood features have been edited on this software, like ‘Gone Girl.’
Premiere is excellent because of the vast amount of tutorials and courses that can teach you to do almost anything within the software. Most premade templates, plugins, and effects for filmmakers are also made for Premiere.
To get Premiere Pro, you must subscribe annually or monthly through Adobe.
DaVinci Resolve: Resolve is a great video editor in its own right, and it has a leg up on Premiere regarding color grading.
Resolve also has the advantage of having different software packed into one. Instead of having to get After Effects (VFX / graphics software), Adobe Audition (Audio editing), and Premiere individually, Resolve combines all of these.
For those with tighter budgets, Resolve also has a free version which is surprisingly feature-rich. Otherwise, you could choose to purchase it for a one-time fee.
Sound
As stated before, sound is super important in film. Except for dialogue, you also want to capture your location’s unique ambiance and sound. But rarely is that enough!
Often, a film’s sound design is enhanced by using foley and sound effects. You can choose to do this yourself or find free and paid assets online.
Music
Finding music for your project is hard! You have three options:
- Hire a musician to make a track
- Find stock music
- Use classical music
Hire a Composer
Your best option would be to find a film composer who could make a track for you. Many who study film music are looking to grow their portfolios, so they might even be ok with doing it for free.
If you don’t know someone, you can look into outsourcing websites like Upwork. However, the quality of some of these places varies a lot.
Nowadays, there are even dedicated freelance marketplaces for film musicians like SoundBetter or MelodyNest that you can try. However, we don’t have any direct experience with these services.
Stock Music
The second option is to use premade stock music. To make this work, you must take your time and effort to find the best track. Avoid free stock music from places like Pixabay or YouTube Music Library because those tracks have probably been used a lot in the past.
Instead, look for stock music on sites like AudioJungle, Pond5, or PremiumBeat. We recommend you utilize all their filtering tools to find what you are looking for.
Classical Music
But there is a third option many people don’t think about. Classical Music.
Now, this doesn’t work with all films! But most classical music is in the public domain, like Mozart. That way, you can use music from a master artisan for free!
Even Stanley Kubrick used classical music in his film ‘2001: A Space Odessy.’
Graphics & VFX
If your film requires VFX shots, you want to use software like Adobe After Effects.
You can outsource VFX work to someone you know or a freelancer. But you can also learn a lot yourself. This will save you money, and you get to learn something new.
There is a lot of simpler VFX work you can learn to do with free tutorials on YouTube, like green screen removal, rotoscoping, and background replacement.
In addition, there are also many asset packs you can buy with audio and video effects you can use. Like gunfire, explosions, particles, and much, much more! Some websites with assets worth looking into are:
- TriuneDigital (FilmRiot)
- Video Copilot
- FootageCrate
Color Grading Your Film
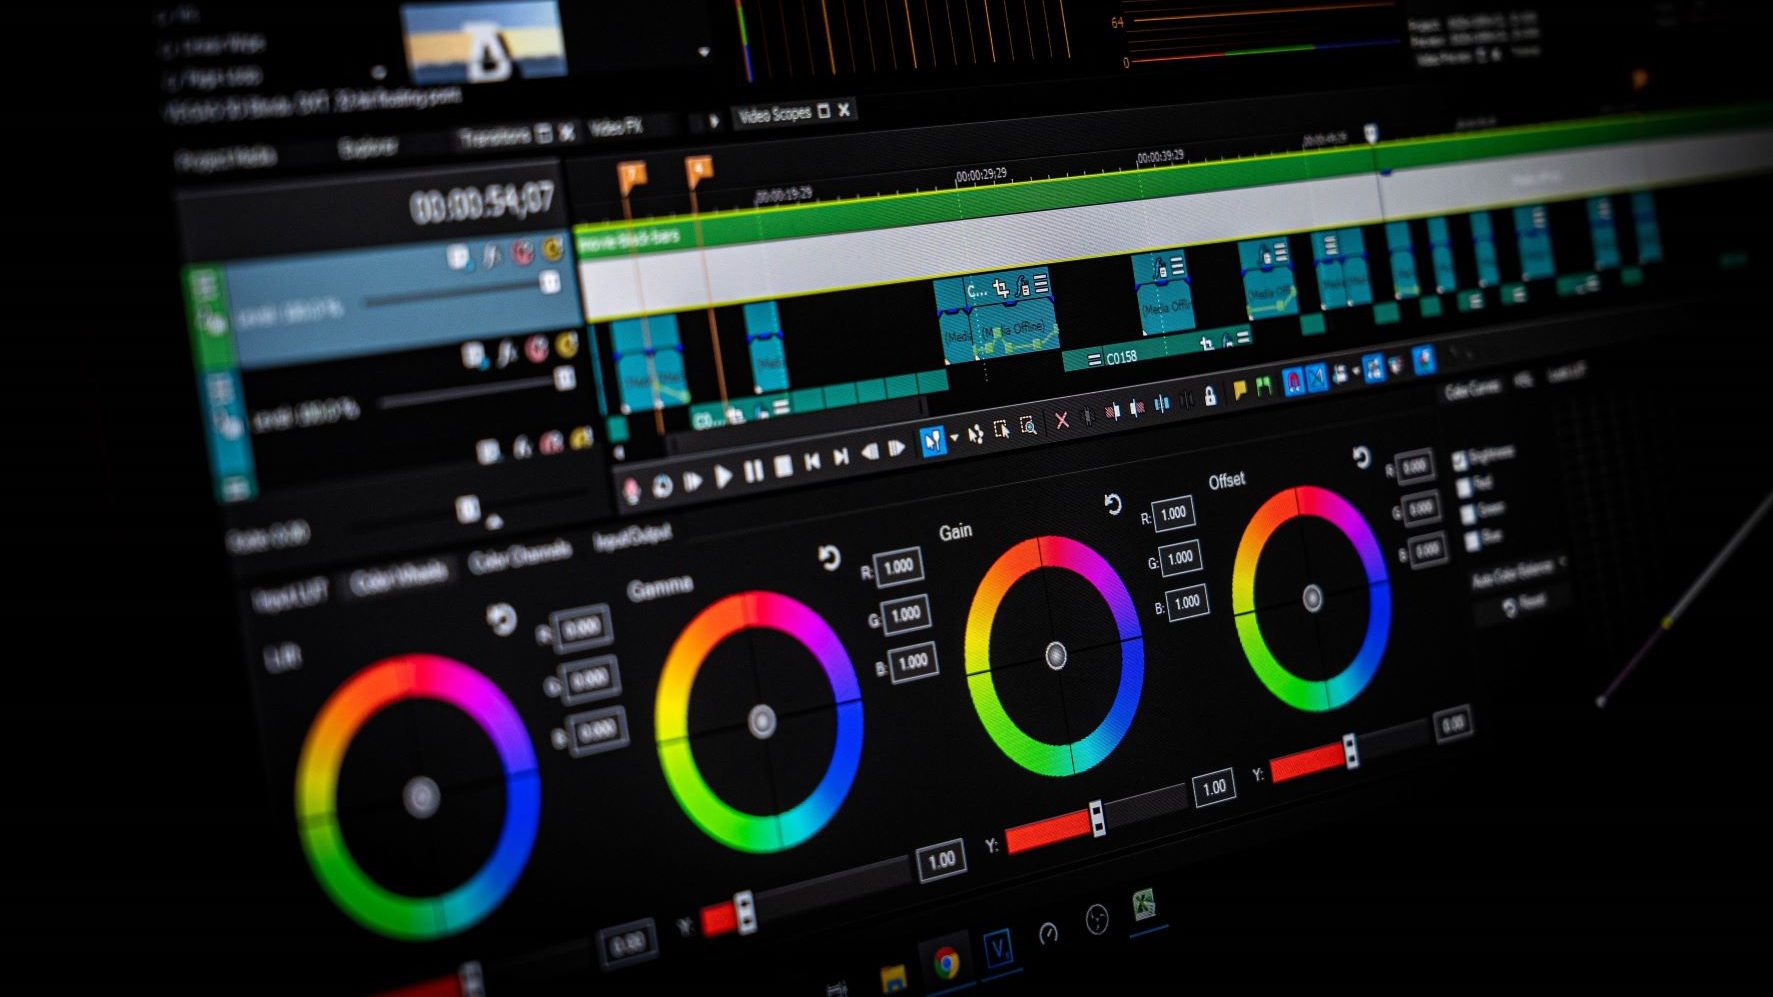
The last part of the post-production is color grading. It’s when you manipulate the colors of your footage to stylize it and make it fit the story you are trying to tell!
This can be done in both Premiere or Resolve. But as we mentioned earlier, Resolve has superior color grading tools.
But before you can color grade your footage, you must first color correct it. Without getting too techy, color correction refers to fixing any color imbalances and adjusting the white balance correctly. There is a lot more you need to read into, so we have included some resources below:
Step 4: Promotion
If you are happy with your short film, you will probably want to show it to people. But how?
Many filmmakers take the ‘build it, and they will come’ approach, but that is not ideal. People don’t usually go out of their way to watch short films.
Getting your film in front of eyeballs is a struggle in itself. But it’s a struggle that is well worth it since you can show off what you can do and your future investors and employers.
Short films are not distributed in the same way as Hollywood features. But you can either submit your work to film festivals or upload it online!
Film Festivals

If you decide to go this route, it is not recommended you release the film on YouTube or Vimeo yet. Many festivals require your movie is not published online while it’s running at the event. This varies from festival to festival, so check their rules before applying.
Instead of listing a bunch of possible film festivals here, go to FilmFreeway, where you can browse and apply to film festivals from one place!
Also, look at more local festivals near you. Many do not even require an admission fee, and you will still get your film in front of important people.
Vimeo & YouTube
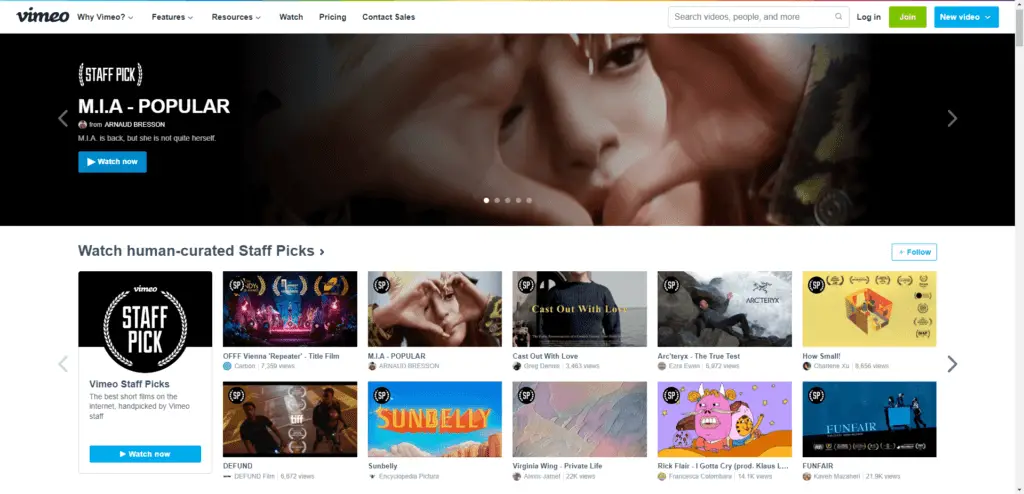
Filmfestival or not, you will want to upload your film on either YouTube or Vimeo at some point. You can easily refer people to it if they ask for your previous experience.
But a short film can also entertain people. Vimeo has its Top Short films section where you might show up. On YouTube, you will have to trust the algorithm.
In either case, promote your film on social media and everywhere else you might find potential audiences.
In Conclusion
This was a lot to take in, and we didn’t expect you to have read it all – but you did – congratulations! Before you forget, bookmark this guide, and you will have easy access to all the links and resources included here.
We are going to be honest with you. Making a film, and a good one at that is hard. But simplicity is your friend. The more actors, locations, and complex plot lines you include, the higher the risk is that your film won’t be as engaging or understandable.
This goes back to what we said at the beginning of this article. Use restrictions. No dialogue means a whole less lousy acting. Fewer locations, props, and costumes mean more time and resources you can spend on making those you do have really great. We really can’t stress this enough.
Even so, if it’s time to experiment and try new things, the short film format is the place to do that. There is no true right or wrong way to do anything. Think of these tips as guidelines rather than rules.
Good luck, and we hope you make a great film!