
Dropping frames has been the bane of the streamer since day one. Nothing is worse than starting your stream and seeing that red exclamation mark in the bottom left-hand corner of Streamlabs.
Luckily though, there are a fair few ways to troubleshoot your dropping frames which should resolve 99% of your problems. Read on below about how to fix dropped frames in Streamlabs OBS in 6 steps:
- Check Your Internet Speed and Compare to Your Bitrate
- Change Your Downscale Filter (If Necessary)
- Change Your Encoder
- Decrease Your FPS Value
- Upgrade Your PC Specs
What are Frames?
Since videography began it has been built on the basis that a video is a collection of still images played one after the other to look like a moving image. No matter how you shake it, this is still true of videos today, albeit on a far more complex level.
Each image that occurs in your video or ‘sequence’ is what we refer to as a frame. The more frames appear within a certain time frame, the smoother the image will look to the viewer.
Frames are usually measured in FPS or Frames Per Second. The higher the FPS, the higher the quality. 30FPS is considered the minimum acceptable quality in today’s modern market, with the preference being 60FPS.
Different video qualities require different frame rates. More on this a little later…
What do Frame Drops Look Like?
So your Streamlabs is telling you you’re experiencing dropped frames but as the streamer, you don’t see anything wrong. What do these dropped frames look like to your viewer?
Let’s say you stream in 30FPS. If you start dropping frames in Streamlabs, your frame rate will drop below 30, probably to around 10 or 15. This will result in a laggy and choppy stream with extremely hard to follow, bugged movement, and potentially important parts of your stream being cut out altogether.
In short, it’s not an experience you want your viewer to have!
Can Dropped Frames Affect my Viewership?
It’s widely accepted that frame drops between 0-5% won’t have much of an effect on your view retention.
If you are dropping frames at a higher rate, however, you will see poorer stream performance in your analytics. People just don’t want to sit around and wait while you lag your way across a map, or hear only half of the lyrics to a new song!
Luckily, there are a lot of fixes that could potentially resolve all of these problems!
From our OBS Mastery Course – Check out the whole 7-hour video course on our YouTube channel.
6 Steps to Fix Dropped Frames In Streamlabs OBS
1. Check Your Internet Speed and Compare to Your Bitrate
Your internet speed directly affects your stream quality. This is the unfortunate truth for many who have slower internet speeds and no way to increase them.
First of all, check your internet speed using an online speed checker like Ookla. When you run the test you’ll be met with 3 results; Ping, Download, and Upload.
Ping – This is how quickly your PC can be reached by a host via the internet. The slower the number, the better the results.
Download speed – This is how fast your PC can download information from the internet. This is somewhat irrelevant for streaming but the higher this value is, the more likely your Upload will also be high.
Upload speed – This is how fast your PC can upload information to the internet. Obviously, when you’re streaming you are sending your video information to a platform (YouTube, Facebook, Twitch, etc.) and so upload speed is critical.
The bitrate for your stream completely depends on your upload speed. The table below will tell you which bitrate value is suitable for your internet speed:
720p30fps
| Internet Upload Speed | Bitrate |
| 2-3mbps | 1500-2500 |
| 4-7mbps | 2500-4000 |
720p60fps
| Internet Upload Speed | Bitrate |
| 3-5mpbs | 2250-4000 |
| 6-8mbps | 4000-6000 |
1080p30fps
| Internet Upload Speed | Bitrate |
| 4-6mpbs | 3000-5000 |
| 6-8mbps | 5000-6500 |
1080p60fps
| Internet Upload Speed | Bitrate |
| 6-9mbps | 4500-7000 |
| 9-12mbps | 7000-10000 |
1. Stream at a Lower Resolution
In an ideal world, everyone would stream at 1440p and 60fps but the reality is that streaming software will limit the resolution you can stream to 720 or 1080p.
Resolution is the size and quality at which your viewers will be able to watch your stream. The higher the value, the higher the quality of your stream.
The most common values to stream at are 720p and 1080p. While in streamlabs, head over to the settings menu and click the ‘Video’ tab.
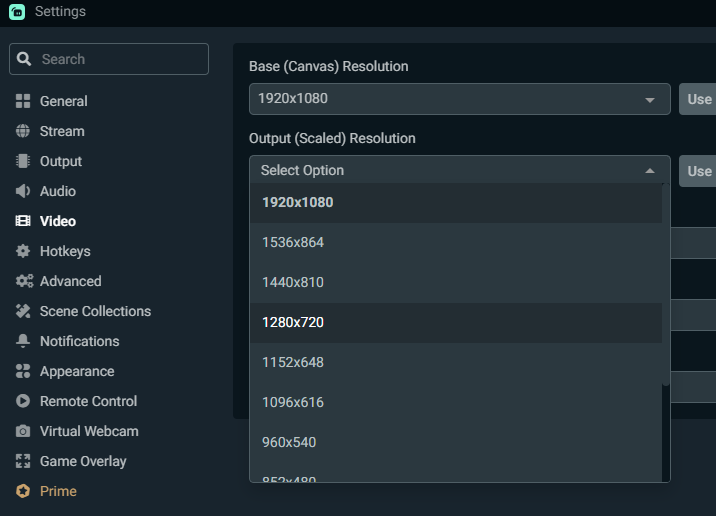
In the Output (Scaled) resolution menu, you can choose your output resolution from a list of many. We’d advise sticking to either 1920 x 1080 or downscaling to 1280 x 720. Some of the other resolutions are strange sizes and can drastically affect the quality of your stream. Streaming at a lower resolution can be a great option when looking to fix dropped frames in Streamlabs OBS.
2. Change Your Downscale Filter (If Necessary)
You’ll notice above that there are two options for resolution; base and canvas. Your base resolution is the native resolution of your monitor and the canvas resolution is the resolution your viewers will view your stream in.
In most cases, your canvas res should be identical to your base res, but if you find yourself experiencing frame drops you might want to consider dropping your canvas resolution to a lower value (in this case 720p).
When you downscale your resolution like this, there are three filters that streamlabs can apply to perform the downscale; bilinear, bicubic, and Lanczos.
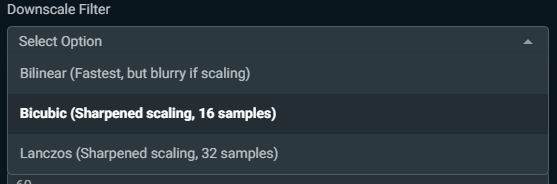
It would be tempting to automatically opt for the sharpest scale and go for Lanczos, but it’s actually a fairly unstable and slow filter. We’d ALWAYS recommend pitching for bicubic. Of all the filters it seems to produce the most reliable and consistent results.
3. Change Your Encoder
In your Output settings tab of your Streamlabs settings menu, you will find an ‘Encoder’ drop-down menu. Your encoder is the part of your pc that actually takes on the physical work of processing your stream and making it ready to send out to your chosen platform.
There are usually three options in this drop-down menu: Software x264, Hardware NVENC, and Hardware NVENC (NEW).
Software x264 is your CPU. If you have a fantastic CPU and want it to bear the brunt of all of your streaming work, set this as your option.
Hardware NVENC is your GPU, so if you have an incredible GPU then set this option. Bear in mind your GPU will also need to compete with processing gameplay if you’re a gaming streamer so try not to overload it. This is USUALLY the best option for most streamers.
Hardware NVENC (NEW) is a development encoder for newer NVIDIA Graphics Cards. It’s buggy and super inconsistent. We’d recommend avoiding this encoder at all costs.
4. Decrease Your FPS Value
Everybody wants to be able to stream in crystal clear resolution and with video as smooth as butter. Unfortunately, this takes a BIG toll on your PC and is only possible with super high spec systems.

If none of the above fixes have worked for you and you’re still trying to stream in 60FPS, crank that down to 30. It’s a small price to pay for a solid stream quality and will be appreciated by your viewers if it reduces frame drops.
To do this, go into your Streamlabs settings and go to the ‘Video’ tab. Keep your FPS type on ‘Common FPS Values’ and change your value from 60 to 30.
As we previously mentioned, reducing your framerate might seem like a step in the wrong direction. However, if the trade-off is for a watchable stream, this is definitely the way forward!
5. Upgrade Your PC Specs
Unfortunately, a lot of the time budding streamers come to the sad realization that their PC just can’t handle gaming and streaming simultaneously. Streaming software is incredibly CPU and GPU intensive and when you combine that with a AAA game it can completely overcook your build.
We’d recommend uploading your specs to PCGameBenchmark.com before trying to stream anything. Their site is a fantastic tool for checking what you can and can’t run on your PC at any given time. You can also use it to see which specific parts from your setup need upgrading in order to achieve your streaming goals.
All this being said, there will be much less stress on your system if you are a ‘just chatting’ or ‘music’ streamer. A change of channel focus might be in order if a new setup is not within your budget. Even older games, emulators, or low spec games like ‘Among Us’ or ‘Jackbox’ can free up a tonne of CPU when compared to AAA titles like GTA, Fortnite, or Cyberpunk.
In Conclusion
Dropped frames in Streamlabs OBS can be incredibly frustrating, but as we showed you above, there are ways to fix that. Thankfully, the six tips above can help you permanently solve these issues and put you on the right track in your streaming career! Video all sorted but your audio is still having issues? Check out our top tips and tricks for Streamlabs audio right here.