
As a streamer, you want to find a way to get viewers more engaged and help them feel more involved during your shared time together. It’s one thing to watch someone play, but it’s another thing to be spending time with them and interacting while they play.
An easy way of doing that is by setting up a Twitch chat box for your stream. In this tutorial, we show you how to add a Twitch chat box in OBS Studio in 10 easy steps.
From our OBS Mastery Course – Check out the whole 7-hour video course on our YouTube channel.
Add a Twitch Chat to OBS Studio Tutorial
Step 1: Create Accounts
Before you can do anything else, you’ll first need to have both a Twitch account and a Streamlabs account. You can sign up with Twitch online by just submitting your username, password, date of birth, and email. Then you just link your Twitch account with StreamLabs.
Log in to StreamLabs through your Twitch account and follow every step of authorization.
You’ll need to supply enough information to register your account successfully. If you don’t, you will run into issues down the line if you want to import chat into OBS.
You can get started with OBS Studio by following our OBS Studio beginner guide, which can get you up and streaming in just a couple of easy steps.
Step 2: Get Everything Opened
Once you’ve got everything set up on your computer or another device, you can begin the process by first opening everything up on your web browser of choice.
Now you’re ready for the next step, which involves getting into the Streamlabs widgets.
Step 3: Go Into The Widgets
On the left of your Streamlabs browser, you should see a menu with several different items listed. The top option should read “Analytics,” while the last one should read “Settings.” Go to the second menu item under the category of “Features” and select “All Widgets.”
Once you’ve done that, you should have the option to click the “Chat Box” option. Go ahead and select it.
Step 4: Customize Your Chat
Once you’ve clicked on the button that reads “Chat Box,” you’ll see that a new page will start loading. Let this happen, and then check out the options available on the next page that will allow you to customize how your chat looks when loaded onto your OBS Stream.
Here, you can make decisions about all of the small visual details about your chat to exhibit more control over your stream’s aesthetics. You’ll be able to choose the theme of your chat, such as the font size and how long messages last on the screen. You can also select the icons, emojis, and emblems on display in your chat.
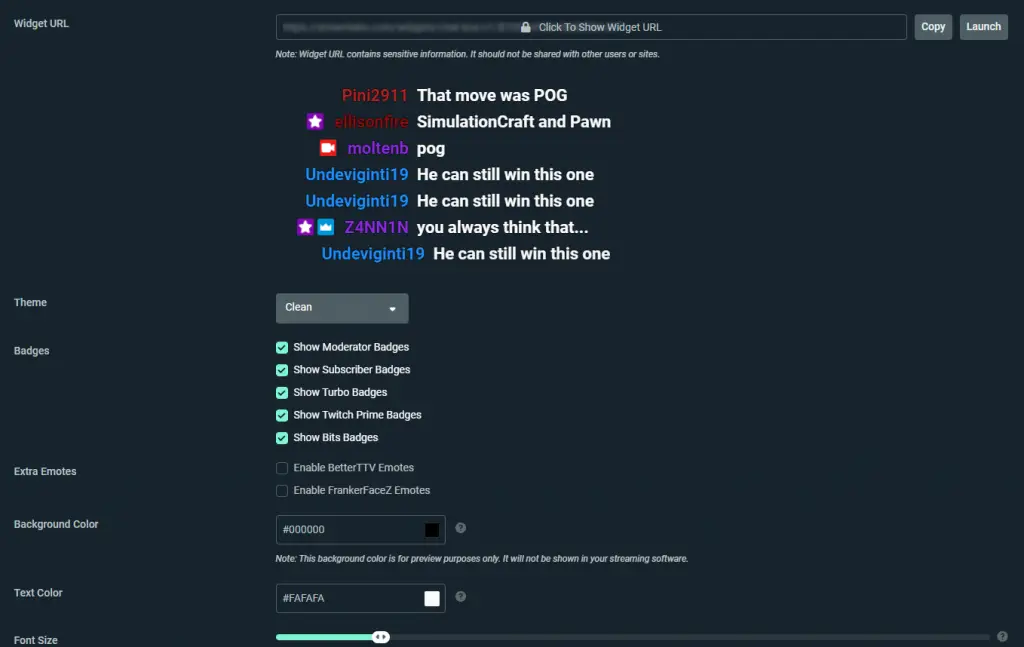
You’ll also see some other customizable options that can be fun to mess around with. Try things out until you get everything set up exactly how you want it. Note that you can change the background color of the chat. If you want the chat to be transparent, though, you should select the color black.
But don’t exit just yet!
Step 5: Save Your Settings
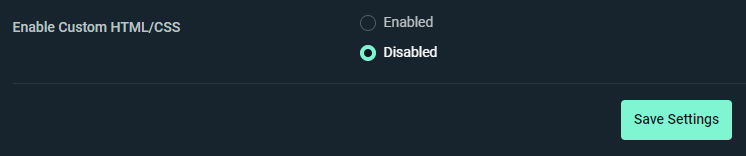
Does everything look the way you’d like? Once you have all of the settings customized to your liking, you’ll need to save these setting preferences to avoid losing all of the time spent making changes.
You can do this by scrolling down beneath where it says “Enable Custom HTML/CSS” and just click the “Save Settings” button.
Step 6: Save Your Widget URL
Then you’ll see a preview of what your chat will look like when it’s on your OBS Studio stream. Go to the top of this preview. Above it, you’ll see what’s called your widget URL.
To save this widget URL to use later, you can go ahead and copy it to your computer’s clipboard. On Macs, the shortcut for this is Command + C. On PCs, it’s Control + C.

Step 7: Add Chat to Your Stream
Now it’s time to start adding your newly customized chat to your gaming stream. To do this, open OBS and select the stream that you want to assign your new chat to. Adding the chat will allow viewers to communicate with you directly. For the last step, you’ll need to add a browser source and name it in OBS.
Step 8: Add Browser Source
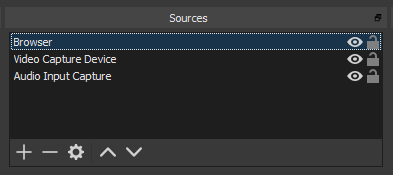
To add a new source to the scene, you can press the “+” symbol and select either “Browser” or “Browser Source,” whichever one you have.
Don’t have either of those options? That might be a sign that you need to uninstall and reinstall OBS to make sure you have this plugin installed.

Step 9: Name The Source (Optional)
Next, name your source. This step isn’t always required, but it can be an excellent way to label and organize your chat rooms. Complete this step, and then continue.
Next, paste in the URL. OBS will provide you with the option to adjust the width and height of your chat. These values are in pixels, so keep that in mind. You can always come back and make changes to these dimensions if needed.
Step 10: Check Out Your Work
Now all of the tedious work is done. You can go ahead and press “OK,” then move your new browser source to spot where you want it to appear on your stream.
Then, go back to your Twitch channel in type in the chat. Do you see the messages populating in your OBS stream? You should!
This method helps you to preview what your chat will look like when you go live.
In Conclusion
If you have followed all the steps correctly, you now know how to add a Twitch chat box in OBS Studio. If you want to learn more about streaming on Twitch, check our out ultimate guide.
Adding extra layers of engagement to your OBS Stream is easy when you know how to connect your Twitch chat. The chat function lets viewers get in on the gaming action by sending you messages and offering support in the heat of the moment. Adding a chat box to your steam could be just the thing you need to level up your streaming!